These instructions are for creating Meetings using Outlook for Windows. If you are using a Mac, please refer to Creating a Skype for Business Meeting (Mac).
On this page:
Creating a Skype for Business Meeting
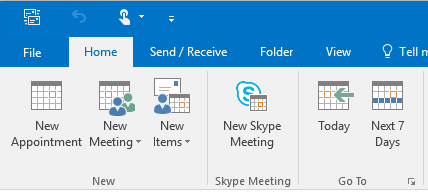
Within Outlook, open your calendar and click on the New Skype Meeting option in the ribbon
You need to use Outlook 2013 or 2016 on Windows to create a Skype Meeting. This cannot be done from the web client or Office for the Mac 2011.
The invitation
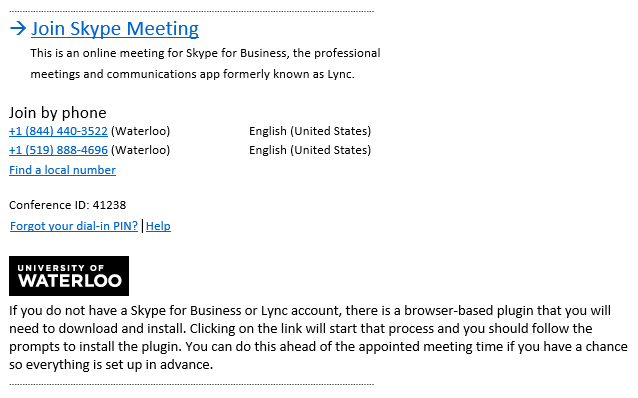
A Skype for Business meeting invitation will include information on how to connect to the meeting (see sample below).
You can edit your meeting invitation and add the content you need to send to meeting participants (keeping the Skype Meeting information at the bottom of the email).
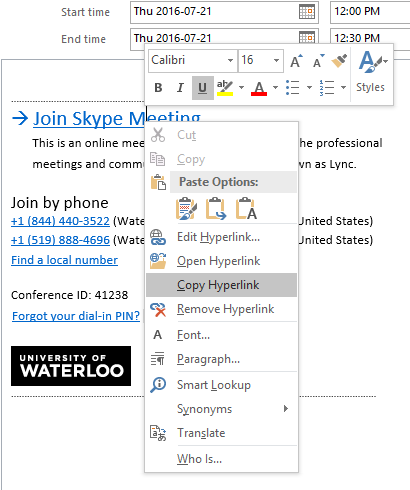
We recommend that you copy the hyperlink information from “Join Skype Meeting” and include it somewhere in the text also. To copy the hyperlink, right click on the “Join Skype Meeting” and select the “Copy hyperlink” option.
Here’s an example of some text you could use (you will have a different https address containing your 8-character userid):
For this meeting, you can click on the “Join Skype Meeting” link below or enter the following address in your browser: https://meetme.uwaterloo.ca/userid/random-string.
Join Skype Meeting Web Link
The Web link contains the meeting URL address. Clicking on it will either:
- launch the Skype for Business (Lync) software if installed
- Open the default web browser to the meeting page
Phone +1 (844)
To call in Toll-Free from anywhere in North America, use the 1-844 number on the invitation.
When prompted, you will need to enter the Conference ID from the invitation (which will be different than the one pictured here)
Phone +1 (519)
To call in from Waterloo Region, use the 519 area code number.
When prompted, you will need to enter the Conference ID from the invitation (which will be different than the one pictured here).
This number can be used for callers outside of North America but will incur long distance charges for the caller.
Dial-in PIN
This only applies if you have full Enterprise Voice associated with your account (which means your UW phone is a Skype for Business phone instead of a tradition telephone handset). Currently, Faculty of Health people using Skype for Business do not have Dial-in PINs.
Without a Dial-in PIN, you cannot host a meeting using the phone – you must use a computer and log in using a web browser or the Skype for Business/Lync software.
If this is a blended meeting (some online participants and some on-campus), be sure to edit the location to include the on-campus meeting room.
The Web Plugin
The most challenging aspect of scheduled meetings occurs when you need to include others who are not using Skype for Business/Lync. While regular/consumer Skype accounts can be added to your Skype for Business contacts list, Skype contacts cannot be invited to Skype for Business meetings.
The Skype for Business web plugin is downloaded when attendees open the meeting link in a browser (usually by clicking on the “Join Skype Meeting” link.
The installation will prompt for changes to security settings to allow the plugin to function (e.g. access camera, microphone, run scripts). When installing the plugin, these conditions must be accepted.
Supported Systems
Generally, you will need a relatively up-to-date system to use the Skype for Business plugin. The following operating systems are supported:
- Windows 7 SP1
- Windows 8
- Windows 8.1
- Windows 10
- Mac OSX 10.8 (Lion) or later
Supported browsers
- Internet Explorer 9 or later
- Edge
- Firefox
- Safari
- Chrome
Attendees from outside the University of Waterloo will need to enter the meeting as a guest.
Advanced Meeting Options
Every Skype for Business account has a dedicated meeting space with these default permissions set. For many meetings these default settings will work just fine – it’s like having an “Open Door” policy for your own office.
There may be times when you need to control who gets in, how they get in and what they can do once they are in. Below are some options for those situations.
Setting your meeting permissions
By default, when you create a Skype Meeting in Outlook, it allows UW people and telephone callers to bypass the lobby and join the meeting directly. It also allows people from UW to be presenters.
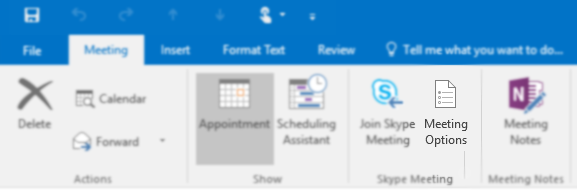
You can change the default (open) settings before you send the meeting request by clicking on the Meeting Options button on the Ribbon of the Skype Meeting you are creating (see below).
You can then set the permissions away from the default settings (using your dedicated, constant meeting space) to a specific, one-off meeting space.

Who doesn’t have to wait in the Lobby
Options for setting who by-passes the lobby:
- Only me (the meeting organizer)
- People I invite from my company (UW)
- Anyone from my organization (UW)
- Anyone (no restrictions)
Callers get in directly applies to those connecting via telephone. By default, telephone callers get straight into the meeting. This may or may not be desired so uncheck the option to hold telephone callers in the lobby. Telephone callers cannot be identified as meeting organizers, internal or external so this setting will apply to everyone calling via telephone (UW and external).
If you are creating the meeting for someone else and do not plan to attend, make sure the “Only me” option is not selected or everyone will be waiting in the Lobby.
Control who can present
Options for setting the presenter are:
- Only me (the meeting organizer)
- People I choose
- Anyone from my organization (UW)
- Anyone (no restrictions)
As with the Lobby by-pass option, if you are creating the meeting for someone else and do not plan to attend, make sure the “Only me” option is not selected for the presenter.
Remember, it’s a new room. If you have back-to-back meetings where you have set the option to create a new meeting space, you will need to leave the first meeting and join the second one from Outlook or the meeting invitation. You are essentially moving rooms between meetings.
Useful Support Sites
On-Campus
- Using Skype for Business - Health Computing
- Choosing a headset or Webcam – Health Computing
- Audio and Video Conferencing – Health Computing
- Quality of a Video Conference Call - Health Computing
- Skype for Business Support Site – Information Systems & Technology
Microsoft Support Docs
- Join a Skype Meeting with Skype for Business Web App
- Trouble installing the Skype for Business Web App plug-in?
Others
- How to Join Skype for Business (Lync) Meetings as a Guest (UC San Diego)