“Burning steel wool demonstration”
The “Burning Steel Wool” demonstration is an engaging means to illustrate that increasing the amount of available oxygen increases the rate of combustion. A 9-volt battery is used to ignite a small piece of steel wool, first in air, and then in an oxygen-enriched environment. The reason the steel wool becomes hot enough to burn is based on a fundamental principle of physics — the resistance of a conducting wire is inversely proportional to the square of the diameter; the smaller the diameter the greater the resistance. On an atomic level, resistance is the result of the electrons moving through the wire colliding with the nuclei or other electrons. These collisions create an atomic level “friction” producing heat and, in some cases, light.
 The demonstration is easy to perform and, if one has a portable source of oxygen, it can be readily repeated and safely transported, making it ideal for chemistry outreach presentations. The demonstration can be made relevant by referring to warning signs that alert one that Oxygen is in Use, no smoking or open flame. Also, in one of the MacGyver television series, MacGyver started a fire using a 9-volt battery and some steel wool.
Concepts
- Chemical kinetics – effect of concentration on reaction rate
- Heterogeneous reactions
- Exothermic processes
- Burning of metals
Materials
- 1-L Erlenmeyer flask fitted with a solid rubber stopper
- Sand
- Steel wool
- 9-volt battery
- Battery extender apparatus (see below for construction)
- Tongs
- Ceramic tile or other non-flammable, heat resistant surface
- Beaker of water (for extinguishing burning steel wool)
- Oxygen (For those who do not have access to oxygen Bernzomatic® markets a multi-use tote torch #OX2550KC that includes a cylinder of oxygen and attachment for dispensing; replacement cylinders of oxygen #330395, both available at hardware stores. At the time of writing this article Home Depot® sells the tote for $59.97 and replacement cylinders for $9.97.)
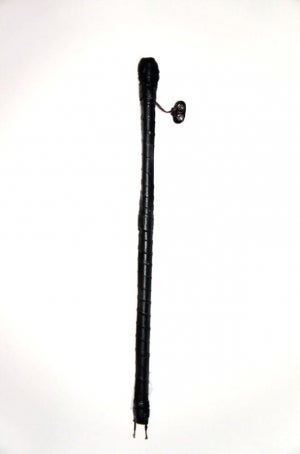 Materials for construction of battery extender (pictured right)
- 9-volt battery clip
- 16 or 18 gauge insulated wire (stranded, like a rope) lengths of wire, each about 20 inches long
- ½ inch diameter wooden dowel 18 inches long
- Electrical tape
- Soldering iron and solder
Construction
- Strip off about 3/8 inch of insulation from both ends of the insulated wires
- Connect each strand of insulated wire to the wire leads of the 9-volt battery clip using solder
- “Tin” the unattached ends of the insulated wires with solder
(“Tin” means to coat the exposed wire ends with solder so the ends do not fray, ravel, etc. One simply heats the exposed wire with the soldering iron and then melt some solder allowing it to flow a bit so that the exposed end is covered.) - Run the length of each insulated wire along the length of the wooden dowel so that the wires are on opposite sides from one another and that the unattached ends extend beyond the end of the wooden dowel by about ¾ of an inch. You can use pieces of tape to hold the wires in place.
- Test the apparatus by connecting a 9-volt battery and touching the ends of the wires to a piece of steel wool.
- Wrap the entire length of the apparatus with electrical tape being sure not to cover the ends of the wire or the part of the battery clip that connects to the battery.
Safety
- Wear safety glasses; long hair should be tied back.
- Check 1-L flask for any stars, cracks, or flaws; do not use if any exist.
- Cover the bottom of the flask with sand to a depth of about ½ to ¾ of an inch; the sand absorbs most of the heat, reducing the chance of the flask itself shattering due to excessive heat.
- Fire hazards exists; be sure all flammable materials are removed from the area prior to performing the demonstration.
- A beaker of water should be on hand for extinguishing the steel wool that is burning in the air; do not use water on the steel wool that is burning in the flask filled with oxygen.
- Oxygen will spontaneously react with grease and related substances; be sure the 1-L flask is clean and dry.
- Keep audience at least eight feet away from the demonstration and/or use a safety shield.
- The steel wool burns very brightly in oxygen; the demonstrator should avoid looking directly at it as it burns and should warn the audience prior to ignition.
Advanced preparation
Cover the bottom of the 1-L flask with the sand. If the oxygen is not transportable to where you will perform the demonstration do the following: fluff a piece of steel wool and place it inside the flask so it is resting on the sand; fill the flask with oxygen and then stopper tightly so the oxygen will not leak out.
Procedure
- Fluff a grape-sized piece of steel wool to about the size of a golf ball.
- Holding the steel wool with tongs over a ceramic tile or other non-flammable, heat resistant surface, touch the terminals of the 9-V battery to the steel wool. The steel wool will glow reddish-orange and emit sparks as it burns. You do not need to hold the battery in contact with the steel wool; just touch it and pull away. If need be, you can extinguish the steel wool in a beaker of water.
- Attach the battery to the battery extender. With a new piece of fluffed steel wool, show how the battery extender produces the same effect (burning of steel wool).
- If you have oxygen available where you are performing the demonstration, fluff another piece of steel wool, put it in the flask that has sand in it, and fill the flask with oxygen.
Stopper the flask to retain the oxygen. Turn off the source of oxygen. If you prepared the flask with sand, steel wool, and oxygen proceed to the next step.
- (Dim room lights) Remove the stopper and touch the steel wool in the flask with the battery extender. The steel wool will burn rapidly emitting a bright light and a lot of heat. Remember to not to look directly at the burning steel wool.
Do not replace the stopper while the flask cools.
- Once cool enough to handle, you can carry the flask around to show the audience the red-hot bits of iron. The reaction generated enough heat to melt the iron (not all of it burned).
Disposal
- Once extinguished, you can dispose of any burnt steel wool in the trash.
- The iron and bits of steel wool in the flask can be removed by passing the sand mixture through a sieve. Discard the iron and steel wool in the trash or save for future performances of this demonstration, allowing the audience to safely see the iron. The sand can be reused.
- Be sure to disconnect the 9-volt battery from the extender.
- If using a portable source of oxygen, be sure it is turned off and then remove the delivery tube.
Discussion
This past summer, Rachel Emrick learned and performed the “Burning of Steel Wool” demonstration as part of a chemistry outreach presentation about chemical energy for a group of middle school-aged girls. This was Rachel’s first outreach performance. The following are her reflections on performing and learning the demonstration.
I conducted a demonstration involving steel wool not long ago for a summer camp of middle school girls who were interested in math and science. Audiences usually like this demonstration so I was prepared with a second handful of steel wool, so it could be repeated. I began by informing the audience that steel wool is commonly found in households all over the US. It is frequently used as a cleaning tool. I mentioned that I had used it to clean pennies. When asked, nearly all of the girls present raised their hands to indicate that they had steel wool in their house. I told them that steel wool is primarily made of iron, which melts at
2795 oF (1535 oC).
I tried using the igniter to burn the steel wool. It didn’t work well; a small bit glowed red and appeared to burn very slowly. I questioned the audience as to why it did not burn very well.
Someone suggested adding more oxygen. I placed some steel wool into the flask that already had a layer of sand on the bottom. I explained that we needed the sand because the temperature of the burning steel wool could actually cause the glass to break. My battery extender, made from a 9-volt battery connected to two metal wires, stood ready. When the electricity flows through the wires and the steel wool, the steel wool becomes hot enough that it ignites. After pumping oxygen into the flask, I inserted the battery extender, touching the wires to the steel wool. It burns really brightly, so I was quite careful because I was standing right next to it. I shielded my face from the harmful heat escaping the flask. The audience gasped and leaned closer to see. Once the flask cooled, and with the remnants changed from red-hot to their normal silver color, I carried the flask around the room to show the girls. Just a lump of steel was left of the fluffed cleaning product. This demonstration was among the most popular of the afternoon. They wanted more, so I did it again!
The first time that I practiced this experiment in the lab, I was not sure what to expect. When I used the battery extender on the steel wool in normal air, parts of the wool looked like snakes with red dots running along their backs. The result was pretty awesome, so I thought I had successfully completed the experiment. Then Dr. Lyle told me to try again, this time using a flask that was lined with sand and had already been filled with oxygen. I was so surprised when it seemed to almost explode in a fury of light and heat! I knew immediately that this was a demonstration that I would love to do in front of groups. It was easy to learn, easy to do, and fun to watch the people react.
*Rachel Emrick is a gifted and talented fifth grade student attending Parkwood Elementary School, Durham NC. Rachel’s parents were required to attend both the practice sessions and the outreach presentations.
**Dr. Kenneth Lyle, a lecturing fellow in the Department of Chemistry at Duke University, serves as the lecture-demonstrator, chemistry outreach coordinator, and instructor of CHEM 180 Chemistry Outreach Service Learning Course. All inquiries should be addressed to kenneth.lyle@duke.edu.