It is often a challenge to integrate spectroscopy into the high school chemistry lab program. Atomic spectra are an important piece of the puzzle for the development of the modern model of the atom, but viewing atomic emission spectra can often leave students feeling confused and uninspired. This pizza box spectroscope project has turned the classic emission spectrum observations into a hands-on, engaging and quantitative lab experience. Gone are the days of just looking at the pretty colors of the atomic spectra. My students can now take measurements of the prominent lines in an emission spectrum that are within 1% accuracy using a pizza box!
I learned how to do this fun spectroscopy project from Edmund Escudero, a teacher at Summit Country Day School, Cincinnati Ohio. Ed presented a hands-on workshop called "Make and take: construct an inexpensive and calibrated spectroscope" at ChemEd 2013 in Waterloo, Ontario. Every participant went home with a calibrated pizza box spectroscope, detailed instructions for conducting the project and a comprehensive list of materials and vendors. This project is exactly the type of take-away that keeps me coming back to the ChemEd conference year after year. I have used it with my students for two years with great success.
The pizza box spectroscope has a diffraction grating at the eye hole, a slit to let in light on the opposite side of the box from the eye hole, and a plastic rod running through the box. The plastic rod is the critical piece of the spectroscope that allows for quantitative measurements of wavelength. Each rod is scored so that it has one vertical notch in the middle. The notch on the plastic rod can be aligned with a color in the atomic spectrum, which allows the student, when the box is calibrated, to determine the wavelength of the colored line. This simple, homemade tool produces excellent results and generates great enthusiasm for spectroscopy.
Construction of the spectrometer starts with a flat pizza box. Supplies for each lab group include a new pizza box, a diffraction grating, two razor blades, a plastic rod and some metal tape. Rather than giving out written instructions for constructing the spectroscopes, I make a template for the students to copy onto their own boxes. I put out my own spectroscope as a model — yes, I'm that proud of it! — so they can see what the finished instrument looks like. Once the template is traced onto their own box, students can use a box cutter to cut out an eye hole where the diffraction grating will be placed and a hole for a light slit to be created by two razor blades placed 2 mm apart. The cuts do not have to be precise as any mistakes can be easily corrected with metal tape. The most entertaining part of the whole project is watching kids figure out how to fold a pizza box. It's not as easy as the pizza guys make it look!
The plastic rod is the last critical piece of the spectroscope that allows the students to take wavelength measurements with their instrument. Each group needs a plastic rod; I use ¼” clear acrylic rod from US Plastics that I cut into pieces that are twice the length of the pizza box. Each rod is scored with one vertical notch in the middle. I learned by trial and error that if the plastic rod is too short you cannot measure the colors at the red end of the spectrum because the rod falls into the hole into the box.
The diffractions gratings that Ed recommended are from Arbor Scientific. Unfortunately, Arbor no longer makes the type of diffraction grating that he recommended, so this year I purchased another version of the same grating from them. The only difference I can see is in the housing of the grating, which is now made of cardboard rather than a plastic slide. I hope they will give the same quality results as the original batch. Although there is an initial cost to purchase the diffraction gratings (package of 5 for US $3.50), I can reuse them every year to make new boxes. Once the holes are cut and the pieces are all in place, the students seal the boxes with metal foil tape to minimize stray light noise. Constructing the pizza boxes requires an 80-minute block, followed by an additional class block for experimentation with the spectroscopes (part 2).
We used the mercury spectrum to calibrate our pizza boxes, which has three prominent lines. In Part 2, I will further discuss this calibration. To take a measurement, the plastic rod is moved left or right until the notch is aligned with one of the lines in the atomic spectrum. Once they have aligned the notch to a line in the mercury spectrum, the students use a ruler to measure the length of rod sticking out of the box. Shining a flashlight on the end of the plastic rod helps to illuminate the notch, making the measurements easier and more accurate. With three data points, they can plot a calibration curve for their box using known wavelengths of the three colored lines. Students are asked to write equation of the calibration line on their box for easy reference during the lab.
Two important points should be mentioned about each box. The students have to measure the length of the plastic rod from the same side of the box each time, and they cannot switch plastic rods with another box. Either of these changes will render their calibration curve useless.
I ask my students to measure the wavelengths of hydrogen’s spectral lines first. This beautiful and iconic emission spectrum is not the only thing that gets the kids excited. If they have taken care during the calibration step, most of the groups will get results that are accurate within 1 to 5%! We finish off the project by identifying unknown elements and mixtures of elements using their spectroscopes.
My students were very proud of their pizza box spectroscopes. I encouraged the groups to decorate them and label the important features of the instrument right on the box.
I appreciate the low-tech nature of this project. Students can build their own instrument "from scratch” and get good data. This strong foundation in spectroscopy helps to set the stage for understanding the electronic structure of the atom.
You can read more details about constructing, calibrating and using the spectroscopes at my blog, Art of Teaching Science. The original experiment instructions can be found in the PSU Chemtrek Lab Manual (ISBN: 978-0-7380-2849-1) by Stephen Thompson. In Part 2, I will discuss experiments one can do with the newly-made spectroscopes.
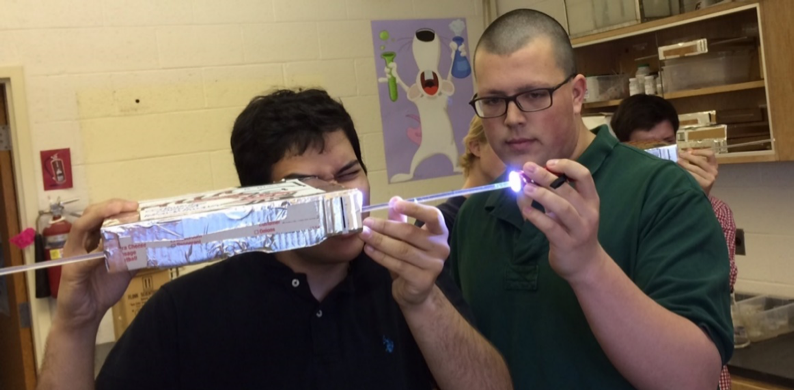
Students look into the eye hole to the other side of the pizza box where the 2-mm slit allows light into the box. The diffraction grating is placed over the eye hole. The notch on the plastic rod can be aligned with a color in the atomic spectrum, which allows the student to calibrate and determine the wavelengths of spectral lines. Shining a flashlight on the end of the plastic rod — as shown — makes measurements easier and more accurate.
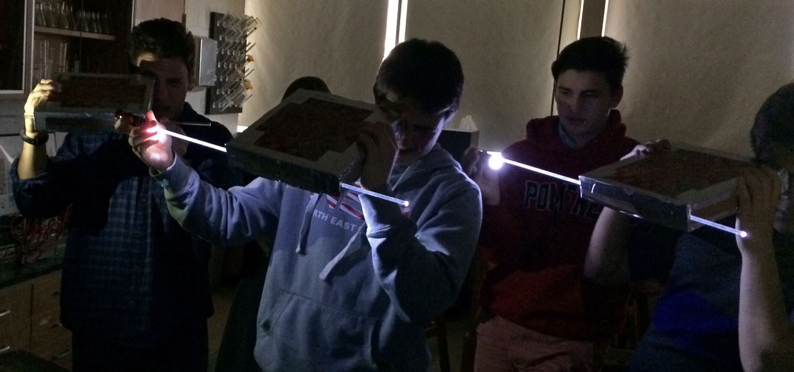
The students face the spectroscope towards a spectrum tube lamp. Once students can see the line spectrum, they will move the plastic rod back and forth to line the notch up with each line.

Helium spectrum observed in the box. The bright yellow line in the spectrum is lined up with the notch on the plastic rod — as shown above — a bright light in the middle of the yellow line on the rod. Shining the flashlight helps students see the notch when it is lined up. This photo was taken through the eye hole.

The template for the pizza box spectroscope with supplies.
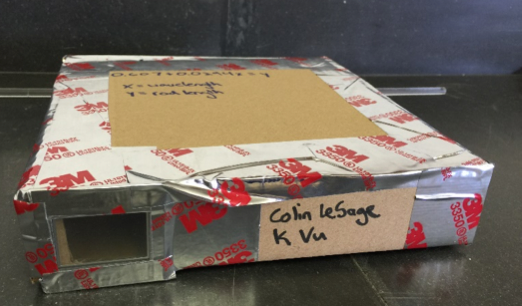
The front of the box with the diffraction grating placed over the eye hole. It is important to place the grating in the correct orientation. The correct orientation will give a full spectrum when the box is facing white light. Notice the box is completely taped to reduce light noise. Students have written the equation of the calibration line on their box. Since each spectroscope is uniquely calibrated, it is wise to have students put their names on their boxes.
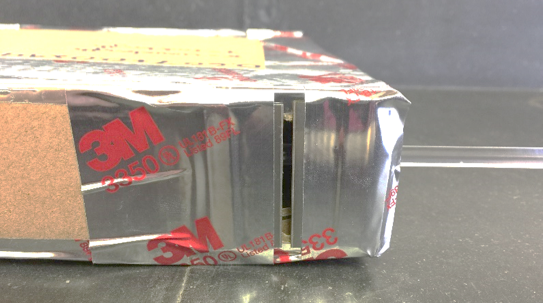
The back of the pizza box spectroscope where there is a slit created by two razor blades. The acrylic rod is sticking out of the box.