At the beginning of a new year I find it challenging to choose a good entry point into the study of chemistry. I like to launch right into a fun experiment, but I also want an activity that will lay the foundation for deeper exploration later in the year. For the opening week of class, I have adapted an experiment from Introductory Physical Science (8th edition by Uri Haber-Schaim) to explore the relationship between the mass of baking soda decomposed when heated and the volume of gas produced.
2NaHCO3(s) → Na2CO3 (s) + CO2(g) + H2O(l)
The decomposition of baking soda provides the perfect opening day demo or class activity that you will refer to throughout the year. I like to follow the opening activity/demo with a guided inquiry experiment.
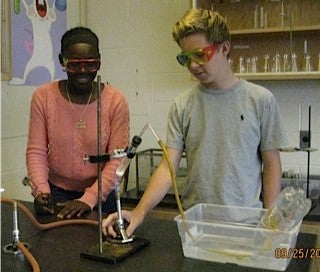
The goal on the first day is to answer the question “What happens when you heat baking soda?” The experiment is run in a closed system with a gas collecting apparatus allowing the students to measure the volume of gas produced during the reaction. After a demonstration on how to assemble the apparatus and safely light the Bunsen burners, each group runs the experiment with the same mass of baking soda (see additional information for more details). By the end of the first day, every group can answer the original question using their own results. This part of the experiment will work well as a class demonstration if you have limited time on the first day of school.
On the second day, I pose the question, "Does the amount of gas produced change if we vary the amount of baking soda?” Based on their results from the first day, the class develops a method to answer this question using the same procedure. Once each group agrees to use a different starting amount of baking soda, the students run the same experiment to generate a class set of data with varied starting masses. Even with the many opportunities for error, the data give a clear answer to the experimental question.
I enjoy starting the year with this lab because it has many introductory concepts all wrapped into one event. The kids will learn how to light the Bunsen burner, they will design and implement an experiment, they will learn how to measure the mass of a powder, they will assemble apparatus to collect a gas, they will plot a graph, and they will answer an experimental question. A solid foundation of lab skills and data analysis will start your year off on the right foot. You can revisit this experiment during the gas laws unit, during the study of chemical reactions, or during a unit on the chemistry of cooking.
Preparation for the experiment by instructor
- Use the burner to bend the glass.
- Carefully insert the glass tubing into the stoppers using some vacuum grease.
Materials needed for each lab group
- Large test tube
- One-hole rubber stopper to fit the test tube
- Glass tubing, approximately 4″, bent
- Bunsen burner
- Ring stand
- Clamp
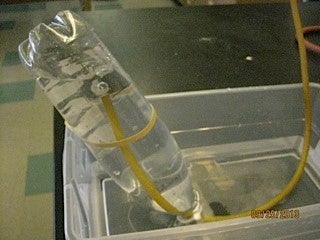
- Clear plastic bottle, one liter
- Rubber tubing, approximately 18″
- Plastic tub to use as water trough
- Baking soda, 2 to 5 grams per trial
- Rubber band, large
Notes for experiment
- Use the large rubber band to secure the water bottle in the trough.
- Students may need to try several times to get the inverted water bottle into the trough without a significant air bubble.
- Students must wear goggles, tie back hair, and secure loose clothing before starting the experiment.
- Some students may ask if the gas is produced from the expansion of air. This question can also be answered using the same procedure by heating only air in the test tube.
- Make note of the production of condensed water on the inside of the test tube during the experiment.
- The measurement of the gas produced can be done by many different methods. My class chose to mark the level of the gas on the bottle with the rubber band, fill to the mark with water, and then measure the volume of water. An acceptable alternative is to measure the height of the gas in the bottle with a ruler, as long as all the bottles are the same. This is an opportunity for an interesting class discussion in which lab teams must defend their ideas and convince the class to use their measuring technique.
- You can read more about this activity on my blog, Art of Teaching Science.
Student procedure
- Assemble the gas collecting apparatus. Fill the plastic trough halfway with water. Fill the plastic bottle to the top, cover the opening with a piece of plastic wrap. Invert the bottle into the water in the trough; remove the plastic wrap while holding the opening under the water. Secure the bottle to the trough with a rubber band.
- Measure out the starting mass of baking soda. Record the mass of baking soda in your data chart. Transfer the baking soda to the large test tube.
- Insert the stopper with the glass tubing into the test tube. Clamp the test tube at an angle to the ring stand. Adjust the height of the clamp as needed to heat the baking soda in the hottest part of the flame. Insert the end of the tubing into the water bottle.
- Light the Bunsen burner. Heat the baking soda in the test tube. Observe any changes that occur. Continue to heat until the gas production stops. Measure the volume of the gas produced using the same method as the other lab
groups.