Celebrating the 90s - 50th Celebration of Chem 13 News

Amiee Larchar Modic, not from the '90s but from 2018 American Chemical Society National meeting in Boston, Massachusetts
Reprint March 1999
Many chemistry students experience difficulty in grasping the abstract concept of electronegativity and its significance in discussions involving polar covalent and nonpolar covalent bonding. The popular use of Linus Pauling's electronegativity series in many secondary and college general chemistry textbooks allows students to label chemical bonds as nonpolar covalent, polar covalent or ionic, based upon the absolute difference in the electronegativity values of the two atoms. While this approach is successful in a quantitative manner, many students still struggle with understanding the concept of electronegativity.
The effectiveness of concrete models during the initial stages of instruction is well known by teachers at all levels. In an effort to help my students "see" the concept of electronegativity, I have created this simple, inexpensive model that will provide students with a visual depiction of electronegativity.
Materials needed
• 2 rubber bands of equal length but different elasticities
• 2 large (2-inch) paper clips
• 2 1-inch diameter Styrofoam balls
Assembly of polar covalent bonds
Now, simply grasp each rubber band between the thumb and index finger of each hand and slowly pull apart. The students should quickly observe that the two Styrofoam balls (i.e., shared electrons) are much closer spatially to the side of the thicker rubber band.
While introducing the concept of electronegativity to my students, I generally describe covalent bonding as a "tug-of-war" for electrons. Continuing with this analogy, I try to set up this demonstration by saying that each of my hands represents an atom, and that each atom pulls on the shared pair of electrons. The students can then be asked to predict which atom will possess the slight positive or slight negative charge. Students often forget that electrons have a negative charge making the assignment of partial charges slightly confusing.
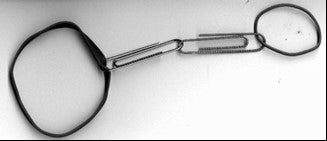
Figure 1. The basic design of the polar covalent bonding device. The Styrofoam balls have been removed for illustrative purposes.
In a simple variation of this demonstration, the rubber bands of the models can be looped around two ringstands, as shown in Figure 2. The ringstands will need to be anchored to the benchtop to keep the rubber bands taut. Using the ringstands allows teachers to keep their hands free during the lecture without having to remove the model from the students' view.
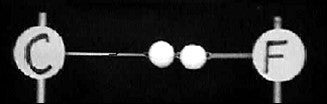
Figure 2. Two rubber bands are looped over two anchored ringstands. Elemental symbols are drawn on heavy paper and taped to the ringstands.
Assembly of nonpolar covalent bonds
The nonpolar covalent bonding model is almost identical to the polar covalent model with the exception being the choice of rubber bands. The nonpolar covalent model requires that both rubber bands be of the same elasticity. The final result of stretching this model is that the two electrons remain equidistant from both atoms. This clearly illustrates that the two atoms are equally sharing the two bonding electrons.
Thanks goes to my student, Ben Cipriany, for his assistance in preparing this manuscript.