Hire a sponsored student
The steps outlined below will guide you through the process of hiring a sponsored student. Payments are made to a student sponsored through the WUSC Student Refugee Program to cover personal expenses such as toiletries, phone cards, stamps, etc.. The student does not need to account for this money and no work is performed by the student in exchange for this money.
Initiate hire
- Type Employee Search into the main search bar to search by employee ID, student ID or WatIAM ID to determine if the new employee exists in Workday. If no results exist, go back and enter a name (in some cases, the ID entered may not be in Workday) and try the search again, validating the IDs or email address listed in the results match your hire. Verifying IDs ensures a different person with the same name will not be paid by mistake.
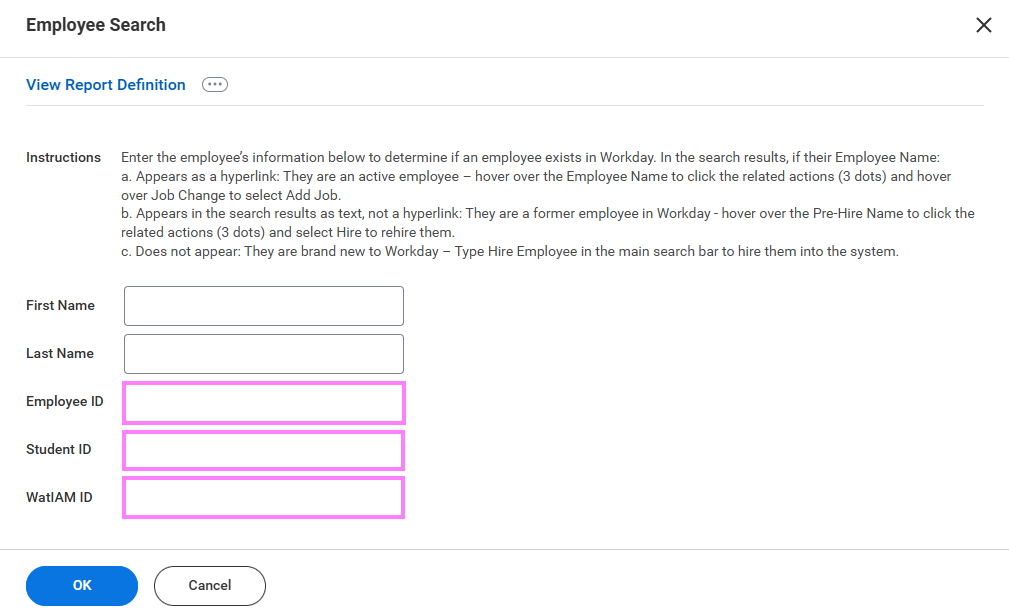
- If their Employee Name:
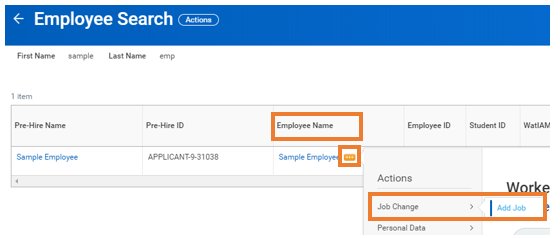
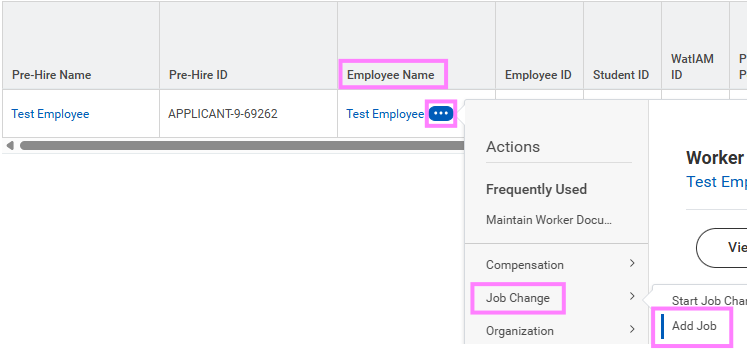
a. Appears as a hyperlink:They are an active employee – this payment should not be entered into Workday. Submit the One-time payment request form to payroll.
Note: If you are a manager and this is a former employee who most recently reported to you, their name will appear as a hyperlink but there will be no Add Job option. In this case, proceed with option “b” below.
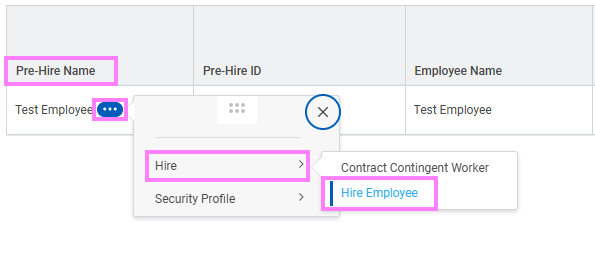
b. Appears in the search as text, not a hyperlink: They are a former employee in Workday - hover over the Pre-Hire Name to click the related actions (3 dots) and select Hire to rehire them and continue from step 3 below.
c. Does not appear: They are brand new to Workday – Type Hire Employee in the main search bar to hire them into the system and follow the steps below.
-
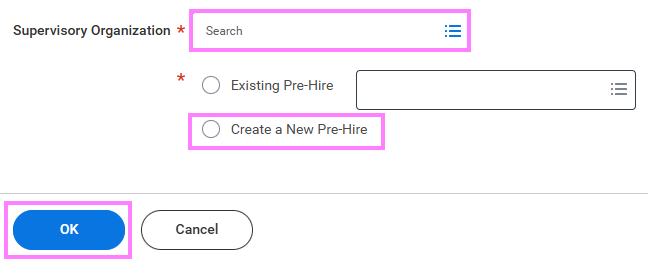
Type the manager name of the supervisory organization (sup org) you are hiring into, in the Supervisory Organization search field and press enter to pull up a list of available sup orgs. From the available options, select the appropriate one with 'JM' denoted in the title.
Note: JM is short for Job Management. This is used to group positions without position numbers including casual, student and non-faculty appointments (i.e. post-doctoral fellows and research associates).
If you have not performed the Employee Search, please see Step 2 before continuing.
- If the Employee Search produced no results: Select Create a New Pre-Hire and click OK to continue to the employee's contact information.
If this is a rehire based off the Employee Search: Their name will now be populated in the Existing Pre-Hire field. Click OK to continue to Step 7 - Enter the employee's job details.
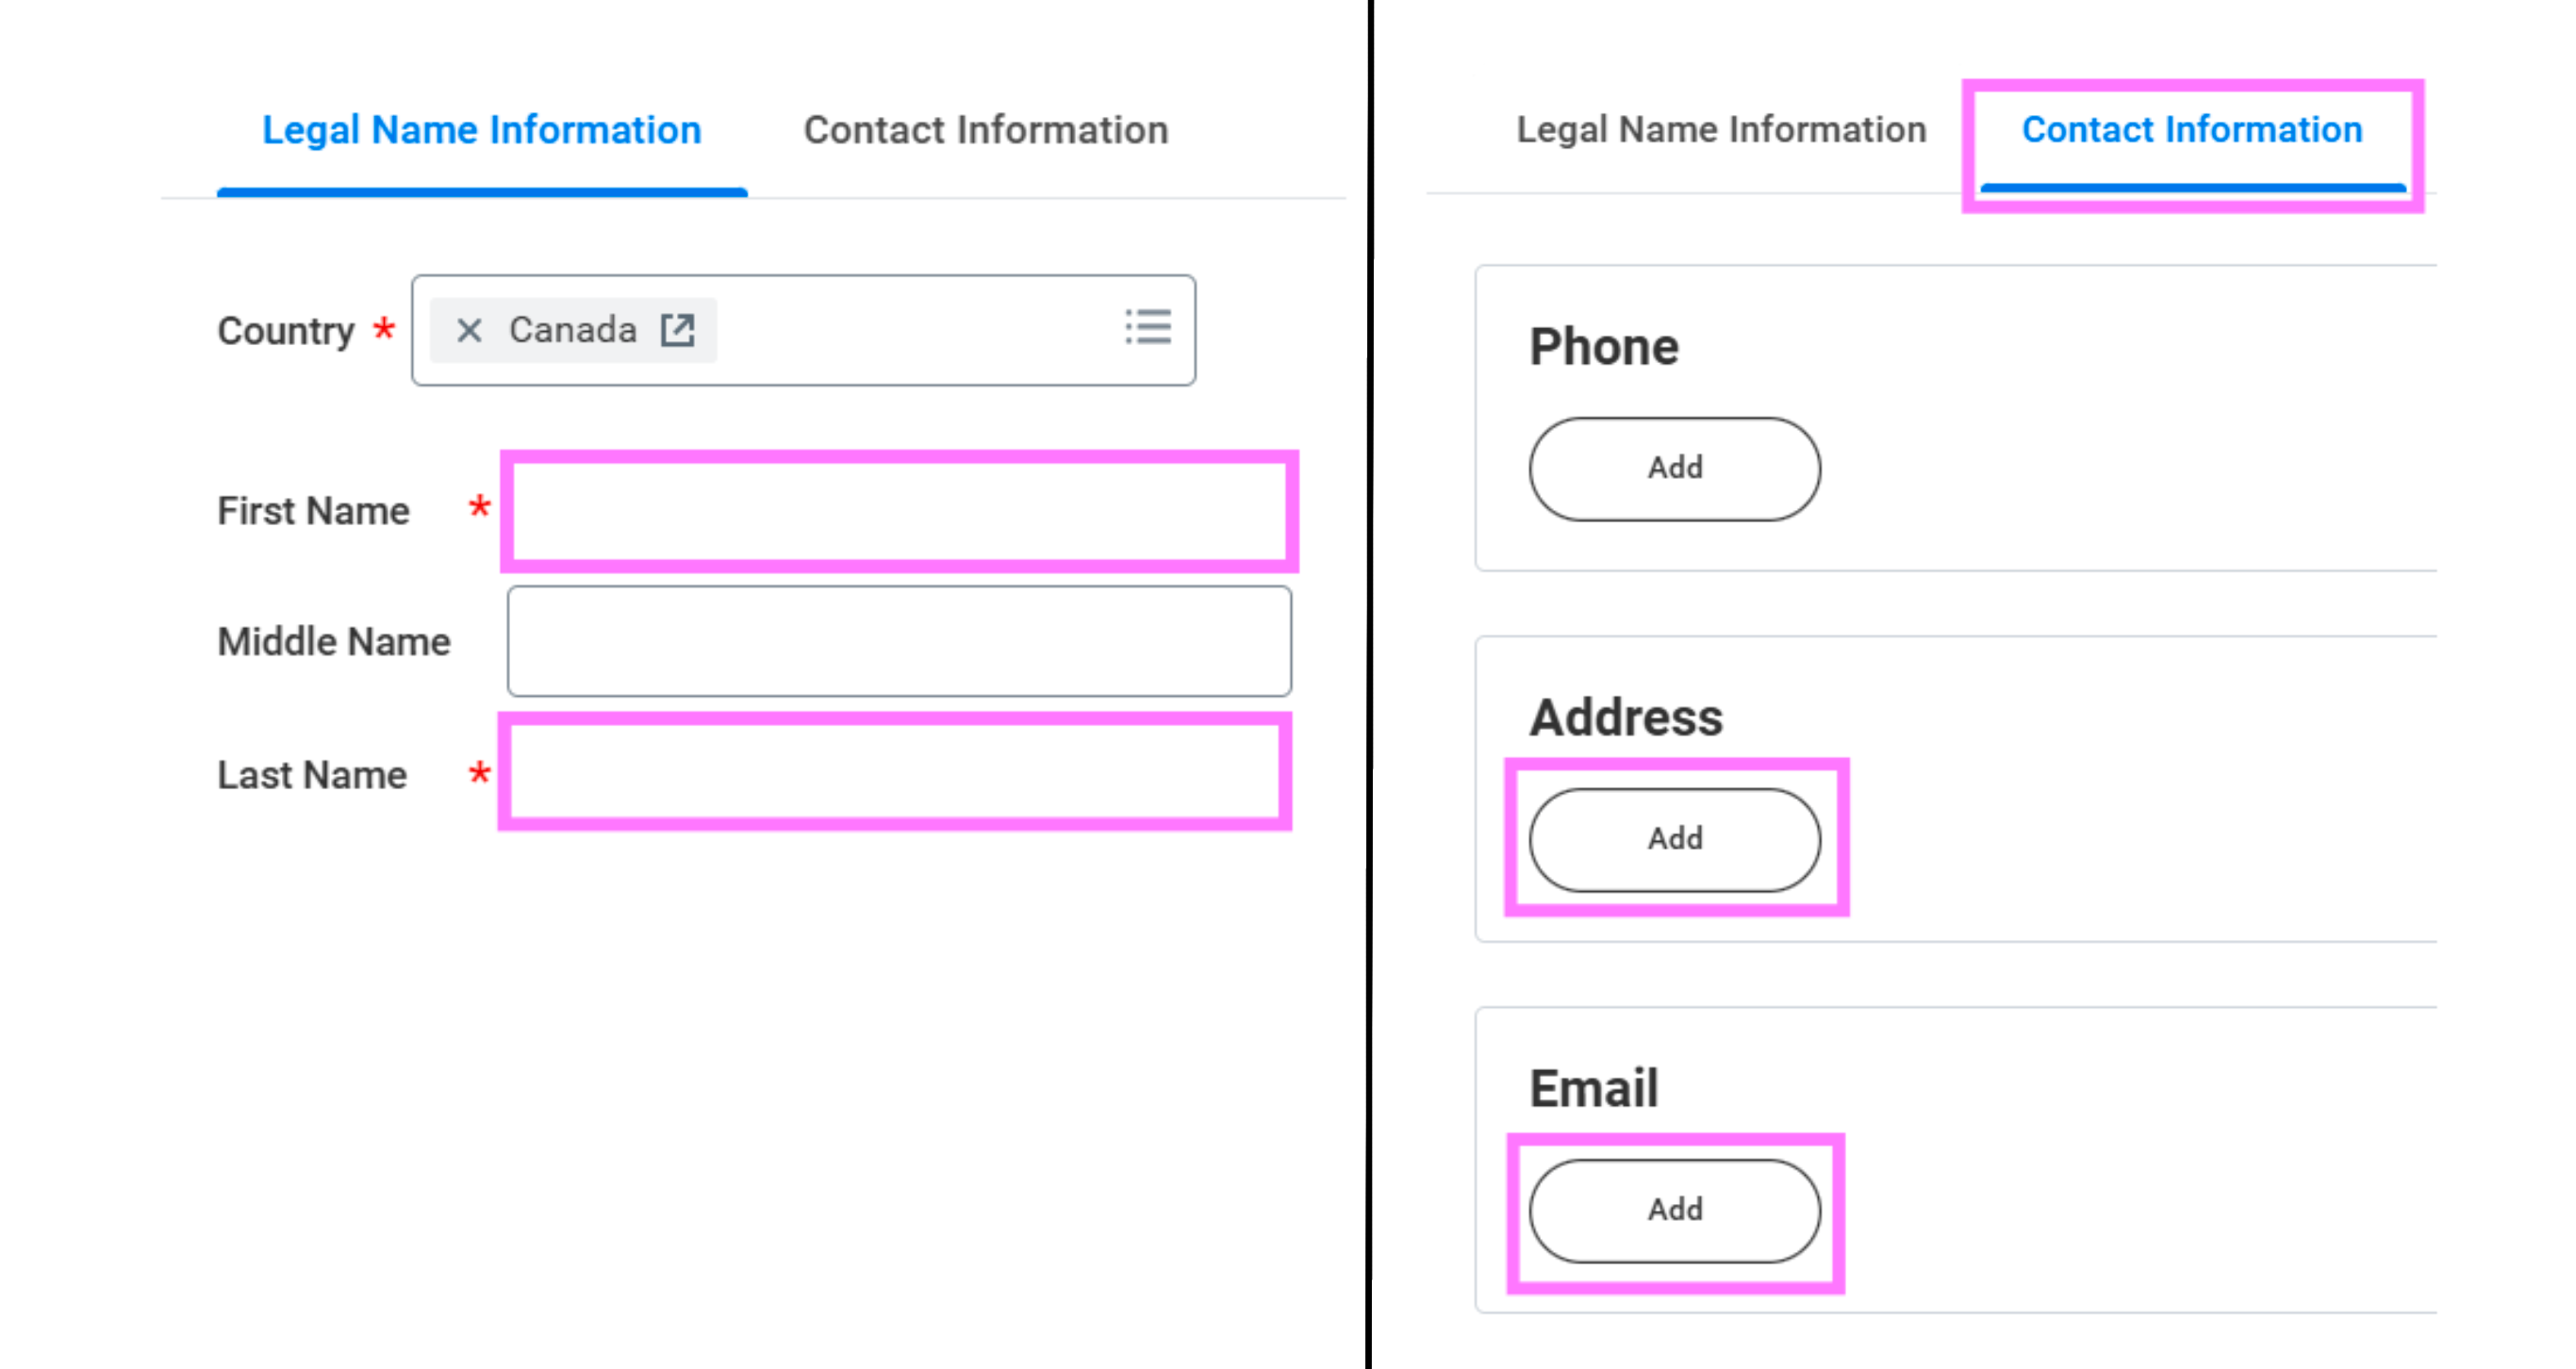
Enter the student's contact information
- Enter the employee’s First and Last Name and then select the Contact Information tab to add a home address and an email address.
-
Click OK to continue to the job details.
Hint: Leave Source and Referred by information blank.
Enter the student's job details
- Enter the Hire Date and
- Choose the appropriate Reason (New Hire if brand new, Rehire if there was a previous Workday record).
Tip: If requesting equal payments, enter the first day of the hire month.
- Enter an End Employment Date for the employee.
Tip: If requesting 4 equal payments, enter the last day of the month.
- Enter the appropriate Employee Type by selecting For Current Country > Student (Fixed Term).
- Select the building Location for the employee from the list of All Locations or type the abbreviation.
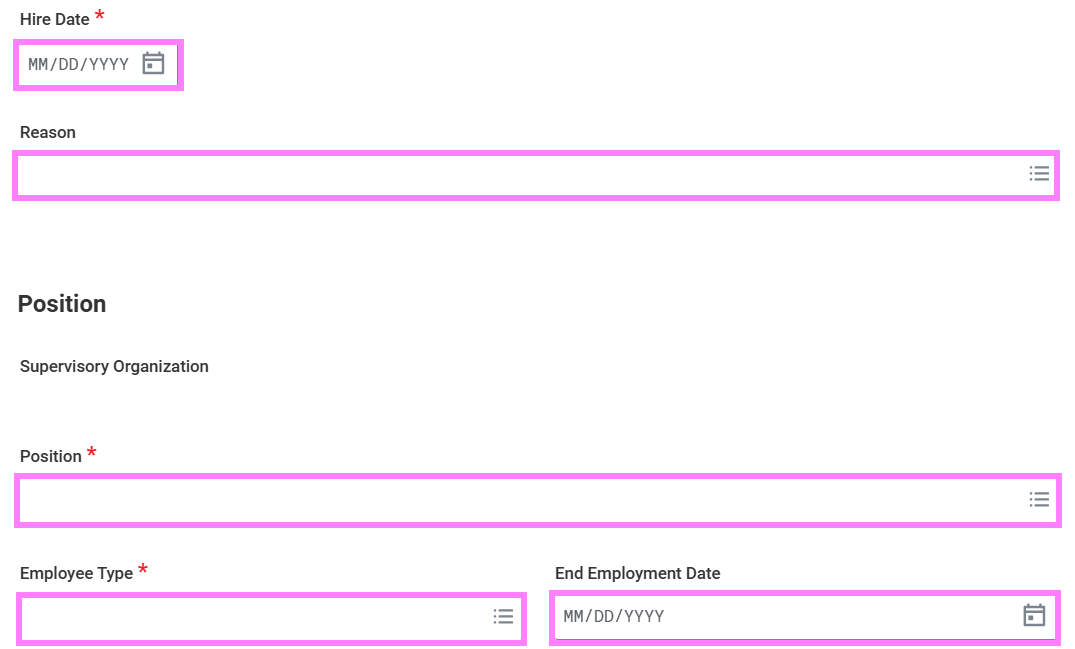
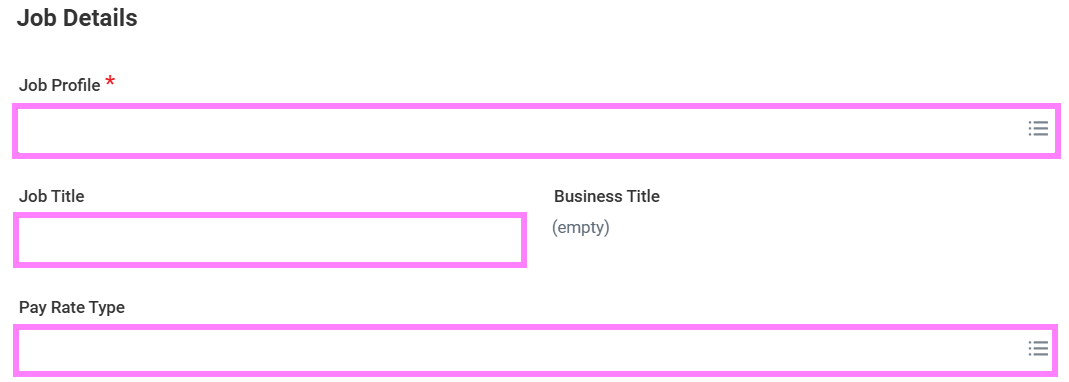
- In the Job Profile field, select or type the Sponsored Student 1572.
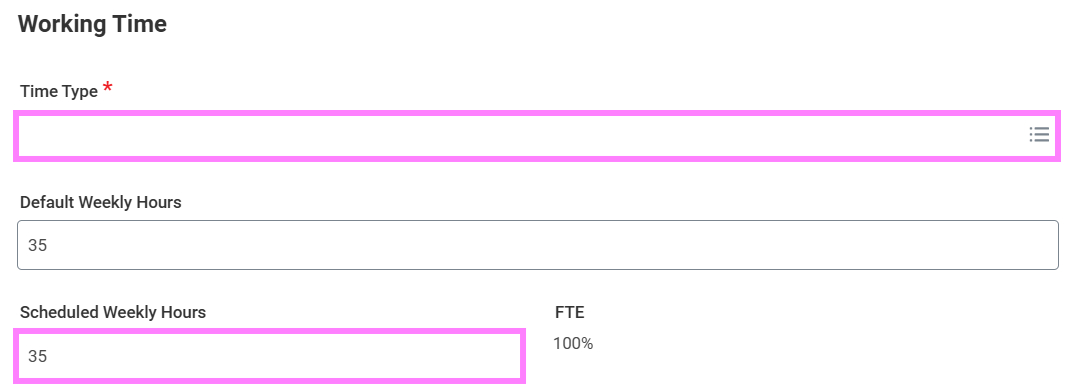
- Select the appropriate Time Type (if 35 hours or greater, select Full Time, otherwise select Part Time).
- Leave Default Hours and Scheduled Weekly Hours as 35.
- Click Submit to continue to enter the Social Insurance Number details.
Enter Social Insurance Number
- Click Open to add a Social Insurance Number (SIN) OR click Skip and OK on the next screen to skip this step if not a Canadian Resident and continue to step 18.

Tip: If you clicked Open or out of the pop-up, the SIN task will be in your inbox to complete or skip from there. To skip it from your inbox, click the gear icon at the top right of the task and select Skip This Task and OK.
If entering a SIN:
- Click the + under the National IDs table to add the Canadian Social Insurance Number (SIN). Click in the empty fields to select the following:
- Country – Canada
- National ID Type - Social Insurance Number
- Add/Edit ID - 9 digit Social Insurance Number
- Issued Date - Leave blank
- Expiration Date - Enter if Social Insurance Number starts with a “9”, otherwise leave blank
- Click Approve.

Enter the student's compensation information
- Click Open to go to the Compensation screen.

Tip: If you clicked out of the pop-up, navigate to your Workday inbox and continue the task from there.
- Click the X in the Salary section and Delete to close it.
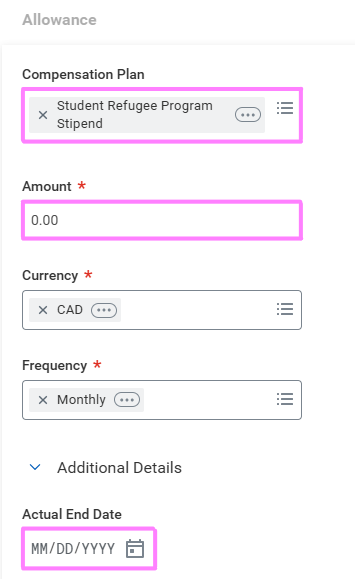
- Scroll down to click Add in the Allowance section.
- Click in the Compensation Plan field and select All Compensation Plans to choose Student Refugee Program Stipend.
- In the Amount field, enter the applicable monthly payment amount.
- Click Additional Details underneath Frequency to expand the fields.
- Enter the Actual End Date to be the same as the End Employment Date (i.e. the end date that was entered on the job details screen).
- Click Submit to continue on to the account entry screen (Change Organization Assignment).
Enter change organization assignment
- Click Open.

Tip: If you clicked out of the pop-up, navigate to your Workday inbox and continue the task from there.
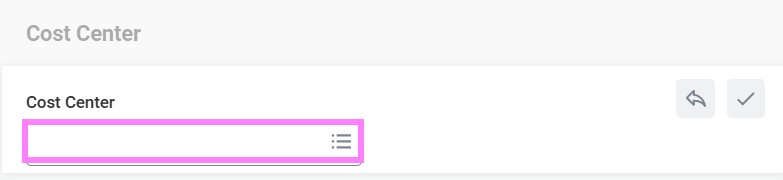
- In the Cost Center section, click the Edit icon and enter the work order and activity for the employee in the Cost Center field in this format xxxxx-xxxxx xxx.
- Click Submit.
- If there is only one applicable Cost Center, click Skip for Add Split Between Salary Accounts, then OK to send the hire to HR for review. If there is more than one cost center, click Open and see the steps below.

Tip: Leave the reason field blank for skipped fields. If you clicked Open or clicked out of the pop-up instead of Skipping, navigate to your Workday inbox and select the gear icon (task actions) in the top right of the Assign Costing Allocation inbox item and click Skip This Task and then OK on the next screen to skip.
If there is more than one Cost Centre:
- Click Open to enter additional salary accounts.
- For Costing Allocation Level, select Worker and Position.
- Click Add.
- Select the + button to add an additional row and enter the additional Cost Centre to the Worktags field.
- Enter the appropriate Distribution Percent.
- Click Submit. The hire initiation is now complete and will go to HR for review.
Tip: To view the status of your hire, type the employee's name into the main Workday search bar and press enter. Make sure All of Workday is selected under Categories and click the Hire:(employee name) link. Click the Process tab on the resulting screen and scroll down the table to see what part of the process the hire is in; OR find the submitted Hire event in the Archive section of your Workday inbox and click the Process tab (items are archived for 30 days).