- LEARN Templates *updated*
- LEARN Quiz tool for Online Term Tests
- Copying Content to another LEARN course
- Checklists in LEARN
- Creating Simple Videos
- Question Pools in LEARN Quizzes
- Editing and Organizing Quiz Questions in the New Quiz Builder
- How to Create Arithmetic Questions in LEARN
- LEARN FAQ Tool
- Supporting Students through Effective Course Design
- Accommodations: Extra Time in Quizzes for Spcific Students
1. LEARN templates *updated* (as of Nov 2020)
To help give instructors a head start in building your content pages, the Keep Learning - CEL team developed several content templates that can be used in LEARN. The templates were designed to provide a starting point/framework for instructors to craft their own HTML pages that help keep both themselves and students organized.
These content templates are now available directly from your LEARN course!
How to access the templates
From your LEARN course:
- Go to Content of your LEARN course.
- Select the module you want the page in -or- create a new module by typing the title in the Add a module... box
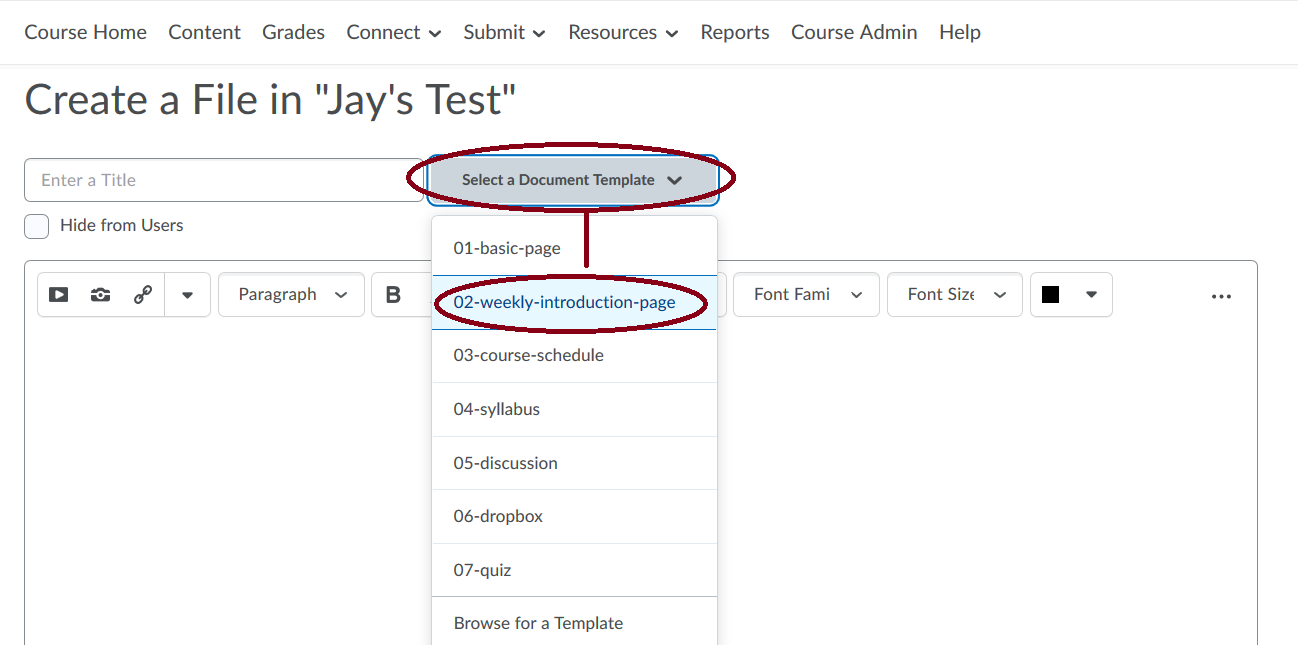
- Click on the Upload / Create button and select Create a File.
-
BEFORE entering a title, click on the Select a Document Template button
- Select a template from the dropdown menu (eg. "02-weekly-introduction-page").
- Provide a title for your page e.g. "Week 1: Introduction to Biochemistry".
- Save (no need to close, this step is just to save the page before you start editing the content).
- Edit the content as you see fit, but try to maintain the overall look and feel as they are designed with accessibility and minimizing cognitive load in mind - for example, the use of headings vs bold and bigger font, incorporation of ample white space, etc.)
There are seven templates:
|
An example of the Weekly Introduction template edited for a course: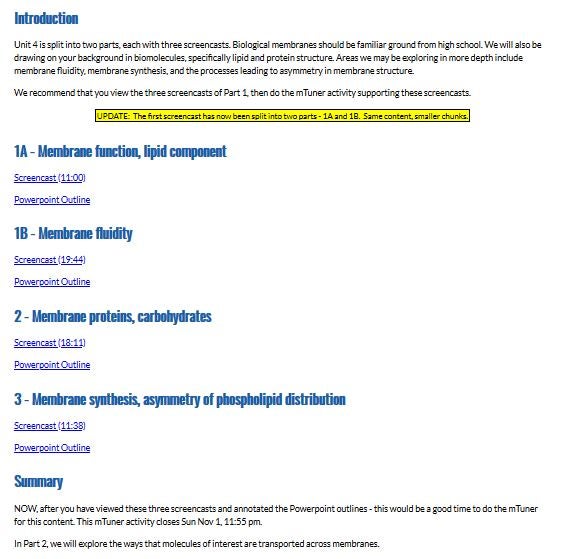 |
NOTE: When working in tables in these HTML files (templates)
- use the "tab" key to advance to the next cell.
- when you come to the end of a table (last cell at the right, bottom), if you hit the tab key, a new row will be created.
For more information, visit the Course Templates page on the Keep Learning website.
2. Online exams/test - using LEARN Quiz tool
Overview
Refer to the guidelines on strategies for final exams and assessments for tips such as setting a flexible time window to complete the exam and administering a timed exam.
If you are using the LEARN quiz tool to facilitate a summative assessment (such as, an online term test, midterm or final exam), you might want to also alter the Submission View so that students DO NOT see their score immediately upon submission.
If you are using the LEARN quiz tool to facilitate a summative assessment (such as, an online term test, midterm or final exam), you might want to also alter the Submission View so that students DO NOT see their score immediately upon submission.
- Editing the submission view for final exams
- Editing the submission message
- Hiding questions and scores
Editing the submission view for summative assessments (term test, midterms, final exams)
For term test, midterms, final exams, etc. it is HIGHLY recommended that you edit the Default View of the Submission view so that students do not see their score immediately upon submission.
- "Edit" a quiz in LEARN and go to the "Submission Views" tab.
- Click on the "Default View" link.
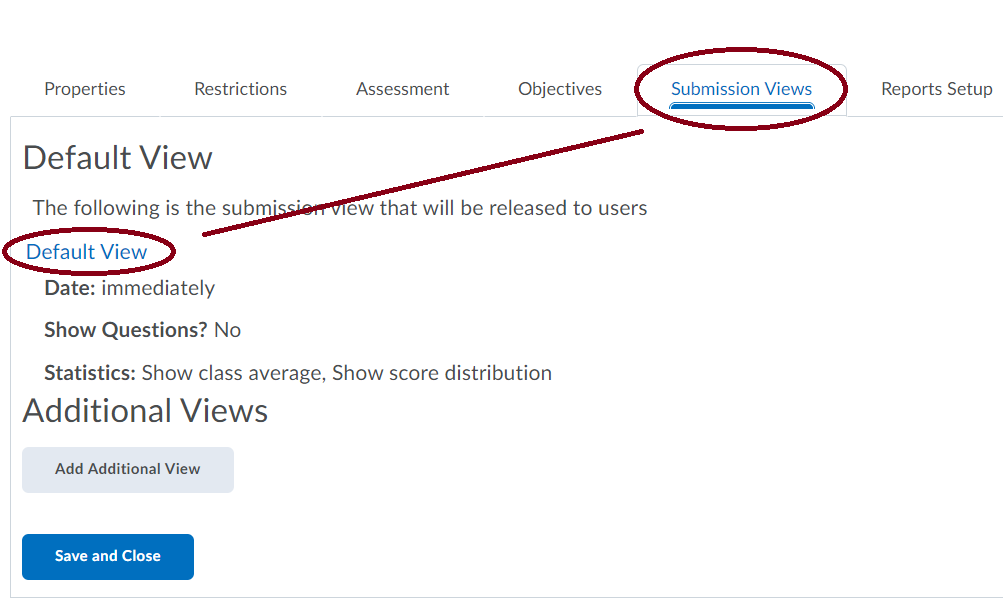
- Editing the submission message: Under "View Properties", you can edit the existing message that displays when the exam is submitted.
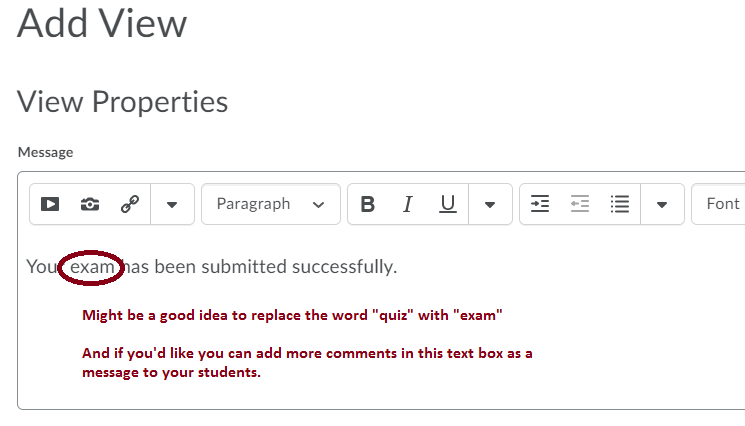
- Optional: Consider replacing the word "quiz" with "exam" and add additional commentary if you wish.
- Hiding question and scores: Scroll down to "View Details".
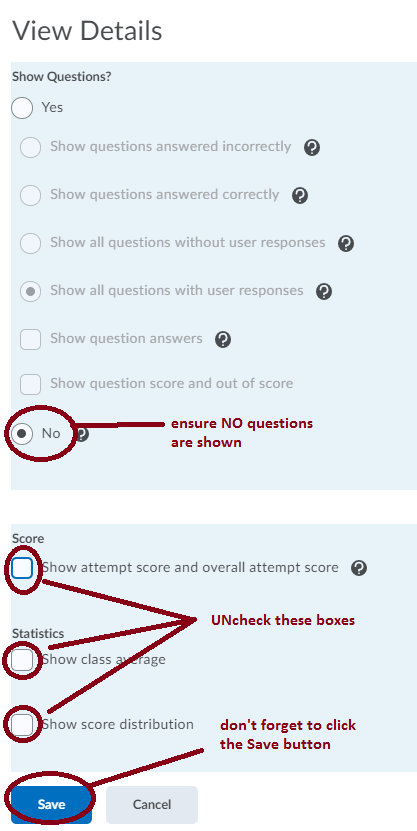
-
- Under Show Questions?, select "No".
- Under Score, un-check "Show attempt score and overall attempt score".
- Under Statistics, un-check "Show class average" and "Show score distribution".
- Click "Save".
-
3. Copying Content to another LEARN course
Copying Contents in LEARN - Overview
LEARN course shells can be created up to 7 weeks prior to the first day of classes of the upcoming term using the Course Request form. If you would like to start building your course prior to the 7 week timeline, you can send an email to learnhelp@uwaterloo.ca to request a "development course" to work in.
Below are detailed instructions on how to copy content from a course of a previous term or a development course.
NOTE: you must be "instructor" in both courses to be able to copy content.
Copying contents to another LEARN course
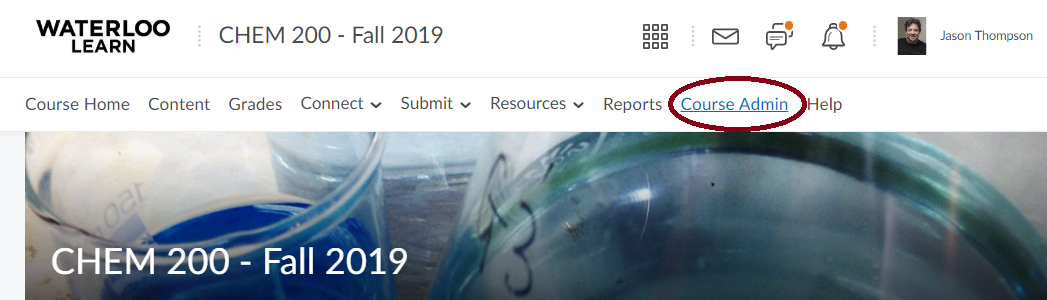
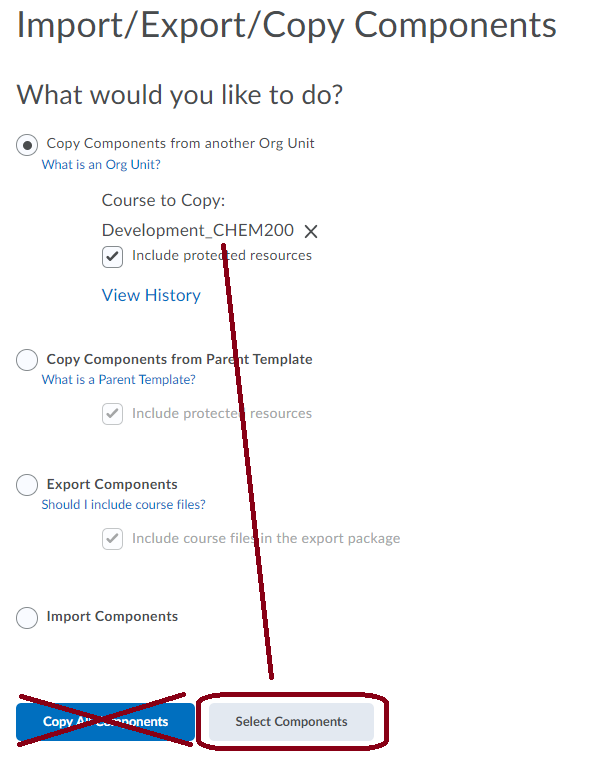
- Go to the LEARN course in which you want to bring the content into and click on "Course Admin" link in the upper nav.
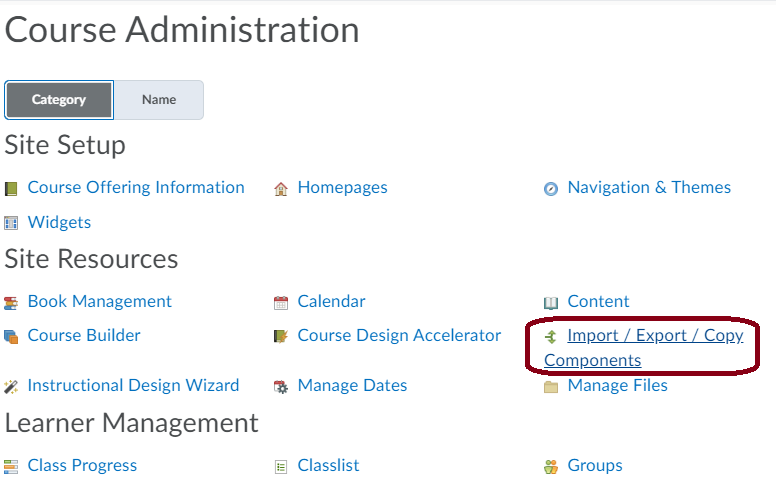
- From the Course Administration page, click on "Import / Export / Copy Components".
- From the Import / Export / Copy Components page:
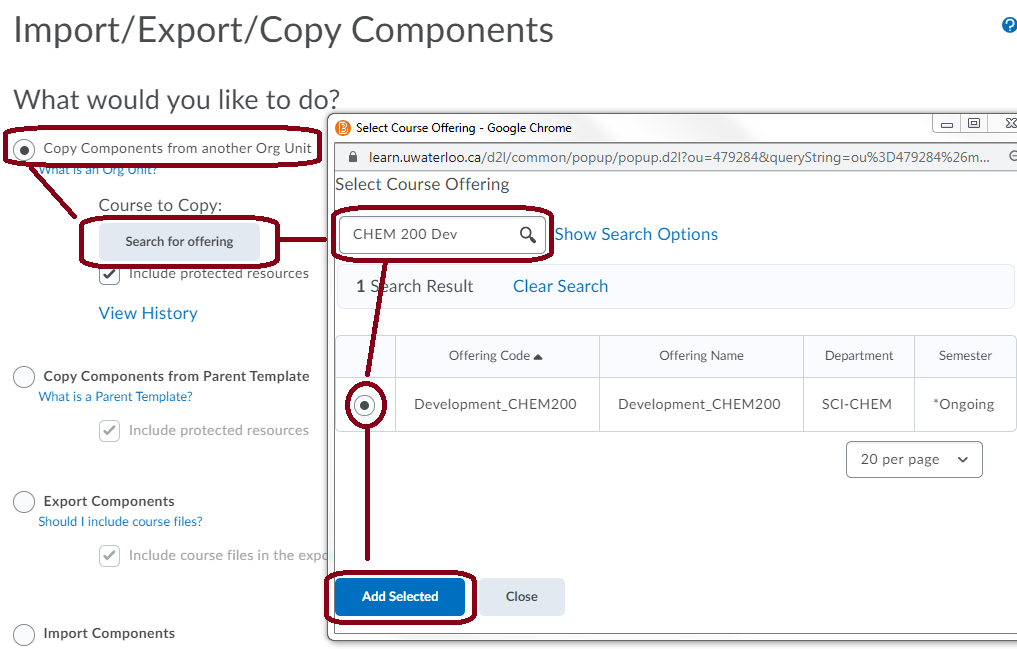
- Select the radio button for "Copy Components from another Org Unit".
- Click on the "Search for offering" button.
- In the pop-up window:
- Type in the course title of your development course (CHEM 200 Dev in this example).
- Select the radio button in front of the course you want to copy content from.
- Click "Add Selected".
- Once the course you want to copy from is selected, click on "Select Components".
- NOTE: If you are sure you want to copy ALL the content from the course, you can click on "Copy All Components" but ALL content will be ported into the new course (which will also include groups, announcement, etc. that tend to be term specific).
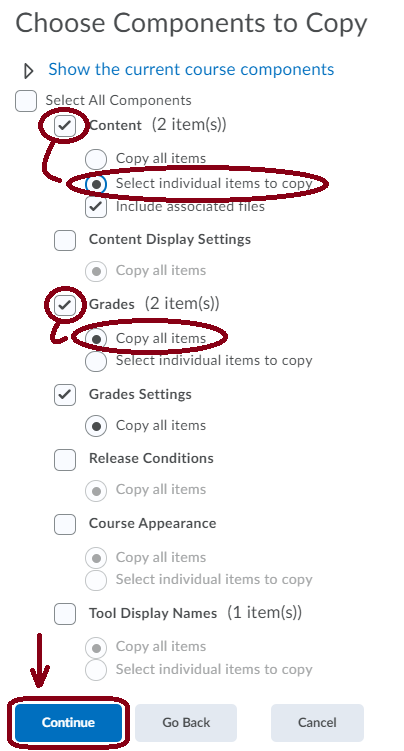
- From the Choose Components to Copy page:
- Check the box for each component you want to copy into your F20 course.
- The radio button is defaulted to "Copy all items" from that component.
- If you only want specific items from that component, select the radio button for "Select individual items to copy".
- When done with the selection, click "Continue".
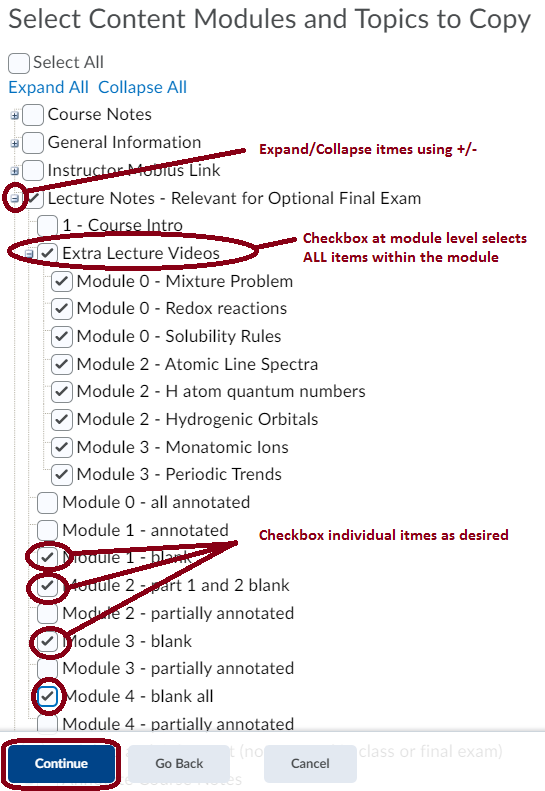
- If you chose "Select individual items to copy" for some components in Step 5, the next page(s) will allow you to choose which specific items you want to copy. From the Select Content Modules and Topics to Copy page:
- Use the +/- button to expand/collapse items.
- If you select a high level of the +/- section, all items within will be selected.
- You can check the box of individual items as necessary.
- Click "Continue" when ready.
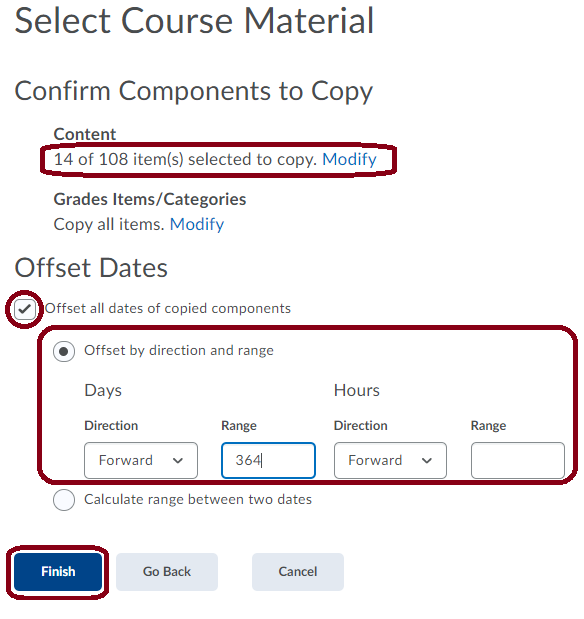
- Once you're done with all the selections, you will come to a confirmation page.
- Review the items listed on the confirmation page.
- If you see something you need to correct, click on the "Modify" link to adjust that specific component selection.
- If you have any date specific items you are copying over (eg, quizzes, dropboxes, etc.), you can offset the dates upon copy.
- "Offset by direction and range" can work.
- Easier/best if you do the math first, for example:
- Items with dates of May 15, 2020 (Friday)
- I want them to be the Friday the next year, which will be May 14, 2021
- So, I want to offset my dates Forward by Range = 364
- Click "Finish" to complete the copy process.
4. Checklists in LEARN
Overview
Checklists is a tool in LEARN that can help you help students by organizing and managing week by week course items or specific steps to course tasks that need to be completed by the student(s).
Checklists can be "checked" off by students as they complete them which helps them keep track of their progress throughout the course - but even if they do not use the functionality of the checklist, it still provides a nice über list of "to dos" for them.
Using checklists
Students can access the checklist you've created in two ways:
- Via the higher level menu item "Resources"
- Then selecting "Checklist" (like the image above)
- When a student clicks on the checklist title, it will be in a pop up box (like the image below)
- Notice the ability to check the items as well as the due dates and completed dates
- This is what the checklist looks like when you add it in a Content area
- Note: To add it to "Content", click the "Existing Activities" button beside the Upload/Create button and select "Checklist")
5. Creating Simple Videos
Overview
So you're moving your course "online". Some common questions we've been hearing are:
- How do I maintain presence?
- How can I make connections with my students?
One idea is to create simple videos!
- Get on camera
- Creating videos can be simple
Get on camera
Let them see and hear you. It does not have to be (should not be) perfect!
We're not talking full lecture capture, rather consider some of these things:
- Creating a (video) welcome message
- Walk your students through the course plan/syllabus in a short 2-minute video
- Even if and particularly if it is not "fully" built yet
- Introduce yourself to them and them to you and each other
- You can use video note in the Discussions in LEARN for this
Creating videos can be simple
Check out this 11-minute video by Michael Wesch, Professor of Cultural Anthropology at Kansas State University!
6. Question Pools in LEARN Quiz
Overview
A question pool is a LEARN quiz feature where the system randomly selects a set number of questions out of a group (or “pool”) of questions.
You can use question pools so that each student will get a random combination of questions in their quiz. You can also use multiple question pools in a single quiz so that each student will have a different combination of multiple-choice questions, true/false questions, short answer questions, etc.
You must add all your questions to the question library before you can start building a question pool in a quiz.
To start, go to your LEARN course, click the "Submit" tab, then "Quizzes"
Create questions in the question library
- Go to the "Question Library" at the top of the page.
- If you want groups of questions in your quiz to be worth different points, create them using "Sections". These are like folders in the question library. Questions will be randomly picked from each section, but every question in the same section will be worth the same number of points.
- NOTE: You can create your sections based on the levels on Bloom’s taxonomy and assign different points for each level.
- Click on "New", then select "Section" in the dropdown menu.
- Enter a title for your section.
- You can also add a description.
- Choose to hide the title and/or description from students.
- Click "Save".
- Repeat steps 3-4 until you have the number of sections you want for your quiz.
- Click on each section to start creating questions within it.
- Click "New" or "Import" to add your questions.
Create your quiz
- Once you’ve finished adding all the questions to your sections, go back to the Quizzes page by clicking "Submit" at the top, then "Quizzes". Click "New Quiz"
- Under the "Properties" tab, enter a name for your quiz, then click "Add/Edit Questions".
- Click "Add".
- Select "Question Pool" in the menu.
- Enter a title for your question pool, e.g. Part I: True/False and Multiple Choice.
NOTE: The student will NOT see the title for the question pool. If you want to give specific instructions for each question pool, e.g. “Refer to this diagram for questions 5-7”, add a "Section" in the quiz to include text and diagrams.
- For example, this shows a Section placed just before the corresponding Question Pool.
- When editing the Section settings, the instructions for the question pool are described in the “Section Text”. Make sure that you uncheck “Hide Section Text from students”.
- Click "Browse Question Library" and check the section that you want this pool to randomize.
- REMEMBER: All questions in the same pool will be worth the same amount of points.
- Enter the number of questions you want to be randomly selected from the pool and how many points each question is worth. Click "Save".
- Repeat steps 2-5 for each question pool you want to add to your quiz. Once you’re done, click "Back to Settings for Quiz".
- You’ll see the question pool under the “Quiz Questions” heading showing random questions. Change any other settings you would like for your quiz, then click "Save and Close".
7. Editing and Organizing Quiz Questions in the New Quiz Builder
As of Spring 2020, Waterloo LEARN has been updated to a new version of the LEARN quiz builder, which includes changes to the format of adding and editing questions in LEARN quizzes.
The new version is currently optional, but this option will be removed at the end of August 2020. Now is a good opportunity to familiarize yourself with some of the features of the new system.
Options for Multiple-Choice Questions
- To add or edit quiz questions, click on Add/Edit Questions.
- Click “New” then select the Multiple-Choice question type from the question menu.
- The new version of the question editor has a new button called “Options” that allows you to add features to questions.
- Depending on the question type you have chosen to edit, the options button will produce a different list of options for you to choose from.
- For Multiple choice questions the options are:
- Add Feedback: Allows you to add feedback on answer choices that will be visible to the student after they submit the quiz.
- Add Hint: Allows you to add a hint that the student will be able to view while taking the quiz, to help them answer the question.
- Add Short Description: Allows you to add more context or description about the question stem.
- Add Custom Weights: Allows each answer choice to be graded differently. For example, the most correct answer could be given 100% weight but the next closest could be worth 75% of the marks awarded for that question.
- Add Enumeration: Adding Enumeration adds a drop-down menu with different types of numbering systems to number answer options. For example, 1. 2. 3. …, a, b, c… etc.
- Once you select an option, a checkmark will appear beside that option to let you know that you have already added this option to your question.
- The image below shows the selected options and their corresponding changes to the question design.
Options for Written Response Questions
- From the question menu, select the Written Response question type.
- The options menu for the Written Response question will look slightly different that the Multiple-Choice question options.
- For Written Response the additional options are:
- Add Answer Key: Adding an Answer Key is different than adding Feedback. Feedback is available for students to view once they submit their quiz. The answer key is only available for assessors to view while they are marking the written responses.
- Add Custom Response Box: This allows you to select the size of the space where students are able to write their response.
- Add Initial Text: Allows you to include some initial text in the student response box. For example, a response prompt. Students will be able to edit or remove this initial test when responding to the question.
Organizing Question Order in the New Quiz Builder
- To change the order of the questions in your quiz there is a new drag and drop feature in the new quiz builder.
- After clicking on the quiz you want to organize, you should see your questions in a list. To move a question within the list, click the grid button on the left side of the question. You will notice that your mouse becomes a cross with 4 arrows, allowing you to “pick up” the question.
- Holding the grid button allows you to drag and drop the question throughout the quiz. In the example below, question 1 will end up in the location of the blue line.
8. How to Create Arithmetic Questions in LEARN
This instructional will go through how to create an arithmetic question in LEARN, including options and settings for specifying answer types.
Select Arithmetic from the question menu.
In the Question Text field, type your question. Where you would normally put numerical values, insert a the variable that will represent a value. Make sure the variable is in curly brackets {}. In a later step we will set the parameters for the numerical values that will replace these variables when the student reads the question. Do not include a variable for the answer, this is what the student must solve.
In the Formula field you will insert the formula that will equate to the answer to the question.
For the example F=ma, I will insert this formula using the same variables that I used in my question text.
Do not include the = sign in the formula. The formula should only include the arithmetic that is needed to equate the answer and should not include the answer as a variable.
For information on how to write out complex arithmetic problems you can click on the “?” button beside the Formula field box. This will give you examples of how to write out equations.
The Answer Precision, Tolerance, Units and Evaluation Options sections allow you to specify how you would like the student to input their answer
Answer Precision: How many significant digits the student should include in their answer.
Tolerance: The range of answers around the actual answer that will be accepted as correct answers. This allows for some rounding error on the part of the student.
Eg. A tolerance of 0.5 will accept answers within 0.5 units of the actual answer. If the answer is 3.5 then the range of answers between 3-4 will also be accepted.
Units: The units the answer should be expressed in. You also have the option of assigning point for including the correct units.
Eg. The units for force are Newtons (N).
The Variables section is where you can specify the range of values that will represent your variables in the question text.
Eg. For the mass {m} variable, I choose a Min of 1 and a Max of 10. This means that learn will choose any value between 1 and 10 to use as a value for {m} when the student reads the question.
The Decimal Places section allows you to choose the number of decimal places that the variable values will include.
You can test you question to see it how the student would see it. To do this go back to the Formula field; beside it there is a button labelled Test.
9. LEARN FAQ Tool
Overview
Communicating with students can be difficult in a remote class, especially with large class sizes. It can be overwhelming to respond to students’ questions if a lot of the same questions are repeatedly asked.
One way to enhance communication is to create a discussion forum to receive all student questions, then selecting helpful and pertinent questions to add to the FAQ tool on LEARN. For ease of access, you can also create an FAQ widget that will be displayed in the course homepage.
- Creating a discussion forum
- Enabling and managing the FAQ tool
- Creating and adding the FAQ widget to the course homepage
Creating a discussion forum
- Create a discussion forum dedicated to receiving questions from students.
- Create discussion topics for categories of questions to receive so that the forum is organized.
- For example, a topic for questions about course content, another topic about assessments, etc.
- Monitor the discussion forum regularly and look for common themes in the questions being asked.
- Pay attention to any good answers to common questions.
- Note down these questions and answers to add to the FAQ tool.
Enabling and managing the FAQ tool
- Enable the FAQ tool by going to the “Course Admin” page.
- Select "Tools".
- Click the status button to the far right of the FAQ so that it shows a blue checkmark.
- Navigate to the FAQ tool by clicking “Resources” in the top navigation bar, then “FAQ”.
- Create categories for your FAQ page so that they are easy to sort.
- Click “New Category”, enter a category name and description, then click “Save”.
- For consistency, you can use the same categories in the FAQ tool as the topics in your discussion forum.
- NOTE: Every question added to the FAQ page must be associated with a category.
- Add questions to your FAQ by clicking "New Question".
- Select the appropriate category for that question.
- Type the Question and Answer in the appropriate fields.
- Click “Save”.
- Under “More Actions”, you can…
- Change the order of the questions by clicking “Reorder”.
- Preview your FAQ page by clicking “Preview”.
Creating and adding the FAQ widget to the course homepage
- To create a new widget, go to “Course Admin”, then “Widgets”, and click “Create Widget”.
- Give your widget a name, e.g. FAQ, Frequently Asked Questions.
- Click the “Content” tab and enter the information you would like displayed in the widget.
- You can direct students to ask questions in the discussion board and to read the FAQ page before they submit new questions. Click “Save and Close”.
- To add a direct link to the FAQ page, you must copy a link that students can access.
- Impersonate a test student.
- Navigate to the FAQ tool by clicking “Resources” in the top navigation bar, then “FAQ”.
- Copy the URL in the address bar of this page.
- To stop impersonating the test student, click the profile in the top right, then “X”.
- Navigate back to the widget by clicking “Course Admin”, "Widgets”, then click on the pencil icon to edit your widget.
- Add a link to the FAQ page by pasting the URL that you copied in Step 4iii. Click “Save and Close”.
- Follow the steps for adding the widget to your homepage and making the new homepage the course default.
10. Supporting Students through Effective Course Design
Overview
Studying in a remote term can be challenging for students who are on a full course load. Here are some tips that you as an instructor can do to support your students through effective course design.
- LEARN + 1
- Consider the quantity of work being required
- Provide structure throughout your course
- Additional Resources
LEARN + 1
- Stick to using the tools in LEARN and at most one other educational technology platform so that the learning curve is manageable for both you and your students.
- Consider using tools that promote active learning, such as Perusall, Piazza, Quizlet, Bongo Video Assignment, and Padlet.
- Make sure that you know where students can get support for any instructional technologies you will be using.
Consider the quantity of work being required
- Be mindful of the number of deliverables you are asking students to submit each week.
- The Remote Course Design Essentials (ReCoDE) course offers these guiding questions when planning assessments:
- Do you and/or your TAs have enough time to complete the grading in a timely manner?
- How have you taken into account the demands on your students beyond your own class?
Provide structure throughout your course
- Provide detailed instructions on how to complete asynchronous activities.
- Clarify your expectations for student engagement via discussion boards and other instructional technologies.
- Clearly communicate the structure of your course by creating an organized syllabus, providing a weekly schedule of tasks to complete, and building an easy-to-navigate LEARN site.
Additional Resources
- Independent Blended Course Design (iBlend)
This self-paced LEARN course, will guide participants through the development of a blended course using a learner-centered backwards design approach. Participants will complete a series of online modules designed to help instructors prepare a blended course. The course emphasizes integrating modalities, managing workload, and ensuring there is a clearly laid out pathway for students through the course. A workbook is provided to help capture work and provide direction as participants move through the design and development process.
How to enrol in these self-paced LEARN sites: These courses are available by clicking on “Self-Registration” link on the top navigation bar of your LEARN homepage then selecting the title of the course from the list of available courses.
11. Accommodations: Extra Time in Quizzes for Specific Students
Overview
Accommodations tool - this feature allows instructors to provide students accommodations using the Classlist tool.
The accommodations currently available are granting users more time to complete quizzes, and the ability to bypass right-click restrictions in quizzes. The right-click restriction is the ability for users to right-click within the quiz while taking it.
Note: These accommodations apply to ALL quiz activities in the LEARN site for the specific student(s).
Adding Accommodations
-
Select Connect from the course navbar.
-
Select Classlist from the drop-down menu.
-
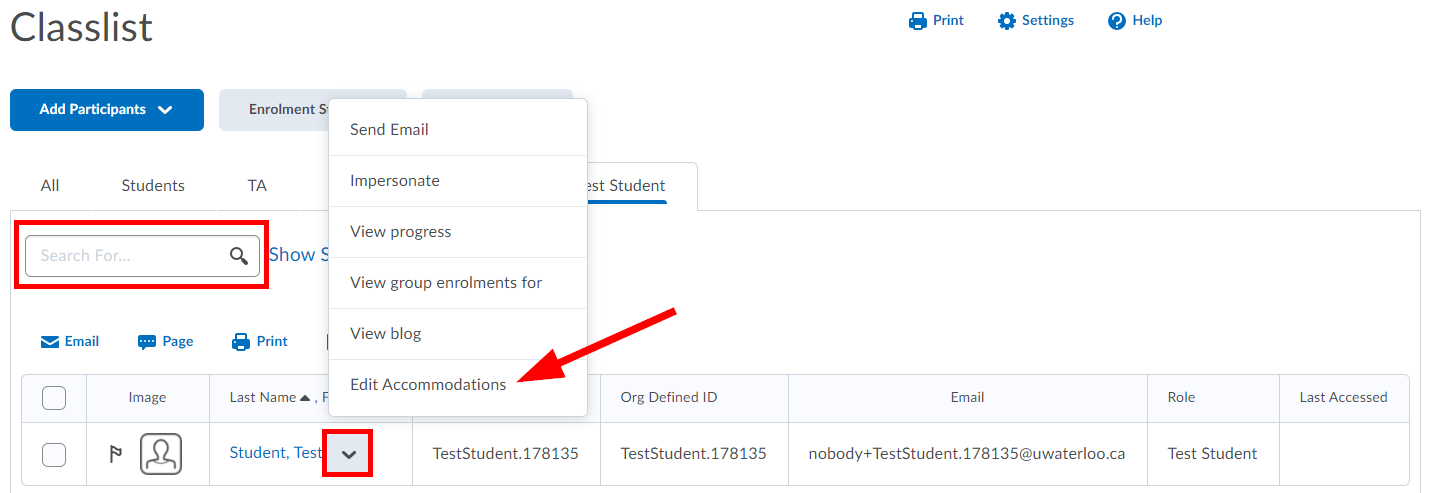
Locate the student you wish to provide accommodations for (use the Search For bar to search for the specific student) then:
-
select the down arrow beside their name.
-
Select Edit Accommodations.
-
-
-
To provide the student with a modified time limit for quizzes, select the check box beside Modify Time Limit. Select one of the following options:
-
Multiplier of original quiz time and enter the multiple of time you want to provide (e.g. 1.5x quiz time)
-
Extra time and enter the number of additional minutes you want to provide (e.g. 30 additional minutes)
-
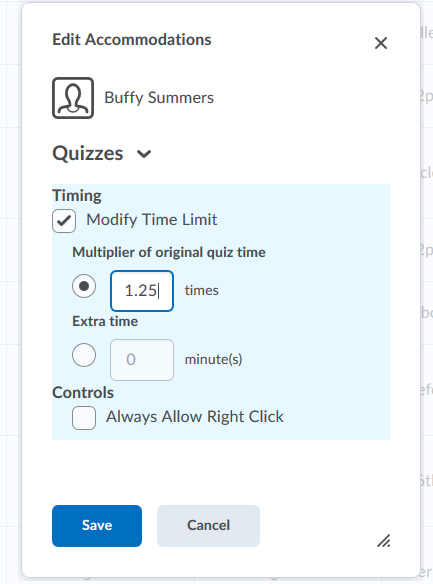
Select the check box beside Always Allow Right-Click if you want the student to be able to right-click while taking quizzes.
Click the Save button.
Repeat steps 3-7 for additional students.
Viewing Users with Accommodations
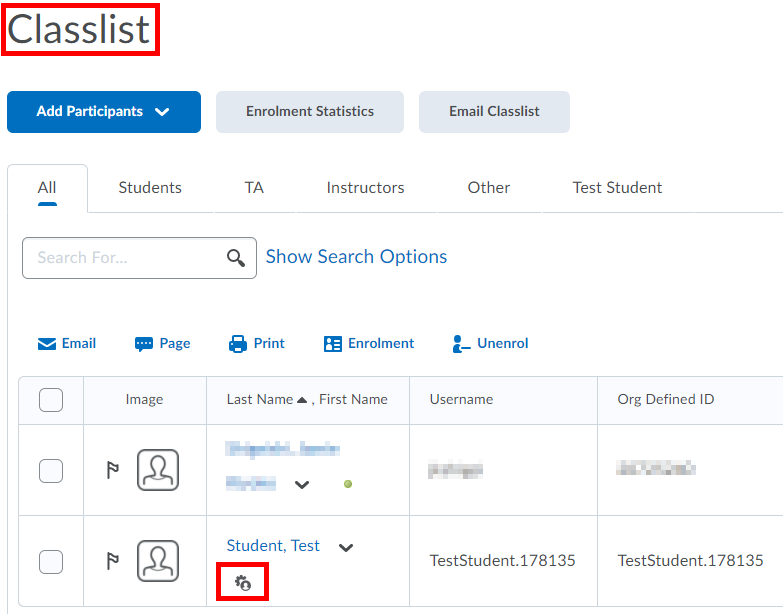
If a student has an accommodation they will see an icon next to their name indicating that they have an accommodation.
When a student with an accommodation starts a quiz an icon will appear next to their quiz time indicating that an accommodation has been applied. No icon will be displayed if the accommodation has been overridden by a quiz-specific special access.
- In the Classlist tool, users with an accommodation will have an icon next to their name.
If you have questions or if you run into any problems, please don't hesitate to contact LEARN Help (learnhelp@uwaterloo.ca, x31744) or Jason Thompson.