NOTE: Microsoft has announced the upcoming retirement of incoming webhooks within Teams, which are used in this post.
An updated version of this post is available that describes how to use the replacement.
WCMS 2 had a dedicated option to send limited notifications to Microsoft Teams, but that doesn't exist at the moment in WCMS 3. Did you know that you don't need to wait on this for webform submission notifications? You can use the tools that already exist - and they're even more flexible than before!

In Teams, you will have to set up (or have an administrator set up on your behalf) an incoming webhook for the team and channel you want to submit to. Once the webhook is set up, you will need the URL provided by Teams, which you'll be using to set up notifications in the WCMS.

Instead of being a global option, this is set up on a per-form basis using webform handlers, meaning you enable it only where you want it, and each form can have a different destination. Multiple handlers can be set up, enabling you to notify across multiple teams and/or channels.
You can also add conditions, for example, to only post a notification if certain values were selected. One use for this would be to set up multiple webhooks in multiple channels, then set up multiple remote post handlers that post to the appropriate hook based on the submission values (e.g., post to the "admissions" channel if it's an admissions question, but post to the "alumni" channel if it's an alumni question).
Teams allows you to set up the notification to be just about anything you might want - this post talks about how to set up a simple notification.
- From within your form, add a "remote post" handler.
- On the "advanced" tab, set the post type to "JSON".
- Back on the "general" tab, add your webhook URL to the "completed URL" field. (You can also set up notifications for when a submission is updated or deleted, using similar methods to those described here.)
- Once you have added the URL, you will see a new field appear, "completed custom data". Cut and paste the following into that field to get basic notifications:
{
"@context": "https://schema.org/extensions",
"@type": "MessageCard",
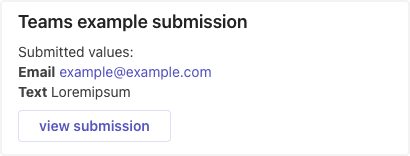
"title": "[webform:title] submission",
"text": "Submitted values:<br>[webform_submission:values:html]",
"potentialAction": [
{
"@type": "OpenUri",
"name": "view submission",
"targets": [
{ "os": "default", "uri": "[webform_submission:url]" }
]
}
]
}
Updating attributes
You can replace the text for the "title" and "text" attributes to be whatever you like. The "text" field supports HTML while the title is plain text. You can also edit the "name" attribute for the button to substitute "view submission" for whatever text (or emoji) you like. All of these support tokens, so you can customize these to your heart's content.
You can add more action buttons, for example, adding a button that would show all of the submissions to the form, by adding more actions inside the "potentialAction" section (separating each section of "curly braces" with a comma). Really, you can do anything you want as long as it confirms to Microsoft's specifications for the JSON that you are sending to Teams (see the Microsoft document explaining how to post a message card). Note, that the WCMS team can only provide assistance with simple notifications - anything else is up to you.
If there are any issues with your URL or your data, the WCMS will not be able to post to Teams. Make sure to test your form! If everything goes well, you will see a notification in your team's channel.