When web pages migrate, it is important to do a comparison check of the back-end (Edit tab) and the front-end (Layout tab). This page provides instructions on how to remediate common migration issues seen with Web pages:
Edit Tab
- From the Administration bar on your WCMS 3 site, select Workbench, then select My Dashboard. Select the web page that you are remediating from the Content list by searching for the name of the web page.
- In the Edit tab, navigate to the Description of content. If there is encoded HTML in the Description of content, manually remove (delete) it. This simply means removing source code and replacing it with the correct characters. If you are unsure of what the correct characters are, the Description of content is often the first few sentences found on the page in WCMS 2. If the Description of content exceeds the character limit, manually shorten it. Occasionally no Description of content will migrate and you will have to manually add one. Choose the first couple of sentences of the content if possible.

This is an example of a Description of content with encoded HTML that exceeds the character limit.

This is how the Description of content would appear after the HTML has been decoded and it has been shortened.
- Navigate to the bottom of the Edit tab and ensure that the moderation state is set to Publish, then select Save.
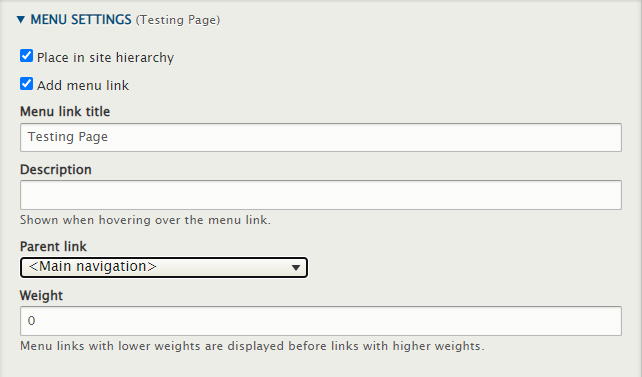
This is an example of how the Menu settings appear in WCMS 3
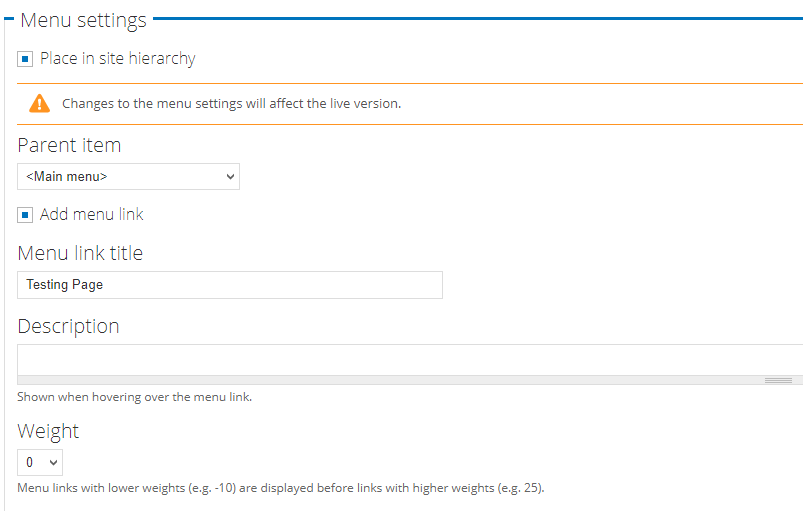
This is an example of how the Menu settings appear in WCMS 2
Layout Tab
Remediating Expand/collapse content
Expand/collapse are now Block types in WCMS 3 and may not migrate successfully, although the content may. The Expand/collapse Blocks must be manually added with the corresponding content from WCMS 2. Navigate to the How to remediate Expand/collapse content page for in-depth instructions.
Remediating broken links
Having broken links on your page can negatively impact your site visitor's experience, and search engine optimization. After a site is migrated, it is important to compare and remediate the links on each page. Ensure parity between the two versions by matching WCMS 3 with what is seen in WCMS 2. If you are completing an in-house remediation, consider updating or removing the broken links you encounter.
After migration, both internal and external links may not function the way they originally did for a variety of reasons:
- Links to file need to lead to the correct file on WCMS 3. For in-depth instructions, refer to How to remediate Files.
- An external link contains an ampersand or possibly other special characters, causing part of the URL to migrate. In this case, the correct URL will need to be re-added in WCMS 3.
- If CTAs have mailto links (i.e. link to email addresses), they may migrate as <nolink> in the back-end. To remediate this, remove the <nolink> and correctly add the mailto link back into WCMS 3.
- An internal link (a link that leads to a content type on the same site) was originally linked via its full URL (i.e. begins with "https://uwaterloo.ca") and not the internal path. On WCMS 3, such a link will lead to the WCMS 2 version of the page. To remediate this, the link will need to be re-added correctly.
For in-depth instructions on correctly adding external and internal links, refer to the respective section in How to add Link text.
Remediating images
Due to the differences between WCMS 2 and 3, images may migrate incorrectly to WCMS 3. This can include
- images not migrating
- images losing their alignment
If images migrate incorrectly or do not migrate at all, they will need to be re-added to the correct spot. This can be done in two ways: images can be added to body content or using an Image block.
If images lose their alignment from WCMS 2, they will need to be manually fixed to match WCMS 2 as close as possible.
Note: WCMS 3 offers various options for adding and formatting images. Consider exploring alternative options in WCMS 3, such as the Banner images block and multi-column sections when formatting your page.
Note: Images cannot be wrapped in a caption box in WCMS 3, as they can in WCMS 2.
Remediating tables
Tables can sometimes migrate as if all of the content is a header and appear dark grey. This is Due to a <thead> tag being placed at the end of the table in WCMS 2. For more information on tables in WCMS 3, navigate to How to create a table.
- From the Administration bar on your WCMS 3 site, select Workbench, then select My Dashboard. Select the web page that you are remediating from the Content list by searching for the name of the web page.
- In the Layout tab, navigate to the Copy text Block that the table appears in.
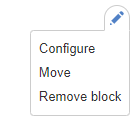
- Select the Pencil icon located in the top right corner of the Copy text Block you wish to add link text to and select Configure.
- Select Source to open the source code.

- If the Copy text Block contains more than the table you are remediating, you can locate the start of the table in the source code by searching for the following code:

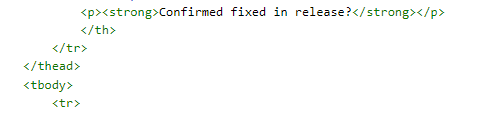
- Navigate to the heading text that is seen furthest to the right in the table, and insert a </thead> tag below the <th> and <tr> tags that appear directly below it. If the heading furthest to the right is “Confirmed fixed in release”, the source code should appear similar to the following:
- Navigate to the bottom of the table by locating the following code:
- Manually remove the </thead> tag placed at the end of the table. WCMS 3 will automatically correct the bottom source code by inserting a <tbody> tag once you have selected Update in the Copy text Block.
- Select Update.
Remediating characters in text
Apostrophes, degree symbols, and quotation marks do not migrate in multi-column sections. After a site is migrated, it is important to compare and remediate the text for each page. Ensure parity between the two versions by manually adding the missing symbols in WCMS 3 to match what is seen in WCMS 2. For more information on Copy text blocks, refer to How to create Copy text.
Consider using a word counter when comparing pages. By highlighting the content of the page and comparing the character count between WCMS 2 and WCMS 3, you can determine if more investigation is needed.
