In what cases do I need to use the virtual private network (VPN)
Users will need to install the VPN software in order to get access to all campus network resources. In this case, you would run the Cisco AnyConnect client software, then do what you need to do to access the resource. For example, you would start the VPN client before running site-licensed software on your laptop that needs to connect to our license server, before mapping a network drive, or before starting your Remote Desktop client.
Table of Contents:
How do I install the VPN client on Windows OS (applies to IE, Edge, Firefox, and Chrome)
- To begin, log into the VPN website with your WatIAM credentials.
- Wireless users: https://cn-vpn.uwaterloo.ca

- Select Save.
- Go to your Downloads folder (via File Explorer) and double-click on the installation file.
- Click Next to start AnyConnect Secure Mobility Client Wizard.
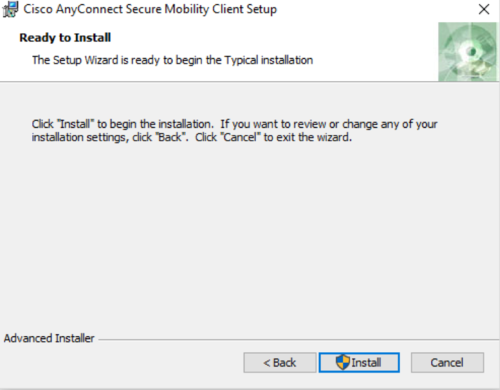
- Click Install on the Ready to Install window.
- Accept End User License Agreement and click Next.

- Click the Finish button.
Using the VPN client after installation
The installation process only needs to be done once. After the client is installed, you can use the "Start Menu" item to launch the client connection window.
- Search for Cisco AnyConnect in the Windows start menu and launch the application.
- Enter in the server address (cn-vpn.uwaterloo.ca) and click Connect.
- Type in your WatIAM credentials
- In the second password type either push or phone or the two factor authentication (2FA) number given in the DUO app depending on how do you set it up when you setup the 2FA
If you are having issues connecting, please confirm the AnyConnect client settings, including location and log in details.
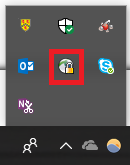
When the VPN client is running, you will see an icon in the taskbar notification area (lower right corner of Windows). This can be used to control the VPN connection:
- Double-click to open the Cisco AnyConnect client
- Right click to close the Cisco AnyConnect client
Settings at a glance
If you already have the Cisco VPN client installed, you can use the following settings to connect:
- Server/connect to address: cn-vpn.uwaterloo.ca
- Username: WatIAM ID
- Password: WatIAM password
- Second Password: push
How to install the VPN client on Mac OS
Settings at a glance
If you already have the Cisco VPN client installed, you can use the following settings to connect:
- Server/connect to address: cn-vpn.uwaterloo.ca
- Username: WatIAM ID
- Password: WatIAM password
- Second Password: push
Installation steps
-
To begin, log in to the VPN website with your WatIAM credentials.
- Wireless users: https://cn-vpn.uwaterloo.ca

- From the VPN download page shown below, click Download for macOS to download the installer disk image.
- Go to your downloads folder and double-click on the installer image, which will have a name such as anyconnect-macos-4.6.01103-core-vpn-webdeploy-k9.dmg. This will mount and open the image and you should see the following window:

- Double-click on the .pkg installer file and you will be taken through the installation process. Click Continue to move through the steps.
- If you are running OS 10.14 (Mojave) you will get the following warning. Click OK to continue.

- At some point in the installation you may get the below dialogue window. If so, click Open Security Preferences and enable Cisco software. Note: you may also get the "Cisco AnyConnect Secure Mobility Client Notification" shown below. In which case, click on the Allow button, which will also take you to the Security & Privacy settings dialogue.

- To authorize Cisco's apps, you will need to authorize them in the Security & Privacy settings shown below.

- Click on the lock icon on the bottom left and enter your admin credentials to unlock so you can make changes.
- Click on the Allow button to allow software from Cisco.After which you can close this preference window.
- You should eventually get to the final screen shown below. Click Close.
- Depending on your OS version you might get the following dialogue after closing the installer. Clicking on Move to Trash will delete the installer disk after closing. If you don't get the above option, you will have to eject the installer volume and delete the installer disk manually.

Running the Mac VPN client
You do not need to repeat the installation process each time you want to use the VPN. The installation process installs the Cisco VPN client into the Applications folder. You can run it from there or add it to your Dock.
If you haven't connected before, you will need to specify the VPN server cn-vpn.uwaterloo.ca as shown below.

- Select "cn-vpn.uwaterloo.ca". This brings you to a login window where you can authenticate with your WatIAM credentials.

- Successful authentication to the VPN client will result in the following dialogue appearing for a short time in the top-right corner of the screen.

- When the client is active, the VPN connection can be controlled from the Menu Bar icon:

How do I install the VPN in Ubuntu (Linux)
- First you will need to login to the webpage using the appropriate link below:
- Wireless users: https://cn-vpn.uwaterloo.ca

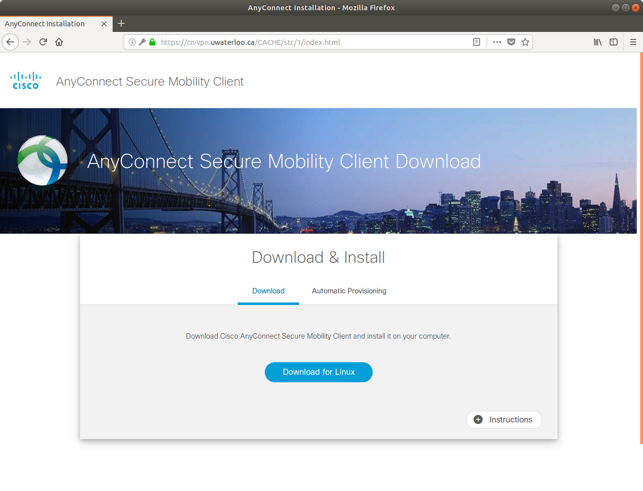
- After logging in, download the “Cisco AnyConnect Secure Mobility Client” by clicking “Download for Linux” and download the script file “anyconnect-linux64-4.6.01103-core-vpn-webdeploy-k9.sh”

- Another window will pop up and it will prompt to save the installer.

- Open up the command terminal (crtl+alt+t) and input these commands:
~$ cd Downloads/ (makes it so that the directory is downloads and allow interaction with the installer file)
Ls – l (looks through the downloads folder to look for the script file)
Chmod o+x anyconnect-linux64-4.6.01103-core-vpn-webdeploy-k9.sh (marks the script as an executable file)
Sudo ./anyconnect-linux64.4.6.01103-core-vpn-webdeploy-k9.sh (this runs the script)
- Input the computer password when prompted (it will prompt you to do this after you run the script).

- After you enter the password, the program should be fully installed on your computer. You can then open the client by selecting “Show applications” on the bottom right of your screen. Then click on Cisco AnyConnect.

- After Cisco AnyConnect opens, you can then type in cn-vpn.uwaterloo.ca to connect to the UWaterloo server.

- Click “Connect”, then it will prompt you to enter your credentials, you will need to input your WatIAM user ID and password and the second password from the two factor authentication. Then click “Connect”.

- You should now be connected! If you want to make sure you are connected, then you can click on Cisco AnyConnect, which should show you it as “Connected”.
How do I connect to the VPN with the Two factor authentication (2FA)?
The installation process only needs to be done once. After the client is installed, you can use the "Start Menu" item to launch the client connection window.
-
Search for Cisco AnyConnect in the Windows start menu and launch the application.
-
If you haven't connected before, you will need to specify the VPN server:
-
cn-vpn.uwaterloo.ca : Accessed from off-campus and from wireless when on-campus
-
vpn-inside.private.uwaterloo.ca : Accessed from on-campus, wired connections only

-
-
Click Connect.
-
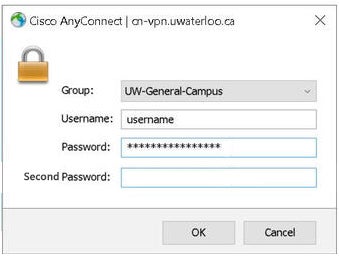
This brings you to a login window where you can authenticate with your credentials. Under the 'Group' drop-down menu, select 'UW-General-Campus'. Note: 'UW-General-Campus' is the recommended profile. 'UW-Campus' should be used as an alternative profile.
-
Enter your 8-character quest username into the username field

-
-
Two-factor authentication (2FA) will be required in order to connect to the VPN starting November 17, 2020. In the 'Second Password' field, enter one of the following, then click OK.
-
For Duo Mobile push: type in the second password field the word 'push' (without quotation marks) and it will send you the aproved/denied access to your phone
-
For Duo hardware token or Duo app: type your 6-digit code in the second password field
-
For Duo Bypass code: type your bypass code in the second password field
-
For Yubikey: enter the code generated by touching the Yubikey
-
For Phone Call: type in the second password field the word 'phone' (without quotation marks)
-
If you are having issues connecting, please confirm the AnyConnect client settings, including location and log in details.
When the VPN client is running, you will see an icon in the taskbar notification area (lower right corner of Windows). This can be used to control the VPN connection:
-
Right click to close the Cisco AnyConnect client
- Double-click to open the Cisco AnyConnect client
