Calendar
Table of Contents
- Calendar using Office portal
- Calendar using Outlook client
- Sharing
- Creating appointments and meetings
Calendar using Office portal (office.com)
Calendar basics
Viewing your calendar
- Login to the Office portal (https:\\office.com) with your WatIAM userid and password.
- Click the blue waffle menu button in the top left corner and select Calendar.

- The first thing you will want to do is pick a view: Day, Work week, Week or Month. Simply select the view from the toolbar.
- To move to a specific month and day, you can use the mini monthly calendar.
- Alternatively, you can use the arrow buttons on the toolbar to move forward or backward through the current view, by one day, week or month at a time.
- To go back to today's date, click the Today button in the toolbar.

Setting your work hours
Set the days and hours you typically work in Outlook Web App to make scheduling meetings at appropriate times of day easier. Days and hours outside of your work hours will be grayed (or blued) out in your calendar. The scheduling assistant in Outlook uses working hours to suggest times for meetings, enabling colleagues to schedule meetings during times you are likely available.
- Click on the Settings (gear icon) button and select Options.

- Under Calendar, select Calendar appearance.
- Under Show work week as:, check off the days of the week you typically work.
- Under Set your working hours:
- In the Start time field, enter the time you typically start work each day.
- In the End time field, enter the time you typically end work each day.
- Click Save.

There may be times when you want to print your calendar. For example, you may want to print your calendar to post on your door or post a meeting room's calendar on the room's door.
- Browse through your calendar to the date range you'd like to print.
- Click Print.

- Select the View you'd like to print.
- If you selected Week or Work week, select the Layout you'd like your calendar printed in.
- In the Print from: and Print to: fields, enter the time range you'd like to print.
- Optionally, select the Print detailed agenda and calendar checkbox.
- Click Print.

Your browser's print dialog box will open:
- Select the printer.
- Set any additional printing settings.
- Click Print or OK.
Calendar Sharing
Adding a calendar
In outlook office portal, you can add other people’s calendars, as well as calendars for resources, to see when they are free/busy.
- Click on Add Calendar and select From directory.

- In the From directory: field start typing the name of the person or resource whose calendar you want to open. An auto-complete list will display people and resources you've previously emailed or booked. If the person or resource does not appear in the auto-complete list, click Search Directory. Click on an entry to add it to the From directory: field.

- Click Open.
- The calendar will appear overlaid on your calendar in a second colour. These calendar now appear in your list of calendars for future use. You can click on the person's or resource's name to show or hide the calendar. You can do the same with your own calendar.

Sharing your calendar
By default, other people will be able to see whether your time is marked as free or busy, but they will not be able to see any details of your appointments and meetings. For most, this is the preferred option. You can provide increased access to your calendar if your colleagues need to know the subject or all of the details of your meetings.
- Click Share.
- In the Share with: field start typing the names or userids of the people you want to share your calendar with. An auto-complete list will display people you've previously emailed. If a person does not appear in the auto-complete list, click Search Directory. Click on an entry to add it to the Share with:field.

- In the dropdown list next to each person's name, select the level of access you'd like them to have.
Limited details: Ability to view meeting subject and location only.
Full details: Ability to view all meeting details. - Click Send. An email will be sent to each person informing them that you've shared your calendar.

Managing access to your calendar
To view who has access to your calendar and make updates:
- Under Your calendars, right-click on Calendar and select Permissions...

- To change a person's access level, use the dropdown list next to their name.
To remove a person's access, click the X next to their name. - Click Save. An email will be sent to each person whose access you've changed. lt="Calendar permissions pane" height="359" src="https://uwaterloo.ca/information-systems-technology/sites/ca.information-systems-technology/files/uploads/images/calendar-shared-with.png" width="605" />
Creating appointments and meetings
Creating an event
- Click on the arrow next to New and select Calendar event.

-
The create event pane will open. In the first field, enter a title for the event.
-
In the location field, enter the location or click Add room to book a room.

-
In the Start and End fields:
-
Select the start date of the event from the dropdown calendar.
-
Select the end date of the event from the dropdown calendar.
-
Enter the start and end times of the event or select the All day checkbox.
-
Or use the scheduling assistant to find a time people and rooms are available.
-
-
If applicable, select the Private checkbox.

-
If the event is recurring on a regular schedule, add a recurrence in the Repeat field.
-
In the Reminder dropdown box, select the amount of time before the event, or None, you'd like to receive a pop-up reminder.

-
To receive a reminder by email:
- Below the Reminder dropdown, click Add an email reminder.
- In the Email reminder dropdown, select the amount of time before the event you'd like the email reminder sent.
- In the Send reminder to dropdown, select who the email reminder is sent to: Me or All attendees.
- In the Reminder message to send field, enter the message you'd like included in the reminder email.
- Click Close.

-
In the Show as dropdown box, select how the event will appear in your calendar: Free, Working elsewhere, Tentative, Busy, or Away.

-
In the WYSIWYG text box, add any additional event details.
-
To attach a file, click the Attach button.
-
For an appointment, click Save.
For a meeting, invite people to the event and then click Send.

Booking a room
If a room is setup as a resource in Exchange, you can book the room by inviting it to the event. Typical meeting rooms will automatically accept the request if the room is available during the event time. Rooms configured to require approval will tentatively accept the request and the booking delegate must accept or decline the request.
- Click Add room.
- Select a room from the list of resources available during the event time.

- Next to location, add any additional location details.

Adding a recurrence
If an appointment or meeting is repeating on a regular schedule, you can add a recurrence instead of creating an event for each instance.
Example 1: Bi-weekly meetings
To schedule a meeting that occurs every other Tuesday during the spring term (May-August):
- In the Repeat dropdown, select Other...

- In the Occurs dropdown, select Weekly. Note: Each option will present different fields below.

- In the Every field enter 2.
- Select the Tuesday checkbox.
- Click Save.

- There are now two more fields:
- In the From: field, enter the start date for the recurring appointments/meetings: first Tuesday in May. (Note: the default is the date from the Start field)
- In the To: field, enter the end date for the recurring appointments/meetings: last Tuesday in August (Note: the default is None)

Example 2: Twice per month meetings
To schedule an appointment or meeting that occurs every second and fourth Tuesday of the month indefinitely, you need to create two events that recur monthly, one for the second Tuesday and one for the fourth Tuesday.
- In the Start field, select the date of the first meeting on the second Tuesday of the month. The options now available in the Repeat dropdown list are based on the date in this field.
- In the Repeat dropdown, select Every second Tuesday.

- Repeat for the fourth Tuesday of the month.
Inviting people
-
Under People, click the Add attendees (+) button.

-
To add people:
-
In the Required attendees: field, enter the email addresses of the people you'd like to invite to the meeting, separated by semi-colons. As you type, an auto-complete list will display people you've previously emailed. Click on an entry to add that person to the Required attendees: field.

-
Or if you've added them to your contacts list, under Your contacts, double-click on the names or click the plus sign (+) next to the names of the people you'd like to invite to the meeting.

-
If they have a UWaterloo Exchange account (faculty, staff, grad student), in the Search People box, enter their names or email addresses and press Enter. Double-click on the names or click the plus sign (+) next to the names of the people you'd like to invite to the meeting.

-
-
Click Save.
Using the scheduling assistant
The scheduling assistant is a useful tool for determining meeting times. It allows you to simultaneously view the calendars of all invited people (if they have a UWaterloo Exchange account) and rooms.
- Next to People, click Scheduling assistant.

- In the Attendees: field, start typing the names or email addresses of the people you'd like to invite to the meeting, an auto-complete list will display people you've previously emailed. If a person does not appear in the auto-complete list, click Search Directory. Click on an entry to add it to the Attendees: field.

- Click the Add room button.
- If there is a particular room you'd like to use, click Show all rooms and then click on the room.
Otherwise, click on Any available room. The first available room during the time slot you pick will be selected. Click on # others available to switch to the next available room.
- Browse through the calendar to find a time with no or few conflicts.
Note: Unless someone has shared their calendar with you, you will not see full event details. You will only be able to see what times they have appointments/meetings scheduled and whether those times are listed as Free, Working elsewhere, Tentative, Busy, or Away. - Click on the time you'd like the meeting to begin. The Start and End fields will be updated accordingly.
- Change the end time to adjust the length of the event. The default is one hour.
- Click OK.

Managing appointment and meetings
When you are invited to a meeting, you will receive an email and an event will appear in your calendar marked Tentative. Notice that the meeting invitation shows a miniature calendar symbol.
It is a good practice to respond to meeting requests as you receive them. This helps to ensure that the most up to date information is in your calendar, and will help to keep meeting requests from cluttering your inbox.
- Open the meeting request email. This email includes the meeting details and whether there are any existing events in your calendar that conflict with this meeting request.
- Select your response by clicking Accept, Tentative or Decline.
Note: If you decline a meeting, it will disappear completely from your calendar. - Select Edit the response before sending, Send the response now or Don't send the response.
Note: If you don't send the response, the meeting organizer will have no way of knowing whether you plan to attend or not.
Updating your response to a meeting request
- Locate the meeting in your calendar and click on it.
- Select your response, by clicking Accept, Tentative or Decline.
Note: If you decline a meeting, it will disappear completely from your calendar. - Select Edit the response before sending, Send the response now or Don't send the response.
Note: If you don't send the response, the meeting organizer will have no way of knowing whether you plan to attend or not.

If you decline a meeting, it will disappear completely from your calendar. Within 30 days of declining the meeting, you can retrieve it from your Deleted Items folder and update your response.
- Select your Deleted Items folder.
- There will be two items in your Deleted Items folder related to the declined meeting: a meeting request email and a calendar event. Select the meeting request email.
- Select your response, by clicking Accept or Tentative.
- Select Edit the response before sending, Send the response now or Don't send the response.
Note: If you don't send the response, the meeting organizer will have no way of knowing whether you plan to attend or not.

Managing your appointments and meetings
Updating appointments and meetings
If your appointment/meeting details change or you would like to include further details, you can edit the event in your calendar.
- Locate the event in your calendar and click on it.
- Click Edit.
- If it is a recurring appointment/meeting, select whether you want to Edit occurrence or Edit series.

- Make your changes/updates.
- For appointments, click Save.
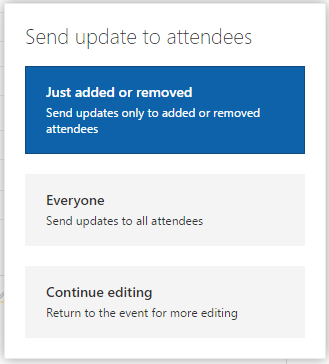
For meetings, click Send. - If you've added or removed people from a meeting, select whether you would like to send updates to those Just added or removed or to Everyone.
Checking responses to your meeting request
After you send out a meeting request, recipients have the option to respond with Accept, Tentative, or Decline. They also have the option of sending you an email with their response. If they do not send you the email, you will not know whether they selected Accept, Tentative, or Decline, and their status will remain No response.
To view responses:
- Locate the meeting in your calendar and click on it.
- The pop-up box displays how many people responded with each option and how many haven't responded.
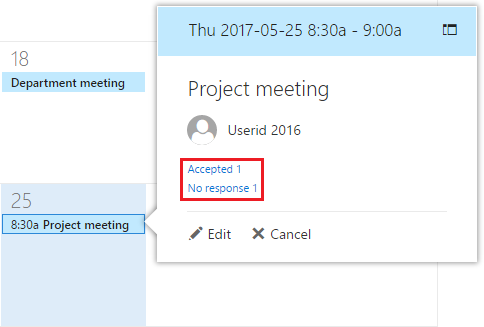
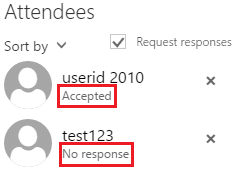
- To view how each person responded, click on the response information.
- Each person's response is listed under their name.
Calendar using Outlook client
Calendar Basics
Viewing your calendar
- Open the Outlook client.
- Click on the calendar icon.
Browsing through different dates
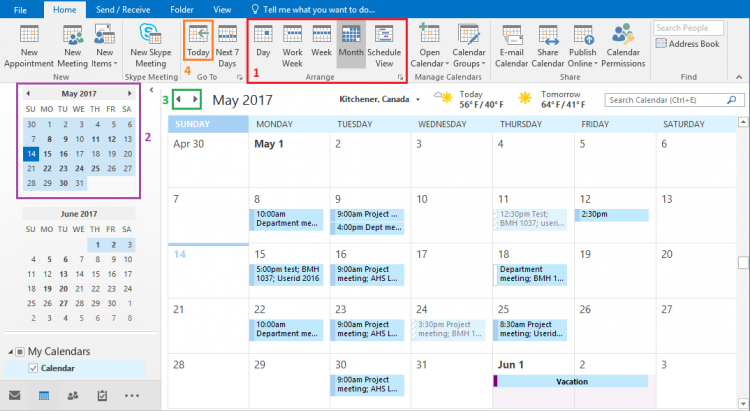
- The first thing you will want to do is pick a view: Day, Work week, Week, Month or Schedule View. Simply select the view from the Home ribbon.
- To move to a specific month and day, you can use the mini monthly calendar.
- Alternatively, you can use the arrow buttons on the toolbar to move forward or backward through the current view, by one day, week or month at a time.
- To go back to today's date, click the Today button in the Home ribbon.
Setting your work hours
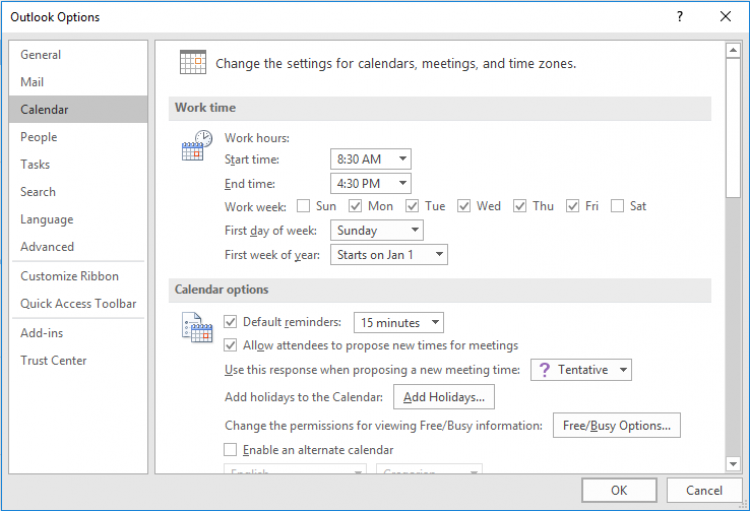
Set the days and hours you typically work in Outlook to make scheduling meetings at appropriate times of day easier. Days and hours outside of your work hours will be grayed (or blued) out in your calendar. The scheduling assistant in Outlook uses working hours to suggest times for meetings, enabling colleagues to schedule meetings during times you are likely available.
- Click on the File tab.
- Select Options.
- Select Calendar.
- In the Work time section:
- In the Start time: field, enter the time you typically start work each day.
- In the End time: field, enter the time you typically end work each day.
- In the Work week: field, check off the days of the week you typically work.
- Click OK.
Printing your calendar
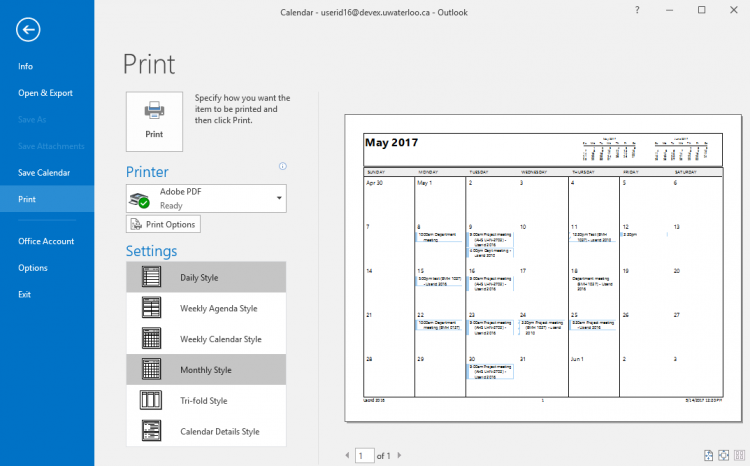
There may be times when you want to print your calendar. For example, you may want to print your calendar to post on your door or post a meeting room's calendar on the room's door.
- Browse through your calendar to the date range you'd like to print.
- Click on the File tab.
- Select Print.
- Under Settings, select the layout you'd like to print the calendar in: Daily Style, Weekly Agenda Style, Weekly Calendar Style, Monthly Style, Tri-fold Style, or Calendar Details Style.
- Select the printer.
- Set any additional printing settings.
- Click Print.
Calendar sharing
Adding a calendar
In Outlook, you can add other people’s calendars, as well as calendars for resources, to see when they are free/busy.
- From Address Book... and select Open CalendarIn the Home tab, click on
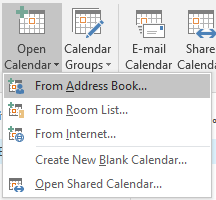
- In the Global Address List, search for the calendars you'd like to add. Double-click on their names to add them to the Calendar field.
- Click OK.
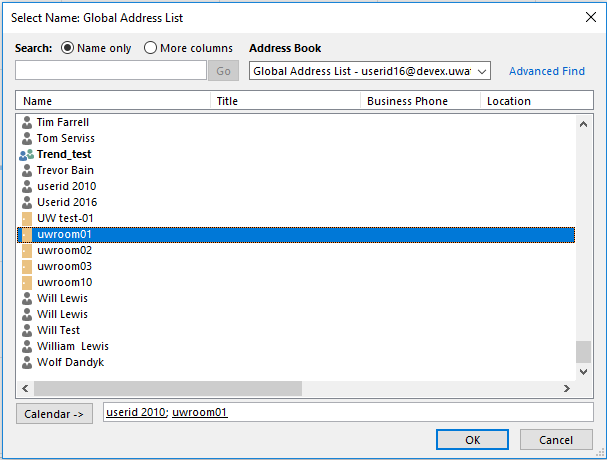
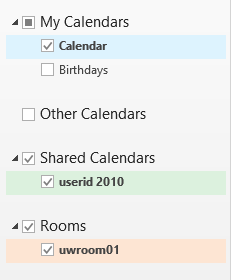
By default, the calendars will open side-by-side.
- These calendar now appear in your list of calendars for future use. You can click on the person's or resource's name to show or hide the calendar. You can do the same with your own calendar.
Sharing your calendar
By default, other people will be able to see whether your time is marked as free or busy, but they will not be able to see any details of your appointments and meetings. For most, this is the preferred option. You can provide increased access to your calendar if your colleagues need to know the subject or all of the details of your meetings.
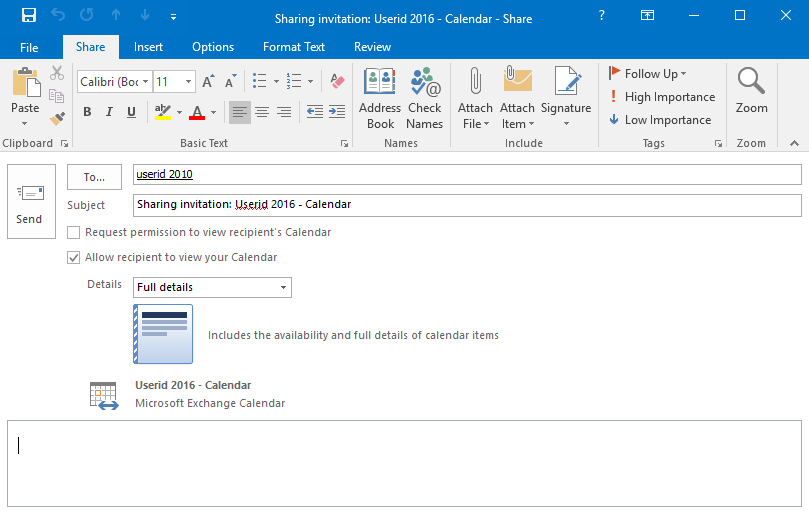
- In the Home ribbon, click Share Calendar.

- In the To: field, enter the email addresses of the people you want to share your calendar with.
Or click on the To: button. In the Global Address List, search for the people you'd like to share your calendar with. Double-click on their names to add them to the To field. - Click OK.
- In the Details field, select the level of access you'd like them to have.
Limited details: Ability to view meeting subject and location only.
Full details: Ability to view all meeting details. - Click Send. An email will be sent to each person informing them that you've shared your calendar.
Managing access to your calendar
To view who has access to your calendar and make updates:
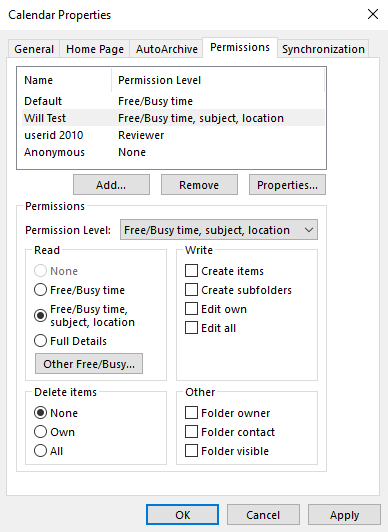
- In the Home ribbon, click Calendar Permissions.

- To change a person's access level:
- Select their name.
- In the Permission Level: field, select a new level of access.
- To remove a person's access:
- Select their name.
- Click the Remove button.
- Click Apply.
- Click OK.
Creating appointments and meetings
Creating an event
- In the Home ribbon, click New Appointment or New Meeting.
A new window will open.
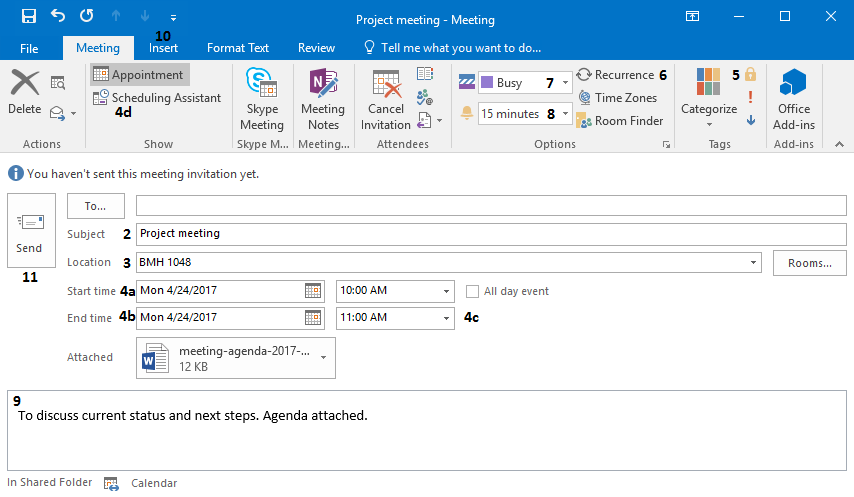
- In the Subject field, enter a title for the appointment/meeting.
- In the Location field, enter the location, or if you're scheduling a meeting click Rooms... to book a room.
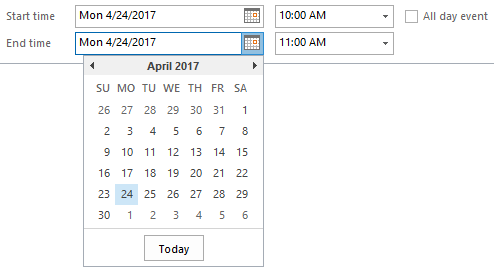
- In the Start time and End time fields:
-
Select the start date from the first dropdown calendar.
-
Select the end date from the second dropdown calendar.
-
Enter the start and end times of the event or select the All day checkbox.
-
Or use the scheduling assistant to find a time people and rooms are available.
-
-
If applicable, click the Private button.
-
If the event is recurring on a regular schedule, click the Recurrence button to add a recurrence.
-
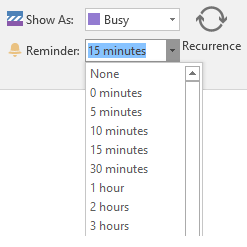
In the Show As dropdown box, select how the event will appear in your calendar: Free, Working Elsewhere, Tentative, Busy, or Out of Office.
-
In the Reminder dropdown box, select the amount of time before the event, or None, you'd like to receive a pop-up reminder.
-
In the WYSIWYG text box, add any additional event details.
-
To attach a file, select the Insert tab and click the Attach File button.
-
For an appointment, click Save & Close.
For a meeting, invite people to the event and then click Send.
Adding a Room
- Open Outlook Calendar.
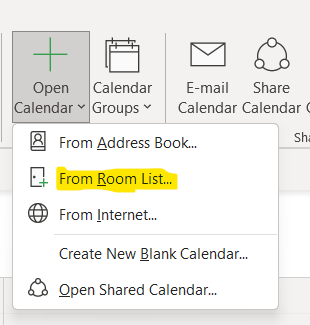
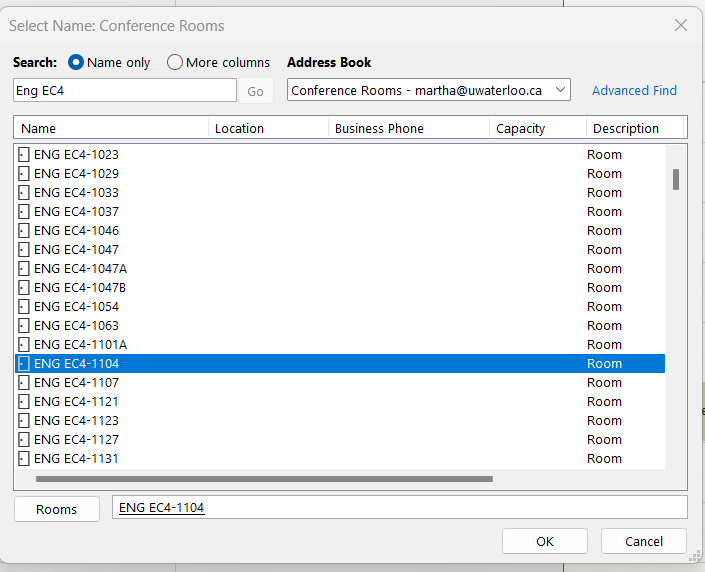
- On the top menu, look for the Open Calendar and from the drop-down menu, select ‘From Room List’.
- A list of rooms that can be added to your Outlook Calendar will be listed here.
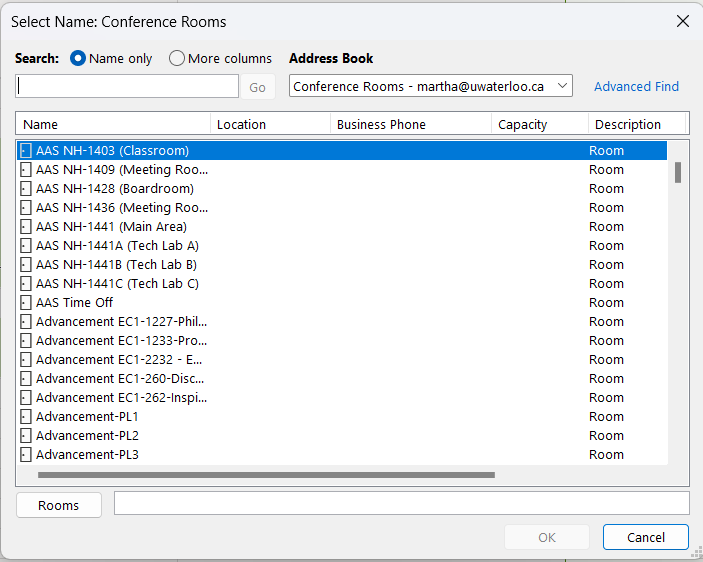
- On the Search box type Eng and the room you are looking for then double click the room you’d like to open and press ok.
- On the right hand side of your screen, you’ll see the room has been added to your calendar.
Booking a room
If a room is set-up as a resource in Exchange, you can book the room by inviting it to the event. Typical meeting rooms will automatically accept the request if the room is available during the event time. Rooms configured to require approval will tentatively accept the request and the booking delegate must accept or decline the request.
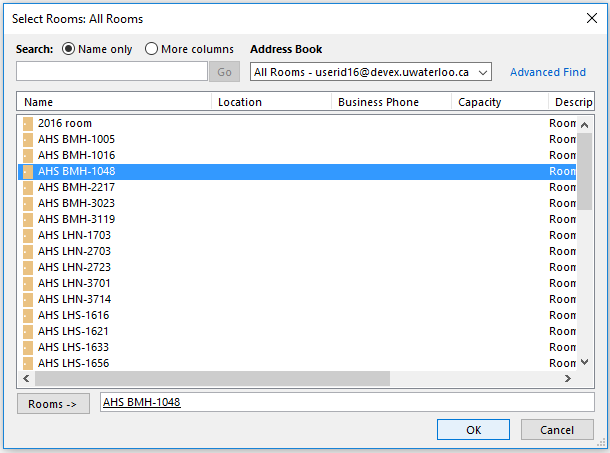
- Click Rooms...
- Search for the room you'd like to add. Double-click on the room to add it to the Rooms field.
- Click OK.
Adding a recurrence
If an appointment or meeting is repeating on a regular schedule, you can add a recurrence instead of creating an event for each instance.
Example 1: Bi-weekly meetings
To schedule a meeting that occurs every other Tuesday during the spring term (May-August):
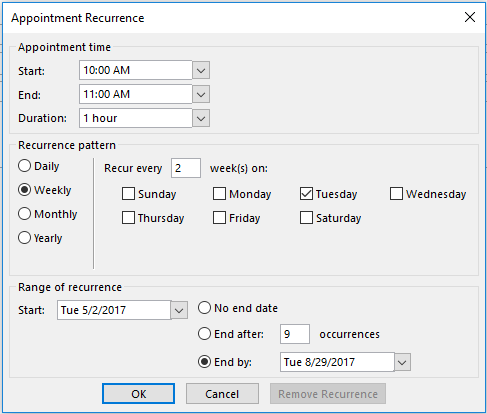
- Click the Recurrence button.

The Appointment Recurrence dialog box will open.
- In Recurrence pattern section:
- Select Weekly. Note: Each option will present different fields.
- In the Recur every field enter 2.
- Select the Tuesday checkbox.
- In the Range of recurrence section:
- In the Start: field, select the start date for the recurring meetings: first Tuesday in May. (Note: the default is the date from the Start time field of the appointments/meetings)
- Select the End by: radio button.
- In the End by: field, select the end date for the recurring appointments/meetings: last Tuesday in August.
- Click OK.
Example 2: Twice per month meetings
To schedule an appointment or meeting that occurs every second and fourth Tuesday of the month indefinitely, you need to create two events that recur monthly, one for the second Tuesday and one for the fourth Tuesday.
- Click the Recurrence button.

The Appointment Recurrence dialog box will open.
- In Recurrence pattern section:
- Select Monthly. Note: Each option will present different fields.
- Select the second radio button.
- In the first dropdown box, select second.
- In the second dropdown box, select Tuesday.
- In the of every field, enter 1.
- In the Range of recurrence section:
- In the Start: field, select the date of the first meeting on the second Tuesday of the month. (Note: the default is the date from the Start time field of the appointments/meetings)
- Select the No end date radio button.
- Click OK.

- Repeat for the fourth Tuesday of the month.
Inviting people
- In the To: field, enter the email addresses of the people you'd like to invite to the meetings, separated by semi-colons. As you type, an auto-complete list will display people you've previously emailed. Click on an entry to add that person to the To: field.

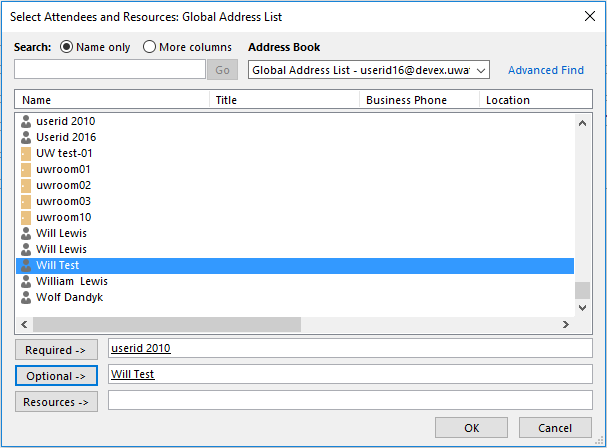
- If they have a UWaterloo Exchange account (faculty, staff, grad student), click the To: button. In the Global Address List, search for the people you'd like to invite to the meeting. Select their names and then click the Required or Optional button to add them to those fields. Click OK.
Using the scheduling assistant
The scheduling assistant is a useful tool for determining meeting times. It allows you to simultaneously view the calendars of all invited people (if they have a UWaterloo Exchange account) and rooms, and it will suggest meetings times with the fewest conflicts.
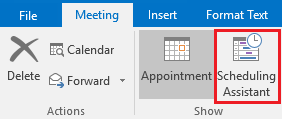
- In the Meeting tab, click Scheduling Assistant.
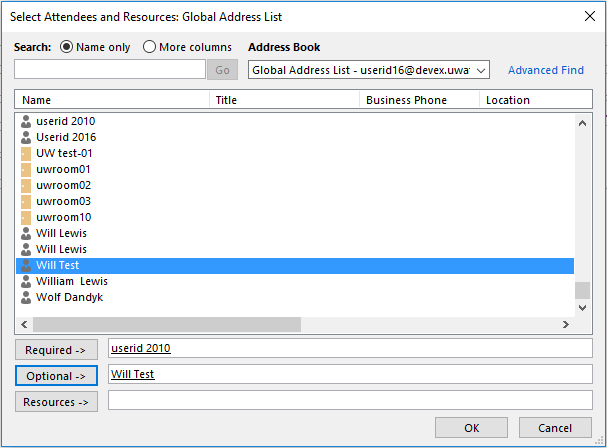
- Click the Add Attendees... button.
- In the Global Address List, search for the people you'd like to invite to the meeting. Select their names and then click the Required or Optional button to add them to those fields.
- Click OK.
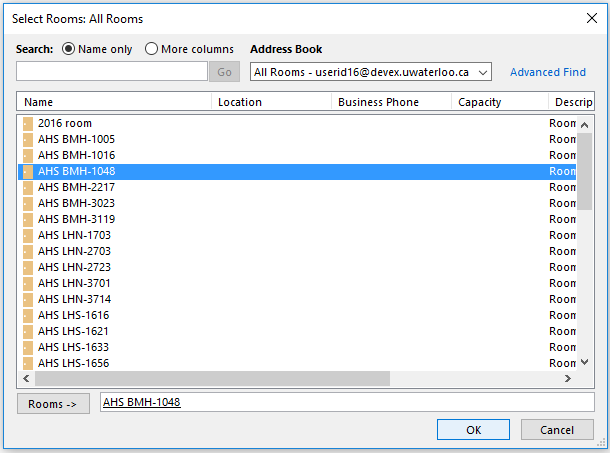
- Click the Add Rooms... button.
- In the Global Address List, search for the rooms you'd like to hold the meeting in. Double-click on the rooms to add them to the Rooms... field.
- Click OK.
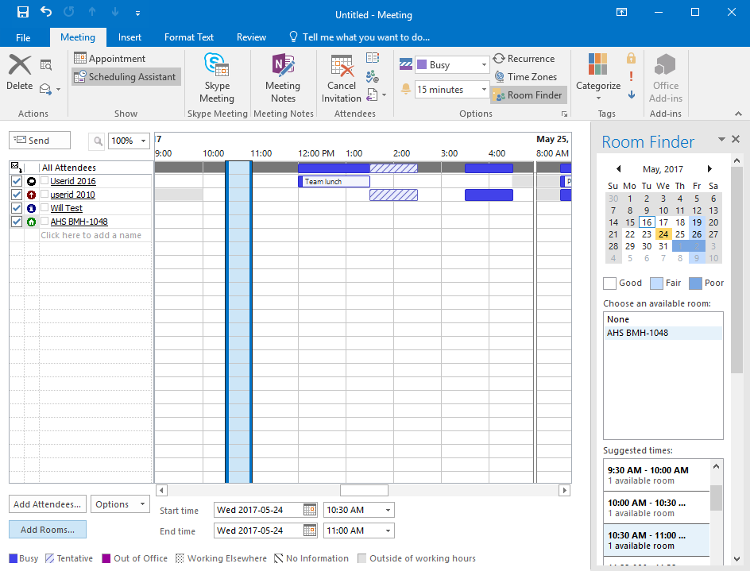
- Browse through the calendar to find a time with no or few conflicts.
Note: Unless someone has shared their calendar with you, you will not see full event details. You will only be able to see what times they have appointments/meetings scheduled and whether those times are listed as Free, Working Elsewhere, Tentative, Busy, or Out of Office.
- Click on the time you'd like the event to begin. The Start time and End time fields will be updated accordingly.
- Change the end time to adjust the length of the meeting. The default is a half hour.
- Or select a time from the Suggested times: section.
- Click Send.
Managing appointments and meetings
Receiving meeting requests
When you are invited to a meeting, you will receive an email and an event will appear in your calendar marked Tentative. Notice that the meeting invitation shows a miniature calendar symbol.
Responding to meeting requests
It is a good practice to respond to meeting requests as you receive them. This helps to ensure that the most up to date information is in your calendar, and will help to keep meeting requests from cluttering your inbox.
- Open the meeting request email. This email includes the meeting details and whether there are any existing events in your calendar that conflict with this meeting request.
- Select your response by clicking Accept, Tentative or Decline.
Note: If you decline a meeting, it will disappear completely from your calendar. - Select Edit the Response before Sending, Send the Response Now or Do Not send a Response.
Note: If you don't send the response, the meeting organizer will have no way of knowing whether you plan to attend or not.
Updating your response to a meeting request
- Locate the meeting in your calendar and right-click on it.
- Select your response, by clicking on Accept, Tentative or Decline.
Note: If you decline a meeting, it will disappear completely from your calendar. - Select Edit the Response before Sending, Send the Response Now or Do Not send a Response.
Note: If you don't send the response, the meeting organizer will have no way of knowing whether you plan to attend or not.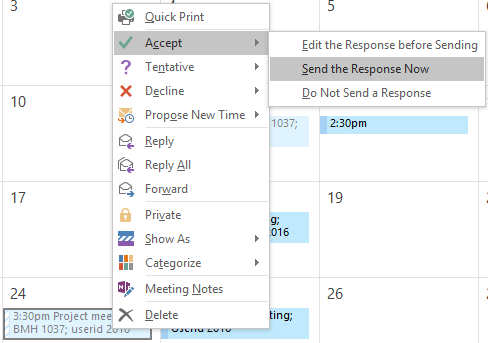
If you decline a meeting, it will disappear completely from your calendar. Within 30 days of declining the meeting, you can retrieve it from your Deleted Items folder and update your response.
- Select your Deleted Items folder.
- There will be two items in your Deleted Items folder related to the declined meeting: a meeting request email and a calendar event. Select the meeting request email.
- Select your response, by clicking Accept or Tentative.
- Select Edit the Response before Sending, Send the Response Now or Do Not send a Response.
Note: If you don't send the response, the meeting organizer will have no way of knowing whether you plan to attend or not.

Managing your appointments and meetings
If your appointment/meeting details change or you would like to include further details, you can edit the event in your calendar.
- Locate the event.
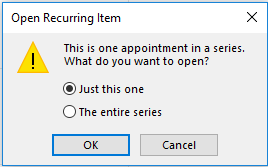
- If it is a recurring appointment/meeting, select whether you want to update Just this one or The entire series. Click OK.
- Make your changes/updates.
- For appointments, click Save & Close.
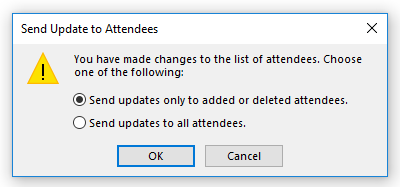
For meetings, click Send Update. - If you've added or removed people from a meeting, select whether you would like to Send updates only to added or deleted attendees or Send updates to all attendees. Click OK.
After you send out a meeting request, recipients have the option to respond with Accept, Tentative, or Decline. They also have the option of sending you an email with their response. If they do not send you the email, you will not know whether they selected Accept, Tentative, or Decline, and their status will remain None.
To view responses:
- Locate the meeting in your calendar and double-click on it.
- In the Meeting tab, click Tracking.