At Mechanical and Mechatronics Engineering (MME) we have a hybrid configuration for premises and cloud email service. The cloud service is office 365 and the premises is for distribution lists.
Table of Contents Email
- How do I setup Outlook email
- How do I setup outlook in MacOs
- How do I configure email in mobile devices
- How to add a shared mailbox to my outlook in windows
- How to add a shared folder from another person inbox in outlook
- Schedule email delivery for later date
- How to recover accidentally delete emails
- Setup a forward email
- Stop a forwarding
- How to create a signature
- How to archive you email to reduce mailbox size
Connect email setup
Configure Outlook (Windows)
Note: These instructions are for Microsoft Windows 11 and Office 2019/2021
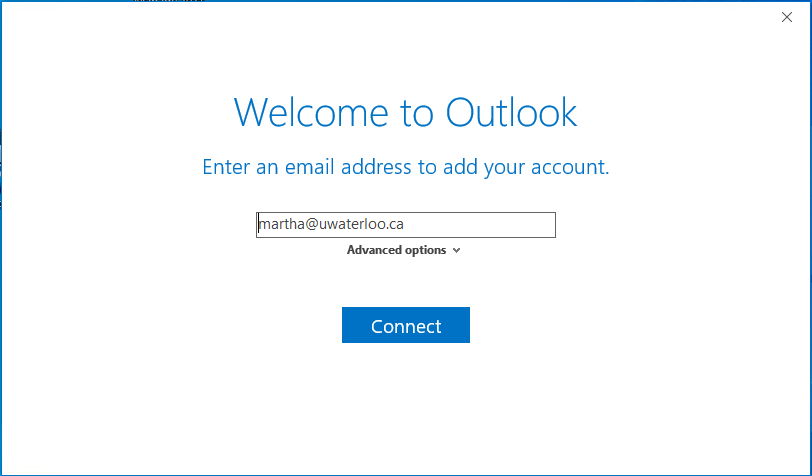
If this is the first time you open Outlook it will start a set up wizard and follow the instructions:
1. Open Outlook and if you email is not already there type userid@uwaterloo.ca
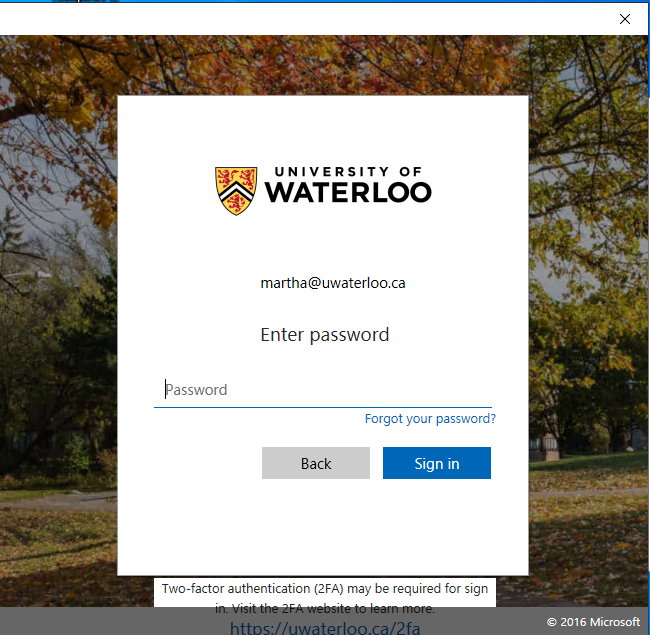
2. In the next window type your password
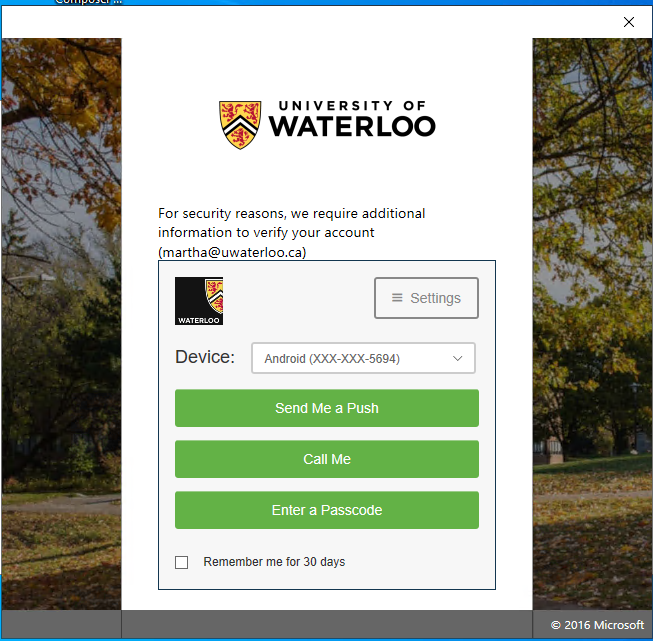
3. In the two factor authentication select the option that you set up when you sign in for this service.
You may be asked Allow this website to configure ... server settings? If so, click Allow.
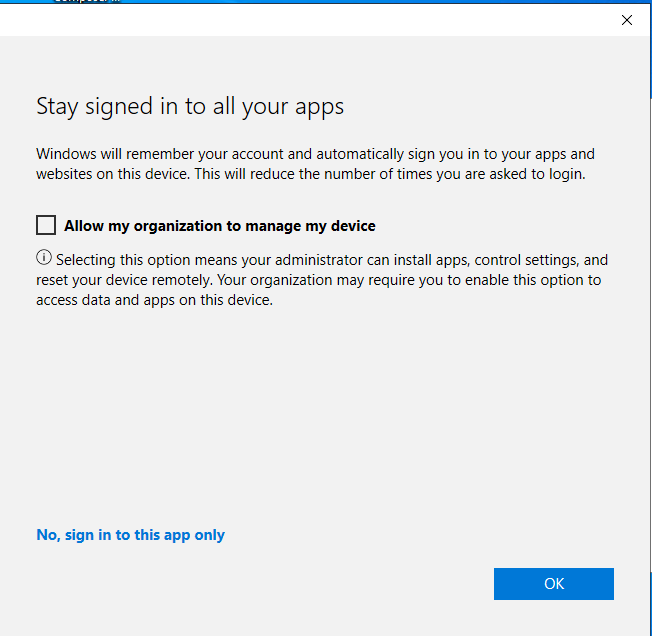
4. In the next windows uncheck allow my organization to manage my device and click OK
5. This will start to setup your email account and click on Done
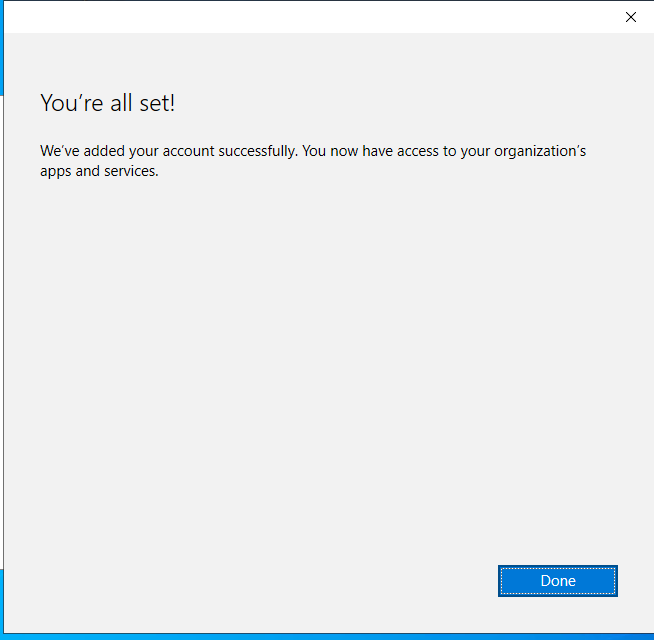
6. It will finish the profile creation now press Ok. If you don't want to setup outlook in your mobile uncheck "Set up Outlook Mobile on my phone too" You are done!

Configure Outlook (Mac)
Add a new connect account to an existing installation of Outlook 2016/2019 for Mac.
- Open Outlook 365/2019
- if you have activate it you office 365 it will recognized your account and install it automatically if not follow this steps
- Click on the Tools menu and choose Accounts.
- Click on the Exchange or Office 365 icon on the Add an Account dialog.
- Enter the following details:
- Email address as: userid@uwaterloo.ca.
- User Name as: "userid@uwaterloo.ca" (no quotations).
- Nexus password.
- Click Add Account.
- All settings should be discovered and completed automatically.
- Choose your new connect account, click on the settings icon and choose Default Account.
- (Optional) Select your old account and click on the minus sign to delete the old email profile.
Configure on Mobile Devices
Mobile devices such as Apple, Android, Blackberry and others change very quickly. Android devices can have different experiences depending on the particular implementation. As such we provide documentation on a best efforts basis and encourage you to read the vendor's documentation for the particulars of your specific device and software versions.
Apple devices
- From the "Settings" application, choose Passwords & Accounts
- On the "Add Account" screen, select Microsoft Exchange
- On the "Exchange setup" screen, enter the following and select "Next":
- Email: userid@uwaterloo.ca
- Description: Anything you wish
- It will send you to the 2FA authentication window
- Type your your WatIAM password
- In the next screen select either send me a push/call me or type a code depending on what you have setup in the 2FA authentication
- Your device will now verify your Exchange account settings
- Tap the Save or Done
Android devices
- Settings
- General
- Accounts
- Add account
- office365
You will need to enter following information to set up your email account:
- Email Address: userid@uwaterloo.ca
- Password: your WatIAM password
- Server Address: outlook.office365.com
Follow the screen instructions. You will need to tap OK a couple of times and tap Activate at the end.
BlackBerry Android devices
Add an email account to the BlackBerry Hub:
- Tap the BlackBerry Hub
- Tap Add account
- Enter your email address, and then tap Manual Setup
- Tap your account type - Microsoft Exchange ActiveSync
- Email address: userid@uwaterloo.ca
- Username: userid@uwaterloo.ca
- Password: WatIAM password
- Server name: outlook.office365.com
- Tap Next
- Tap OK
- Tap Activate
Adding a shared mailbox to Outlook for Windows
New Outlook
-
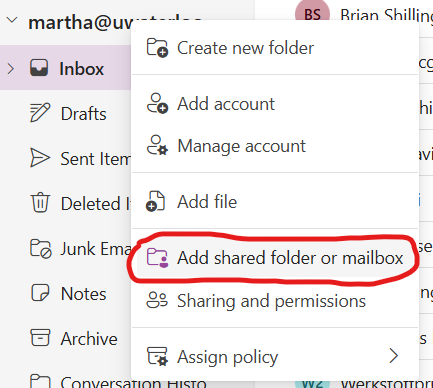
Right-click on your name in the left navigation pane, and then choose Add shared folder or mailbox.
-
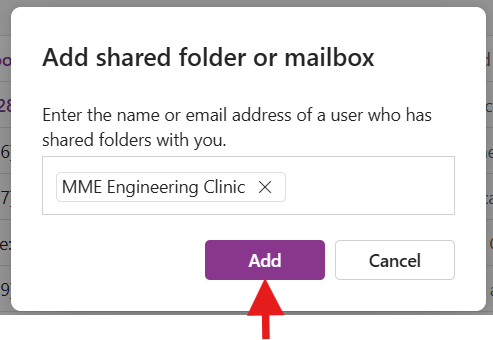
In the Add shared folder or mailbox dialog box, type the name or email address of the shared mailbox, and then click Add.
- You will see it now in your right left hand side under "shared with me"

Outlook 365
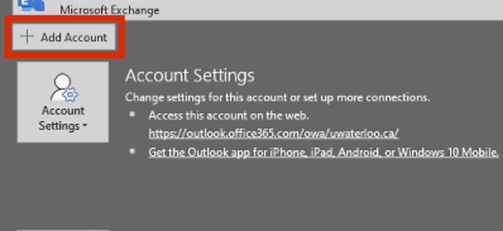
- Open Outlook. Click on the “File” tab near the top-left corner of the window, and then click the “Add Account” button.
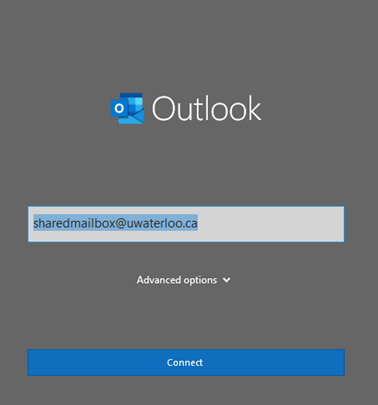
- Type in the email address of the shared mailbox and then click the “Connect” button.
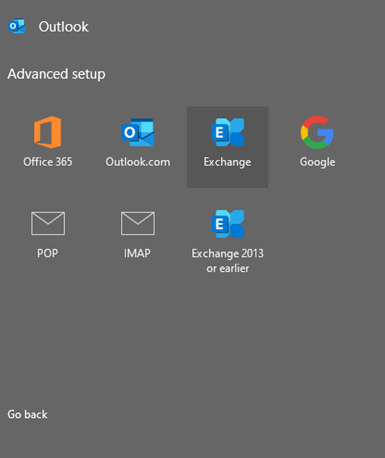
- Click “Exchange” at the Advanced setup window.
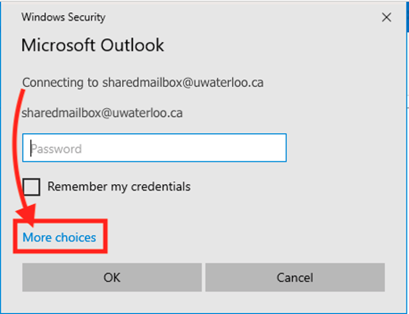
- Click the “More choices” text towards the lower-left corner of the Windows Security prompt window.
- Click “Use a different account”

- Type in >@uwaterloo.ca in the DOMAIN\username or email field and type in your WatIAM password in the password field. Check the box for “Remember my credentials” and then click “OK.”

- A message that the account was successfully added will appear. Click the “Done” button to close the window.

- Close Outlook – wait about 10 seconds – then launch Outlook.
- Be patient when you restart Outlook. Email messages, folders and calendar appointments in the shared mailbox will require time to download from the server.
- The next time you click on the New Email button, you will have the option to send from the shared mailbox or from your own account.
- Try sending a test message from the shared mailbox to ensure the account is working properly.
How to add a shared folder from another person's inbox in Outlook.
Important: To open another person's Mail, Calendar, or People folder, both you and the other person must have a Microsoft Exchange account, and the account owner must grant you permission.
Before email folders/mailboxes can be shared with other users on Office 365, you must set up the account's default folder permissions. If this step is not performed before sharing, the folders will remain inaccessible to those users.
- Right click the folder or mailbox you wish to share and select Permissions...

- In the Permissions For window, check the Folder Visible box then click OK.

Now that default permissions are set up, you can share any folder with another user.
Add shared folder in outlook
-
On Outlook on the File menu

-
Point to Open & Export

-
Then click Other User's Folder...

-
In the Folder Type list, click Inbox, Calendar, or Address Book depending on what the other person shared with you

-
Type the email address of the person who granted you access, click Ok

-
The shared Mail folder appears in the Folder pane. The shared Calendar appears in the Folder pane under the Shared Calendars heading. The shared Address Book appears in the Folder pane under the Shared Contacts heading.
Notes:
-
If you receive the message "Outlook was redirected to the server autodiscover-s.outlook.com to get new settings for your account." choose Always use my response for this server and click Allow.
-
If you have a shared folder selected in the Folder pane, new items that you create are saved in that shared folder.
Manage email
Schedule delivery of an email for a later time
If you need to schedule a particular email to send later on in the day or at another day follow the following instructions:
1. Write the email do you want to send
2. On the ribbon menu select options
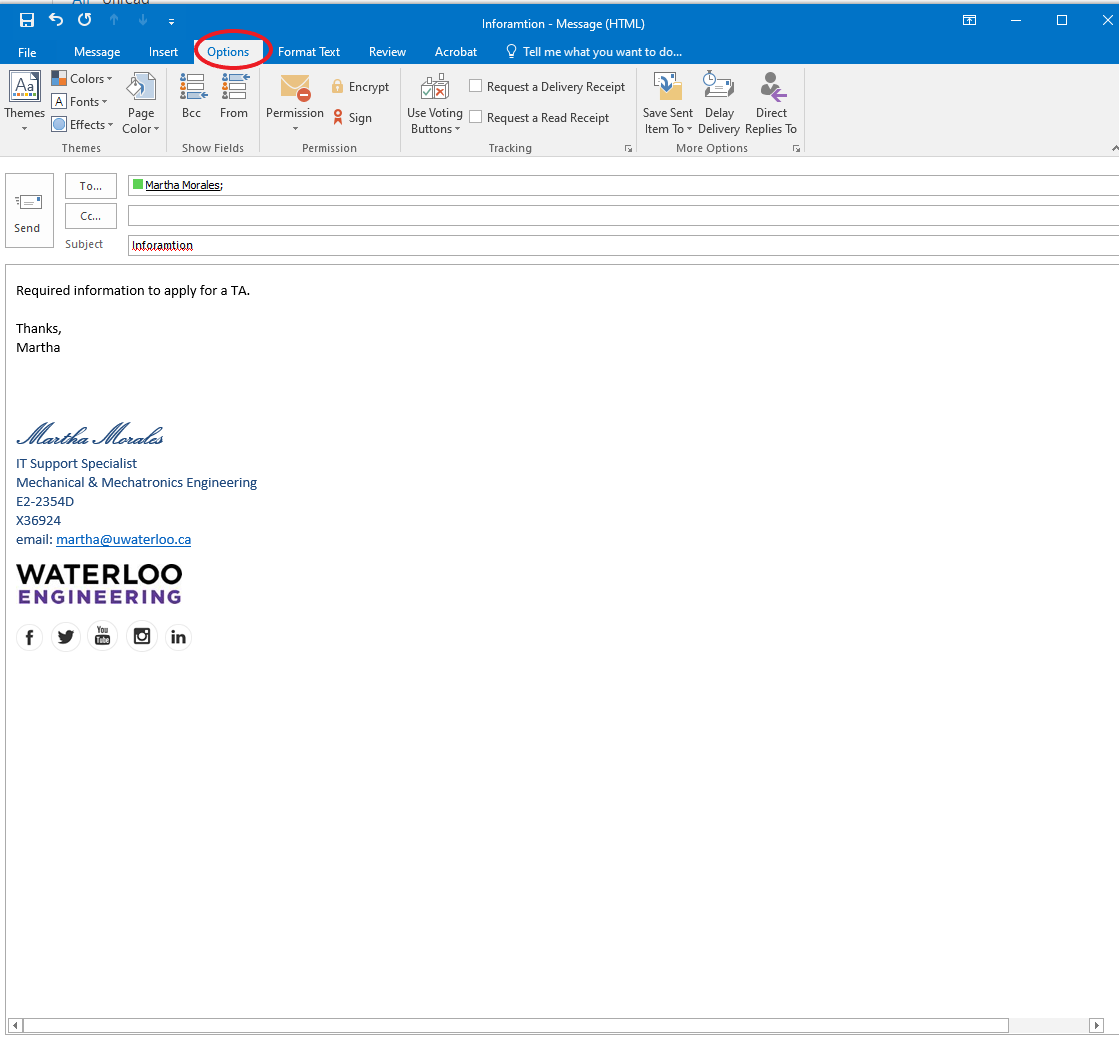
3. Click on Delay delivery
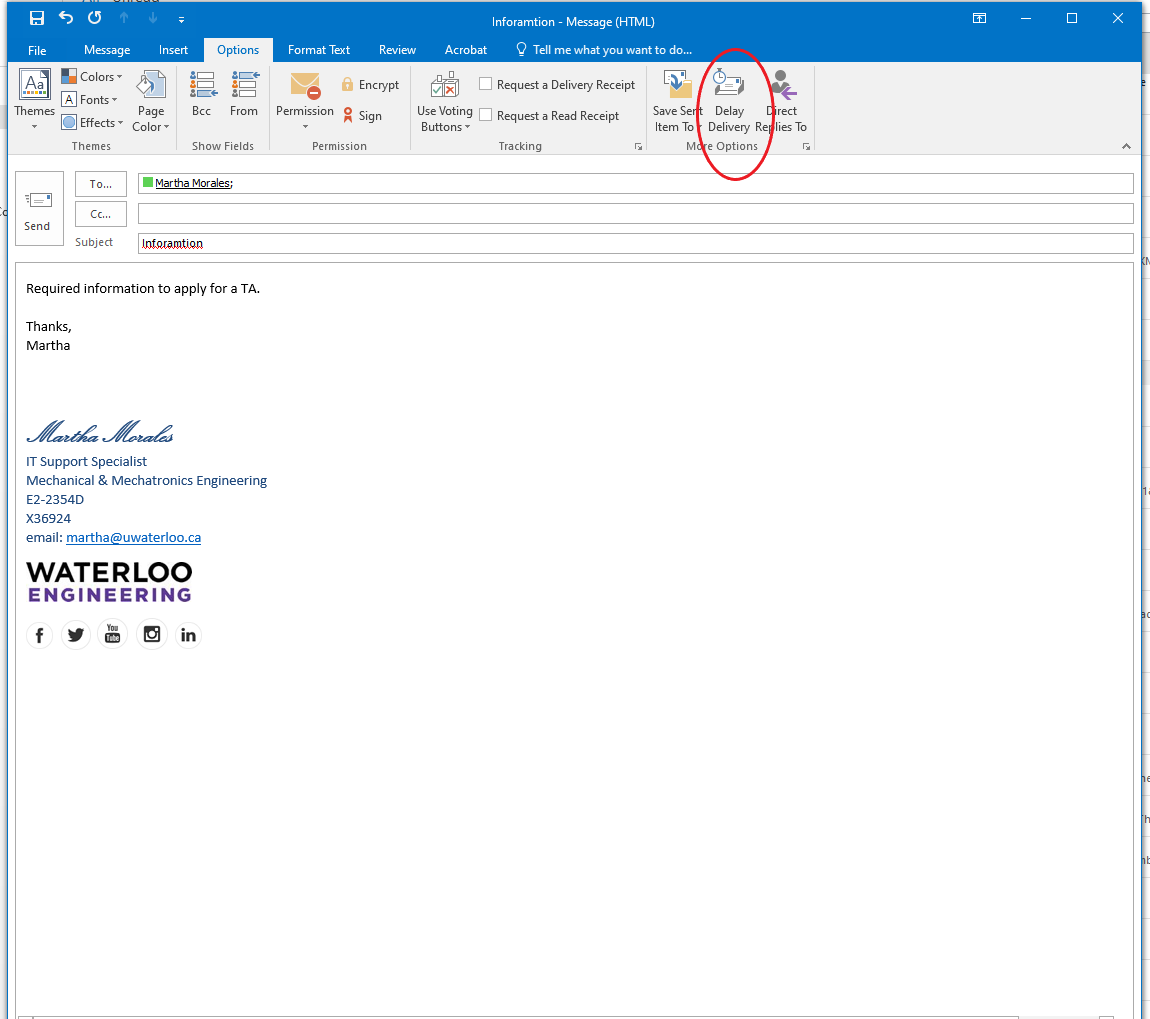
4. This will bring out a new window. In here you can set up when do you want this message deliver. It could be later on the data so select a time or another day select the calendar and choose the date and time of the delivery and click on close

5. Click on send. This message will be deliver on the date that you set. You will see this email on your outbox once it is send it will get move to the sent items.
Accidentally Deleted Items
When you delete an email it goes into your Deleted Items folder. When you empty your Deleted Items folder there is still a way to get it back. Deleted items can be recovered within 30 days of being deleted.
- Open the Deleted Items folder

- Right click on the Deleted Items folder and from the toolsmenu choose 'Recover deleted items'

- Select the email to recover (you can sort by Sender, Subject, etc by clicking on the Column headings)
- Click 'Recover' at the top
Setup a forward
-
Log in to outlook.office.com with your username@uwaterloo.ca (your username is your 8-character UWaterloo username, i.e. myuserna@uwaterloo.ca) and password.
- At the right-hand side of your screen, click on Settings (ie. the gear symbol)
- Scroll down and click on View all Outlook settings

-
On the Settings page, click on Mail > Rules > click on + Add new rule

-
Complete the information for the new rule:
-
Name your rule
-
Add a condition: Select Apply to all messages from the drop-down box
-
Add an action: Select Forward to from the Add an action drop-down box and enter the email address you wish to forward to. Choose this option if you want to have the messages forwarded to another email address, but keep a copy of the email message in your M365 Inbox.
Or
Select Redirect to from the Add an action drop-down box and enter the email address you wish to redirect to. Choose this option if you want to have the messages redirected to another email address without keeping a copy of the email message in your M365 Inbox.

-
-
Check the box Stop processing more rules and click Save to create the rule.
Stop forwarding my uwaterloo.ca email
If you have been forwarding all your incoming email to an off-campus account and wish to use the University's email services, you need to remove any forwarding that has been set up for your account.
WatIAM
First check your WatIAM email settings.
- Sign in to WatIAM (https:\\watiam.uwaterloo.ca)
- Click on Update Profile.
- Check the Email forward (delivery mailbox): field. If it contains your off-campus email address, change it to (replacing userid with your uwaterloo.ca userid:
- userid@connect.uwaterloo.ca if you are staff, Grad student or faculty
- Click on Save at the bottom of the page.
- Click on LOGOUT at the top of the page.
Office 365 accounts: web interface
Office 365 web interface uses an additional set of filtering rules
To disable email forwarding at the server:
- Sign in to connect web interface (https:\\office.outlook.com).
- Click on Options near the top of the page, then Create an Inbox Rule...
- If there are no rules on this page, the server is not forwarding your email on arrival. If there are rules, click on each rule in turn and read the description that comes up on the right side of the page. If any rule includes a Do the following that includes something like redirect the message to 'someone@example.org', click on the X above the rule list when that rule is highlighted. You will see a pop-up dialogue that asks Are you sure you want to delete the Inbox rule "rule description"? Click Yes.
- There is typically only one forwarding rule on an account. Verify no remaining rules are redirecting email in ways you do not want, then click Sign Out at the top of the page.
Verify your email is being delivered to uwaterloo.ca server
To verify that email forwarding has been removed from your account, send (or ask someone to send) email to your userid@uwaterloo.caaccount. Use your email client or the web interfaces to read the message once it has arrived.
Create an email signatures
-
Open a new email message.
-
Select Signature > Signatures from the Message menu.
Depending on the size of your Outlook window and whether you're composing a new email message or a reply or forward, the Message menu and the Signature button might be in two different locations.
-
Under Select signature to edit, choose New, and in the New Signature dialog box, type a name for the signature.
-
Under Edit signature, compose your signature. You can change fonts, font colors, and sizes, as well as text alignment. If you want to create a more robust signature with bullets, tables, or borders, use Word to format your text, then copy and paste the signature into the Edit signature box.

Notes:
You can add links and images to your email signature, change fonts and colors, and justify the text using the mini formatting bar under Edit signature.
-
You can also add social media icons and links in your signature. For more information, see Insert hyperlinks to Facebook and Twitter in your email signature.
-
To add images to your signature, see Add a logo or image to your signature.
-
-
Under Choose default signature, set the following options for your signature:
In the E-mail account drop-down box, choose an email account to associate with the signature. You can have different signatures for each email account.
If you want your signature added to all new messages by default, in the New messages drop-down box, select one of your signatures. If you don't want to automatically add a signature to new messages, choose (none). This doesn't add a signature to any messages you reply to or forward.
If you want your signature to appear in the messages you reply to and forward, in the Replies/forwards drop-down, select one of your signatures. Otherwise, accept the default option of (none).

-
Choose OK to save your new signature and return to your message. Outlook doesn't add your new signature to the message you opened in Step 1, even if you chose to apply the signature to all new messages. You'll have to add the signature manually to this one message. All future messages will have the signature added automatically. To add the signature manually, select Signature from the Message menu and then pick the signature you just created.
Add a logo or image to your signature
If you have a company logo or an image to add to your signature, use the following steps.
-
Open a new message and then select Signature > Signatures.
-
In the Select signature to edit box, choose the signature you want to add a logo or image to.
-
Select the Image icon, locate your image file, and select Insert.

-
To resize your image, right-click the image, then choose Picture. Select the Size tab and use the options to resize your image. To keep the image proportions, make sure to keep the Lock aspect ratio checkbox checked.
-
When you're done, select OK, then select OK again to save the changes to your signature.
Insert a signature manually
If you don't choose to insert a signature for all new messages or replies and forwards, you can still insert a signature manually.
-
In your email message, on the Message tab, select Signature.
-
Choose your signature from the fly-out menu that appears. If you have more than one signature, you can select any of the signatures you've created.
Out of the office Messages
If you will not be checking your email for a while, you can create a reply that will automatically be sent to people the first message time they send you an email while you are away.
There are two ways to activate the "Out of Office Assistant," either from your desktop Outlook client or through Outlook Web App (OWA). Note that Mac users must always use OWA to activate the Out of Office Assistant.
From your desktop Outlook Client
- From the File menu select the Automatic Replies (Out of Office) button
- Check the box, Send automatic replies
- Check the box, Only send during this time range:
- enter the start time and end time
- Type in an auto-reply for senders inside your organization
- Click on the tab, Outside My Organization
- Check the button(s) to choose whether to send this reply to your Contacts only or anyone outside your organization
- Type in an auto-reply for senders outside your organization
- Click OK.
From Outlook Web App (OWA)
- Log onto OWA (https:\\connect.uwaterloo.ca)
- From the top-right, select Settings

- Activate the Out of Office assistant,
- check the button, " Send Out of Office auto-replies "
- check the button, " Send Out of Office auto-replies only during this time period: enter the start time and end time
- type in an auto-reply for senders inside your organization
- check the button, " Send Out of Office auto-replies to External Senders "
- check the button(s) to choose whether to send this reply to All External Senders or just those in your Contacts list
- type in an auto-reply for senders outside your organization
- From the top-left of click OK.
Sending email to many recipients (mass email)
What thresholds/limits are in place?
- You should not send more than 1000 emails in a 24-hour period.
- Emails are sent at a maximum rate of 30 emails per minute (users using a modern mail client like Outlook won't notice this as the mail client will retry the messages automatically)
- Each email should have no more than 150 recipients per message.
- If your needs exceed this, you should look at using a mailman list (https://uwaterloo.ca/information-systems-technology/services/bulk-mailing) or using an application which can send out your email in a metered fashion (e.g., GroupMail).
Why are these limits in place?
- Increasingly, compromised account credentials have been used by spammers to send their email via UWaterloo email systems.
- To preserve our reputation with other service providers (e.g., Gmail, Hotmail, Yahoo, Rogers).
- Mass mailing is what spammers do. You need to ensure that your email does not look like spam. These limits actually help to ensure that your email is delivered.
What happens if I send more than the suggested limit?
- Servers receiving email for delivery will apply their own policies. These policies vary from server to server and company to company.
- In some cases, the server will refuse to accept further email after a certain limit has been reached.
- In other cases they will accept the email but at a much slower rate.
- In both cases, your email can create a backlog of other messages destined for the same company or institution, which will negatively impact others at the University of Waterloo.