Theses and other long documents (books, manuals, reports) can present challenges that shorter documents wouldn't. Theses are often more structured, contain several levels of headings, and may have numbered headings. It is more difficult to maintain a standard "look and feel" throughout a long document like a thesis.
Information on using the UWaterloo Thesis template.
Theses often contain components not found in shorter documents such as a Table of Contents, List of Tables/Figures, an Index, cross references, footnotes or endnotes. Thefiles used in the exercises below are Nursery_Rhymes.docx and fiddle.bmp. The .jpeg version below can be saved and used.

University of Waterloo thesis requirements
Waterloo thesis regulations for formatting requirements are outlined on the Graduate Studies website.
Some details worth mentioning (as of April 2008):
- The text of the thesis (main body) must either be double spaced or
space and a half. - Captions related to figures: it is acceptable to have them single spaced on the same page (some
disciplines do require the caption to appear on a separate page).
Index:
Styles
Heading styles
Modifying styles (including a related exercise)
Creating a new style (including a related exercise)
Modifying a heading style (including a related exercise)
Numbering headings (List style and Legal style numbering) (including related exercises)
Document templates (including accessing and using the UW Word Thesis Template)
Captioning and numbering of tables and figures (including related exercises)
Footnotes and endnotes (including related exercise)
Endnotes with square brackets ([1],[2],...)
Bookmarks (including related exercise)
Cross references (including related exercise)
Outline view (including related exercise)
Creating a table of contents (including related exercise)
Generating a list of tables and a list of figures (including related exercises)
Page numbering/Headers and footers (including related exercises)
Inserting landscape pages (including related exercises)
In-line references and bibliography
PDF for Electronic Submission
Electronic thesis submission
Styles
The best way to ensure consistent formatting in a Word document is by consistent use of Word styles. Every paragraph in Word has a “Style” associated with it. A style is a collection of formatting that details the font, font size, font highlighting (bold, italics, etc.), paragraph alignment, paragraph indents, paragraph spacing, and so on. If a style is edited, and any of its attributes changed, the formatting of any paragraph to which that style was assigned will immediately change to reflect the modifications.
The style assigned to the current paragraph is indicated in the Formatting toolbar near the top of your window.
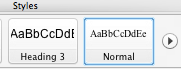
A document can contain many different styles, but most documents will have paragraphs of “Normal” style, which are standard paragraphs, and one to three levels of headings (Heading 1, Heading 2 and Heading 3).
It is important to use styles in all documents to carry out formatting of paragraphs of different types. This is especially true in longer documents where it is more difficult to apply standard formatting manually, and where the formatting requirements may change a number of times throughout the document production time. A unique style should be created for every paragraph type: normal paragraphs, indented paragraphs, etc.
You can create your own styles, or adapt one of the many styles that are pre-defined in Word. It is highly recommended that you use the built in Heading styles Word provides. You can, of course, modify them to look as you like. You can view the recommended style list from Word by simply clicking on the arrow under the Styles section in the Home tab, but to see a complete list of styles:
- From the Format menu, choose Style...
- Under List: choose All styles
- Now in the Styles area you will see many built-in styles you may use. You may modify them as you will see later in this document.
- To go to a specific style, click on any style in the list and type the first letter of the style you are looking for; you will then see all styles beginning with that letter.
- To close the Style window, simply click on the Cancel button.
Heading styles
Amongst Word’s predefined styles are nine levels of heading styles: Heading 1 through Heading 9. Although you could make up your own styles to apply to headings in your document, there are several reasons why you should use Word’s built-in heading styles.
- It becomes trivial to generate a Table of Contents of items tagged with heading styles.
- Word’s outline view offers a powerful tool for structuring long documents, and it is driven by Word’s heading styles.
- You can insert cross-references to headings created with Word’s heading styles.
- You can easily include the chapter number when numbering tables or figures, if you have used the Heading 1 style for your chapter headings
To practice editing styles, we will use the file called Nursery Rhymes.docx.
Modifying styles
If you do not explicitly assign a style to a paragraph, Word assigns the “Normal” style. Most other styles are based on this Normal style, so modifying the Normal style can have the effect of modifying other styles in the document.
The following exercise takes you through the process of modifying a style.
For example, to change the Normal style to Arial, 11 point, with 3 points of white space following each paragraph, do the following.
Exercise:
- Before beginning, change your measurement type to inches so that you may follow the exercises in this document as they are:
- From the Word menu, choose Preferences...
- Click on General in the Authoring and Proofing Tools section.
- Near the bottom, beside Measurement units: choose Inches from the drop down list.
- Click on the OK button to close the window.
- Now open the file on your N:\ drive called Nursery Rhymes.docx
- Control click on the Normal style in the Styles section of the Home tab and choose Modify, OR:
- From the Format menu, choose Style...
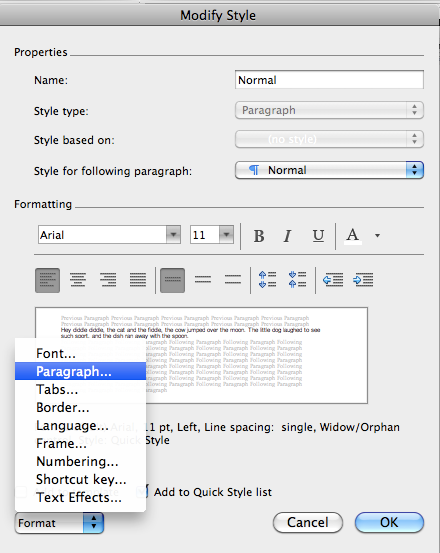
- Make sure the Normal style is selected in the list of styles and click on the Modify button.
- The Modify Style dialog box will appear.
- Under Formatting, from the font drop down list, select Arial, and from the size drop down select 11.
- If we wanted to increase the spacing both before and after each paragraph by 6 points, we could do that by clicking on a preset button (
) in the Modify Style box, but we want to be more precise than that, so we must click on the Format button at the bottom left, and choose Paragraph...:

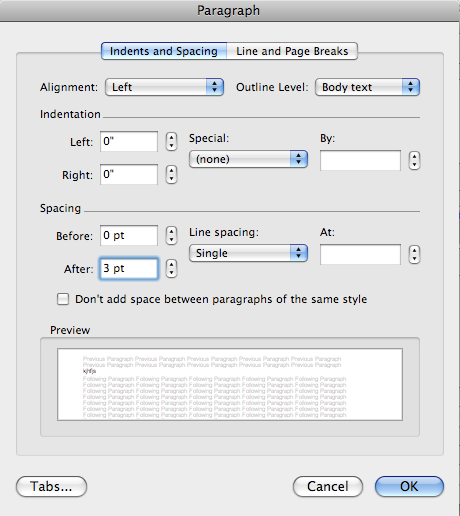
- In the Spacing, After: box, enter a 3, to leave 3 points of white space following a paragraph:
- Click OK, then click OK again, and then click Apply. The Normal style has been modified.
Creating a new style
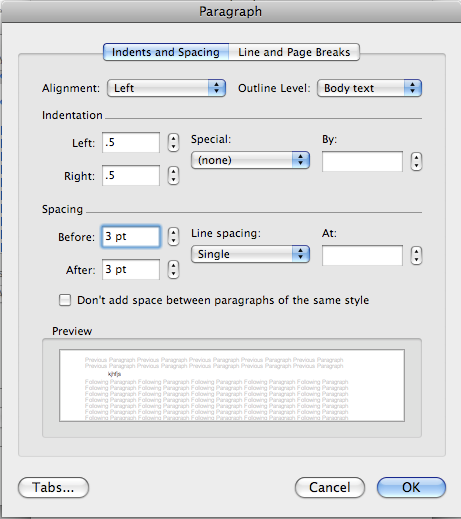
You may need to create a new style that does not currently exist in Word. For example, you may want a paragraph that is indented half an inch from both the left and right margins, and has 6 points of white space after, and 3 points before. This style could be called Indp.
Exercise:
- From the Format menu, choose Style...
- Click on the New... button.
- The New Style dialog box will appear. Beside Name: enter the name for our new style, in our case Indp.
- Ensure that Style based on: is the Normal style, and that the Style for following paragraph is Normal. We base this on the Normal style because we want it to inherit most attributes from Normal, such as the font, font size, alignment, etc. We choose Normal style for the following paragraph on the assumption that an indented paragraph will most likely be followed by a regular paragraph.
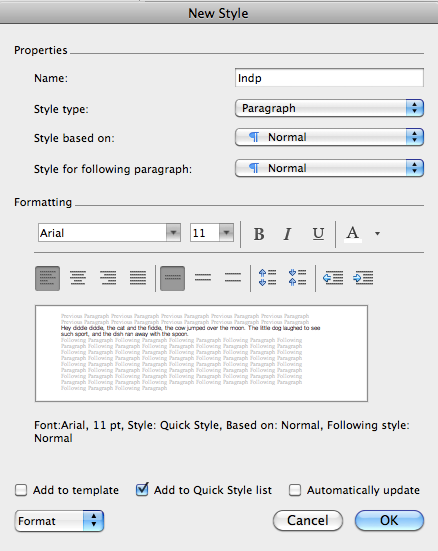
- Click Format, and select Paragraph... Enter 0.5" for both Left and Right indentations. Under Spacing, enter 3 for Before: and 3 for After:. (The previous Normal paragraph will already have provided 3 points of space before an Indp paragraph.). Click OK.
- You could now add a keyboard shortcut for this style if you like. This can make it easier to apply a style while you are typing. (Note: keyboard shortcuts can be created for any style). You would do this by clicking on the Format button and choosing Shortcut Key... Press Command-Shift-I (all at once - this will be your shortcut key combination) and click on the Assign button. Click the OK button, the OK button again and then click Apply. You have successfully created a new style.
- Now go to the end of the Jack and Jill rhyme, press Enter to start a new paragraph, and type the second verse of Jack and Jill:
"Up Jack got and off did trot, As fast as he could caper, He went to bed to mend his head, With vinegar and brown paper" - Now apply your new Indp style to this paragraph by clicking anywhere in the paragraph, and selecting Indp from the Styles section of the Home tab or by pressing Command-Shift-I.
Modifying a heading style
As mentioned above, Word has nine levels of built-in heading styles, called Heading 1 to Heading 9. You will probably use 3 or 4 levels in your thesis, and the format of the heading styles is the most likely thing you will want to change.
Steps to modify the Heading 1 and Heading 2 styles are given below.
Exercise:
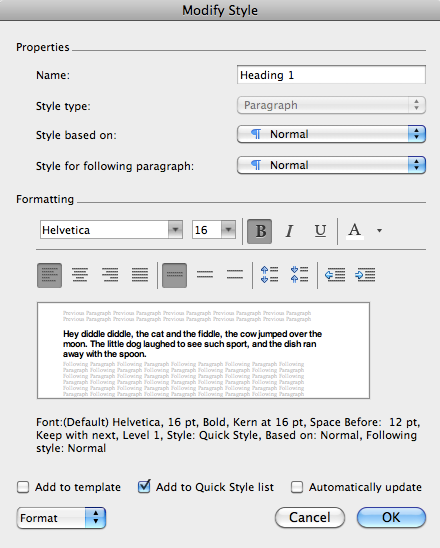
- Suppose we want Heading 1 styles to be in Helvetica font (it is acceptable to have the body of a document in one font, usually a serif font, and the document headings in a different font, usually sans serif), 16 point bold, centered.
- From the Styles section of the Home tab, find the Heading 1 style. Hold down the control key on the keyboard and click on the Heading 1 style and then choose Modify from the drop down list. The Modify Style dialog box will appear.
- Under Formatting, choose Helvetica from the font list, 16 from the size list, and click on the Bold button if it is not already selected.
- Now click the Format button (at the bottom left), and choose Paragraph...
- In the dialog box that appears, choose Centered from the Alignment box (If you don't see 'Alignment:' click on Indents and Spacing at the top first).

- Now click on Line and Page Breaks at the top of the window. Make sure that Widow/Orphan control and Keep with next are both checked. Keep lines together is also good to have checked for headings.
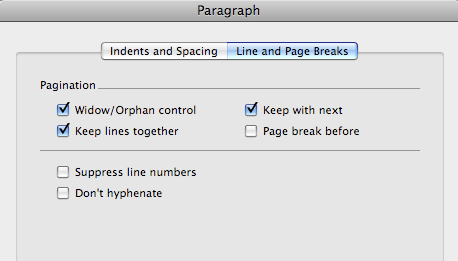
Widow/Orphan control: Prevents Word from printing the last line of a paragraph by itself at the top of a page (widow) or the first line of a paragraph by itself at the bottom of a page (orphan)
Keep with next: Prevents a page break between the selected paragraph and the following paragraph.
Keep lines together: Will keep the lines of the heading together on the same page.
Generally speaking, all paragraphs should have Widow/Orphan control set. Also, all headings should have Keep with next set; otherwise a heading might appear all by itself at the bottom of a page, and that is not a desirable situation. Notice some other settings you can make on this dialog box. Keep lines together should be used if you have a paragraph that you want to prevent from being broken across two pages. The other option, Page break before, could be used, perhaps, for a Heading 1, if you always wanted Heading 1 to begin on a new page (this can be confusing sometimes, though, if you aren't aware of this setting and are trying to remove the page break).
- Click OK.
- (Note in this window, that a Heading 1 style will be followed automatically by a Normal style. That’s all right, unless we knew we had a document structure where a Heading 1 was always followed immediately by a Heading 2. In that case, we would choose Heading 2 as the default style to follow a Heading 1. We don’t think that is the case here, so we will leave it at Normal.)
- Let's create a shortcut key for each heading style to make it easier to apply them while typing. We'll use 1 for a Heading 1, 2 for a Heading 2, etc. Click the Format button at the bottom left, and choose Shortcut Key... Hold down the keys 1 all at once. Click Assign, OK, OK and then Apply.
- Now we want to modify a Heading 2 style. Our Heading 2s should be Helvetica font, 14 point bold, and left justified. Follow the above instructions (2. to 9.) to make these changes to the Heading 2 style (use 2 as the shortcut keys for a Heading 2).
Other heading styles can be modified in the same way.
Some documents use the style “body text” for standard document paragraphs. If that is what you want, you should modify all other styles used in the document to make “Body Text” be the paragraph type to follow all other paragraphs and also the style that other styles are based on.
Numbering headings
Theses frequently have a requirement that all headings in the document be numbered. There are two types of numbering.
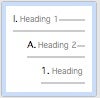
The first is list style numbering, where major headings are numbered with one style, perhaps I, II, III… second level headings in another style, perhaps A, B, C…etc. third level headings in yet another style, perhaps 1, 2, 3… and so on. Every time a new higher level heading occurs, the numbering of lower level headings starts at the beginning.
The other type of numbering is legal style numbering, where first level headings are numbered 1, 2, 3… (or perhaps I, II, III…); second level headings are numbered 1.1, 1.2, 1.3…(or 2.1, 2.2, 3.1, 3.2… as appropriate); third level headings are numbered 1.1.1, 1.1.2.… and so on.
List style numbering
Exercise:
- To number headings with a List style, first go to the top of your document by pressing Command-Home (together) on your keyboard. (Similarly, pressing Command-End will move the insertion point immediately to the end of the document. Want to get back to the last place you were working? Try SHIFT-F5.) If you are using a MacBook that doesn't have a Home or End button, Command + Fn + Left Arrow will move you to the beginning of the document and the Command + Fn + Right Arrow will move you to the end of the document.
- In the Home tab, Paragraph section, click on the Multilevel List button
and choose Define New Multilevel List....

- In the dialog box that appears, click the Morebutton
at the bottom left.

- Make sure Level 1 is selected by clicking 1 under Level:
- Choose the numbering style you want by selecting it from the Number style: list., perhaps I, II, III, ... etc.
- Modify the punctuation beside the number if you like. If you want the number followed by some other punctuation (or nothing) instead of a right parenthesis, click to the right of the punctuation beside the number/letter at the top under Number formatand hit the Delete key to remove the punctuation. If you want some other punctuation, type it now. If you don’t want the number followed by any punctuation, don’t type anything. (Ensure not to type over the letter/number but to only add/change the punctuation.)
- Set Number position to Left, set Aligned at to 0.
- Under Text position, set Indent at: to 0.
- Beside Link level to style: choose Heading 1.
- Beside Follow number with: choose Space.
- Now select 2 under Level:
- Select a, b, c, .. from the Number style: list.
- Type the desired punctuation to follow the number style under Number format (ensure not to type over the letter/number but to only add/change the punctuation).
- Set Number position to Left, set Aligned at to 0.
- Under Text position, set Indent at: to 0.
- Beside Link level to style: choose Heading 2.
- Beside Follow number with: choose Space.
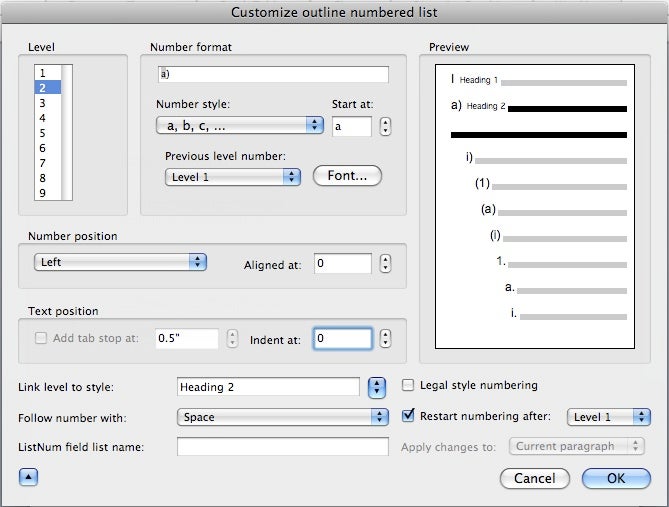
- Repeat the above procedure for levels 3, 4 and as many heading levels as you have in your document. In all cases, make sure that the Restart numbering after: (higher list level) is checked.
Note 1: If you are defining this numbering format for a document that already has headings with heading styles applied, make sure that the mouse is clicked at the very beginning of the body of your thesis. This will cause the numbering styles to be applied from that point forward. The numbering will also apply to any subsequent headings that you enter.
Note 2: You could have selected a pre-formatted numbering style such as
Legal style numbering
Exercise:
- Go to the top of your document by pressing (together) (or Command + Fn + Left Arrow if you don't have a Home button) on your keyboard.
- In the Home tab, Paragraph section, click on the Multilevel List button and choose the image for legal style numbering with heading styles attached:

- This may be all you need to do. If you want to change the alignment options or make the first level a roman numeral number (I, II, III, etc.), the steps below describe how to do this:
- To customize, in the Home tab, Paragraph section, click on the Multilevel List button and choose Define New Multilevel List....
- If necessary, click the Morebutton at the bottom left to see more options.
- If you want to change the first level to be a roman numeral number:
- Make sure Level 1 is selected by clicking 1 under Level, and choose I, II, III, ... from the Number style: list.
- If you want the number followed by some other punctuation (or nothing), click to the right of the punctuation beside the number/letter under Number format, and hit Delete to remove the punctuation. If you want some other punctuation, type it now. If you don’t want the number followed by any punctuation, don’t type anything. (Ensure not to type over the letter/number but to only add/change the punctuation.)
- Now, we must reset levels 2, 3, ... back to regular legal style numbering:
- Select Level 2 under Level and then put a check beside Legal style numbering
Note, if we did not do this step, level 2 numbering would look like this: I.1, I.2, etc. instead of 1.1, 1.2, etc.

- Repeat this for level 3 and any other levels you are using
- Select Level 2 under Level and then put a check beside Legal style numbering
- If you want to change the alignment of the numbers/text:
- Make sure Level 1 is selected by clicking 1 under Level.
- Set the Aligned at: and Indent at: levels as you like.
- Repeat this for levels 2 and 3 as well.
- For each level you may also want to change:
- Set Follow number with: to Space or Tab (Define the tab location by checking Add tab stop at: and enter the tab position; usually the Indent at: and tab stop are at the same position.)
- Set Number position to Left, Centred, or /Right
- Click OK.
Left aligning multi-line headings
Exercise:
- If you anticipate any of your headings will wrap to a second line, you may want to set up your numbering such that the first line and any subsequent lines will line up vertically. To do this we will set a specified position for the text that follows the number and follow the number with a Tab.
- First go to the top of your document by pressing (together) (or Command + Fn + Left Arrow if you don't have a Home button) on your keyboard.
- In the Home tab, Paragraph section, click on the Multilevel List button and choose Define New Multilevel List....
- If necessary, click the Morebutton at the bottom left to see more options.
- Make sure Level 1 is selected by clicking 1 under Level.
- Set Number position to Left, set Aligned at to 0 (or whatever position you want your number to be left aligned at).
- Check the checkbox beside Add tab stop at: and enter 0.5"(or larger if necessary); set Indent at: to 0.5"(or a larger indent if necessary) .
- Beside Follow number with: choose Tab character.
- Repeat step 7. for each level you are using. Keep in mind that the tab stop and indent should be larger than the Aligned at value by enough space to allow for your largest anticipated number (e.g. if you are using legal style numbering and anticipate a level 4 number like 23.12.11.1, you will need to make sure the Indent is at approximately 0.8" or so larger than the Aligned at setting.
- Click OK once you have set these settings for all levels you are using.
Document templates
Every document created in Word has a template associated with it. A template is a collection of formatting, styles, macros and possibly text. When you start Word, a blank document is opened based on the “Normal” (or standard) template. If you create a new document by clicking on the File menuand choosing New Blank Document, Word opens a new blank document which uses the Normal template. To choose a different template, in Word 2011, you would click on the File menu and choose New from Template...
A template is simply a Word document, with a file extension of .dotx (regular template) or .dotm (a template that may contain macros) instead of .docx.
Saving and creating templates
Templates you create should be stored in the My Templates folder: /Users/youruserid/ Library/Application Support/Microsoft/Office/User Templates/My Templates ('youruserid' is your log-in username). (In Word 2011, when saving a template, simply choose the Format, Word Template (.dotx), and the default folder location should change to My Templates.
You may wish to create all the styles you think you will need, and set up some standard formatting, (margins, etc.) and:
- Choose File/Save As...
- Beside Format: choose Word Template (.dotx) from the drop down list (or, choose Word Macro-Enabled Template (.dotm) if your template is based on the uwthesis_word template as it contains macros).
- At the top beside Save As: type the name you would like your template to be called.
- Click the Save button.
- Now, every time you start a new document that will be part of your thesis, choose File/New from Template..., click on My Templates from the list on the left and then select your template and click Choose.
Using the UWaterloo Thesis template
The UWaterloo Thesis template (dotm) may be useful as-is for your thesis, or it may be a useful starting point for you to modify.
Exercise: Downloading and using the UWaterloo Word Thesis template
- Download the UWaterloo Thesis template (dotm).
- From the Downloads window, you can double click on the template.
- When prompted, click on the Open button.
- A new document, based on the UW thesis template, will open in Word. You can choose to use this as a starting point for your thesis, or you may make changes to heading styles, etc. first. Alternatively, you may also want to make changes to the template and re save the template into your My Templates folder (under Saving and Creating Templates) as described above.
- Note: If you paste any text from other files into this thesis template, it is best to paste as plain text so that you do not bring in codes from other files (Edit/Paste Special..., choose Unformatted Text and click OK).
- Note that although this template has been created with the help of the Graduate Studies Office at the University of Waterloo, your faculty/department may have specific requirements that are different from the template format, so please check the requirements of your faculty/department ahead of time.
Captioning and numbering of tables and figures
In a longer more structured document, you will frequently want to number and add captions to your tables and figures. You could do this manually, but a better idea is to let Word add these captions and automatically assign the numbers. You need this automated approach for a number of reasons.
- If you want to easily make a cross-reference to the table or figure, Word must maintain the caption.
- If you want to automatically create a List of Tables or List of Figures for your Table of Contents, Word must maintain the captions.
- If you insert or delete tables or figures, Word will automatically renumber if it maintains the captions.
A caption consists of the word Table or Figure, whichever is appropriate, followed by a number. You may then choose to add punctuation, such as a period or a colon, and then the text you wish to have for the caption.
Captioning tables
You may want to add captions to tables already entered into your document or, alternatively, you may want to have captions automatically added to any new tables you create.
Adding captions to existing tables
If you have tables without captions in your document and wish to add captions, you can do so quite easily. For each table:
- Click somewhere in the table
- From the Insert menu, choose Caption
- In the Caption box, it will read Table 1 and allow you to add further information. If you wish to have punctuation appear after the number, type it, and then type the text of the caption. Notice that the Position box lets you select 'Above selected item' or 'Below selected item' for the caption, but table captions are generally positioned above the table.
- Click OK.
Repeat the above procedure for every table in your document. Word will automatically provide the correct table number.
Automatically captioning tables
Word can automatically add the caption to a table when the table is created. To do this:
- From the Insert menu, choose Caption
- Click on the AutoCaption button. You will be presented with a list of objects that can be captioned automatically. One of those is Microsoft Word Table. Click the checkbox beside this item. Confirm the Options below are what you want and click OK. Now every time you create a table, the caption, 'Table', followed by the appropriate number, will be added automatically. You can simply click in the caption line, type any punctuation you wish, and then type the caption text.
Combining manual and AutoCaptioning
You can manually caption any existing tables, and then ask Word to AutoCaption any additional tables you add. Word will handle the numbering properly.
Captioning figures
To caption an existing figure, select the figure and:
- From the Insert menu, choose Caption
- Select Figure beside Label. The Caption box will read Figure 1 and permit you to type additional information. Type any punctuation that you wish to have after the number, and then type the text of the caption. Repeat this process with each figure in your document. Note that the caption appears by default at the bottom of the figure.
Aligning the table and figure caption
The caption for both figures and tables defaults to left alignment. You may wish to have your captions centered, particularly if your tables and figures are centered on the page. Captions are inserted with the Caption style attached. To change the alignment:
- Click on the Format menu and choose Style. Select the Caption style from the Styles: list, then click on the Modify button.
- Click on the centre icon (
) and click OK and then click Apply.

Since the same style is applied to Figure and Table captions, you cannot have different alignments for these two types of captions, unless you create a new style for one of the captions. This will work, but you must remember to apply that new style manually to the captions, and if you are creating a List of Tables or List of Figures, you must remember to tell Word to use items of that new style to build the list.
Concatenating chapter number to figure or table number
You may wish to have the chapter number appended to the table or figure number in the caption, such as Table 1.3, or Figure 3.8:
- From the Insert menu, choose Caption
- Choose Table in the Label box
- Choose the Numbering button and click the Include chapter number text box
- Choose Heading 1 beside Chapter starts with style: and choose. (period) beside Use separator:
- Click OK (note that the type of numbering you chose for your Heading 1s will be used).
- For figures, repeat the above, but choose Figure in the Label box
Captioning tables and figures in appendices
You likely want to caption your tables and figures in your Appendices using the Appendix letter and the number of the table/figure (e.g. A-1). I have found two ways to do this:
- You could use a heading style (for example Heading 9) for your appendix headings. You could base it on the Appendix style and then format it as you like it. You would then need to click on your first appendix title and go back into Format/Bullets and Numbering to link the level to style 'Heading 9' (rather than style 'Appendix'). You would also need to change all the Appendix titles to the Heading 9 style as well. At this point, you could use the built-in labels for Tables and Figures and click on Numbering and indicate to Include chapter number and Chapter starts with style, Heading 9.
- You can create a new label when captioning your tables and figures: When you are in Appendix A you would create a new label of Table A- and then the numbering will add the 1, 2, etc. The only issue with this is that it 'forces' a space after the '-' that you would have to remove manually or with a macro (or you could add a space between the 'A' and the '-' in the label so the spacing is even but that may not be consistent with the rest of your thesis). If you choose to do it this way, when you generate your list of Tables and Figures you would need to generate the list of tables and figures in the appendices separately by choosing these other labels at the time of creating your lists of tables and figures.
Step-by-step captioning and numbering tables and figures
Exercise:
- Our document already contains 1 table, and we will be adding more. We would like to add a caption to the existing table, and automatically add captions to any additional tables we create.
- First, click anywhere inside the existing table.
- From the Insert menu, choose Caption.
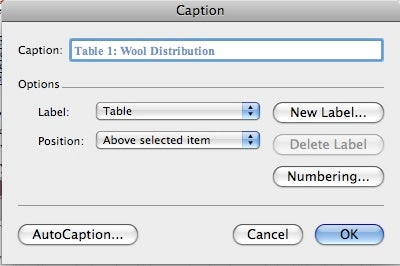
- In the resulting dialog box, make sure that Table is selected in the Label: box, and Above Selected Item in the Position box.
- Click in the Caption box, and type a punctuation mark if you wish, perhaps a colon, then type the text of the caption “Wool Distribution”. Click OK. Note that the caption now appears above your table.
- Now we will ask Word to automatically add captions to any additional tables that we create:
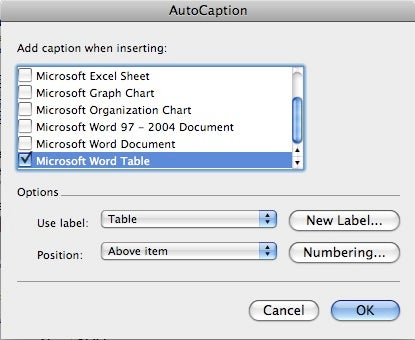
- From the Insert menu, choose Caption.
- Click on the AutoCaption button.
- You will be presented with a list of objects that can be captioned automatically. One of those is Microsoft Word Table. Click the checkbox beside this item. Confirm the Options below are what you want and click OK.
- Now go to the Jack and Jill rhyme, and click at the end of the text of the Jack and Jill rhyme, and press Enter to move to a new line.
- Click on the Tables button on the toolbar and drag to create a 3x2 table:
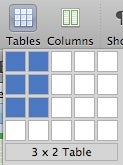
- Enter the following information into the table.
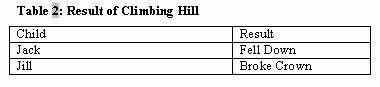
Note that the caption “Table 2” is created automatically, and you can click after the 2 and type a colon, and then type the caption “Result of Climbing Hill”.
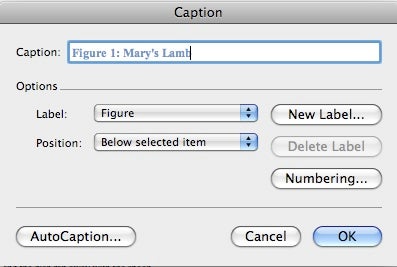
- Now we will add a caption to the Lamb figure that appears in “Mary had a Little Lamb”:
- Click on the image of the lamb to select it, then click on the Insert menu, and choose Caption.
- In the label box, select Figure. Note that that causes the Position to be set to Below selected item.
- After Figure 1, type desired punctuation, and then the caption, “Mary’s Lamb”. Click OK, and see the caption added to the document.
Footnotes and endnotes
Footnotes and endnotes are handled in a similar fashion, except that footnotes appear at the bottom of the current page, and endnotes appear at the end of the document.
Exercise:
The instrument in question was really a violin. The rumour that it was a very expensive Stradivarius was simply that, mere rumour.
A crown is another name for the head. They could have said that Jack broke his head, but that would not rhyme, so they used the word crown instead.
- We will continue to use the Nursery Rhymes file. We wish to insert a footnote after the word fiddle in the rhyme Hey Diddle Diddle. Click your mouse immediately after the word fiddle and from the Insert menu, choose Footnote. If you are inserting footnotes, make sure that Footnote is selected and then click Insert. If you are inserting endnotes, make sure that Endnote is selected and then click Insert. After clicking Insert, if you are in Print Layout view, you will be shifted to the bottom of the page and be able to enter your footnote text right away. If you are in Draft view, a new pane will appear at the bottom to allow you to type your footnote. In either case, to return to the same spot in your document, simply double click on the footnote number. (In Draft view you could also click on the Close button.)
- Type the footnote text:
- Now, you can return to the place in the document where you were working by:
- Double clicking on the footnote number
- To make changes to the settings, if necessary, click on the Insert menu, choose Footnote:
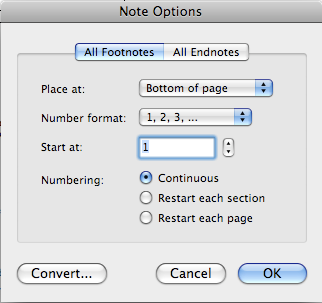
Here you could make changes to the number format, restart the numbering, convert footnotes to endnotes (use Convert button for this), etc.
- Now, switch views. If you were in Draft switch to Print Layout, and vice versa. Do this by selecting the appropriate option from the View menu.
- We want to add another footnote, in Jack and Jill, after the word crown. Click after the word crown, click on the Insert menu, choose Footnote and click Insert. The footnote number will be presented, and you can type your footnote. Type this footnote:
- Now return to the main document by double clicking the footnote number.
- Move the mouse over one of the footnote indicators in the document (don’t click) and see the note that appears showing the text of the footnote.
How to change the footnote separator
The footnote separator is the thin line that appears between the bottom of your page and any footnote text that may be on that page.
- From the View menu, choose Draft to switch to Draft view.
- Double click on one of your footnote numbers within your text to open the footnote pane at the bottom of the window.
- Directly above the pane that appears at the bottom is a drop down menu. From this drop down menu, you can choose Footnote Separator.
- You can then change the footnote separator in the pane. Click on the Close button in the top right of the pane when you are finished.
Endnotes with square brackets ([1],[2],...)
- For all your endnote references, do the following:
- From the Insert menu, choose Footnote; make sure Endnote is selected and click OK.
- Next, we will change the Endnote Reference style from superscript to no superscript:
- From the Format menu, choose Style. Find the Endnote Reference style in the list and click on the Modify button.
- In the Modify Style window that opens, click on the Format drop down list (bottom left) and choose Font; uncheck Superscript and then click OK and OK again and then click Apply. All of your Endnote Reference numbers should now NOT be superscript.
- Now, our challenge is to get square brackets around the reference numbers. Save your document before doing this. We will do this using Word's Replace feature:
- Click at the top of your document (or press Command-Home (together) on your keyboard (or Command + Fn + Left Arrow if you don't have a Home key on your keyboard) to quickly go to the top of your document).
- From the Edit menu, Find/Advanced Find and Replace...
- At the bottom, choose the Format drop down list and choose Style.
- Scroll through the list and find and choose Endnote Reference from the list and click OK.
- Click on the Replace option at the top.
- Click in the text box beside Replace With: and type [^&].
- Now click on the Replace All button. A message will pop up to tell you how many replacements were made. Click OK. All of your Endnote Reference numbers should now have square brackets around them.
- Click the Close button (red circle at top left of window) to close the Find and Replace window.
Bookmarks
A Bookmark marks a place in a document that you may wish to jump to, refer to, etc.
We will insert a bookmark at the location of the song “Inky Dinky Spider”.
Exercise:
- Select the title “Inky Dinky Spider”. From the Insert menu, choose Bookmark. In the resulting dialog box, enter the bookmark a name of “spider” and click Add. Initially, you will not see any indication that a bookmark exists, but the next step will describe how you can view a bookmark 'codes' so you will know where your bookmarks are.
- From the Word menu, choose Preferences. Under Authoring and Proofing Tools, click on View. Put a checkmark beside Bookmarks and click OK.
- Now you will see the bookmarked text in your document enclosed in square brackets.
The square brackets simply indicate that a bookmark is present. They do not print. Note that you could have created a bookmark by simply clicking the mouse and not selecting any text. This would be indicated by the square brackets displaying one on top of the other (
- Click the mouse near the top of the document. From the Edit menu, choose Find/Go To...
- From the list on the left under Go to what: choose Bookmark. If you had multiple bookmarks, you could then choose the one you wanted to go to from the drop down list on the right under Enter bookmark name:. Choose spider from this list (in this example, we only have one bookmark) and click on the GoTo button. We immediately jump to the bookmarked text.
Cross references
A cross-reference is a referral from one location in a document to a component elsewhere in the document. For example, “see Table 2: Snowfall in 2003”. Cross references can be made to tables, figures, footnotes, headings, page numbers, bookmarks, etc.
We will create a cross-reference to the “Jack and Jill” table.
Exercise:
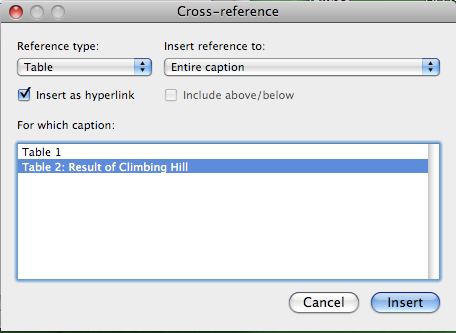
- Go to the end of “Inky Dinky Spider” and after the word "again" type “As we saw in”. Now from the Insert menu, choose Cross-reference.
- In the Reference type: drop down list, select Table. Note that a list of all tables appears.
- Choose Table 2: Result of Climbing Hill. In the Insert reference to: drop down list, select Entire caption and click Insert. Then click Close.
- Note that the text now reads:
and we can add the text “climbing things can prove dangerous”. Note that the grey area that you see when you click on the inserted cross-reference text is there to indicate that this is a cross-reference. It will not print.

- Now we will delete the first table in our document, and we will see what happens to our reference. Drag through to select the caption and the complete Table 1, and press the delete key.
- Now look at your document and you will see that Table 2 has not been renumbered to Table 1 and the cross reference is still to Table 2. There are two ways we could fix this:
-
- If we print it or do a print preview, the references will be updated before printing occurs.
- We can select the entire document, and force updating by pressing the
- Option-Shift-Command-U keys at once. Do this now:
- Edit menu/Select All or press Command-A on your keyboard to select your entire document
- Press Option-Shift-Command-U at once.Note that the table numbering and cross-references are updated.
-
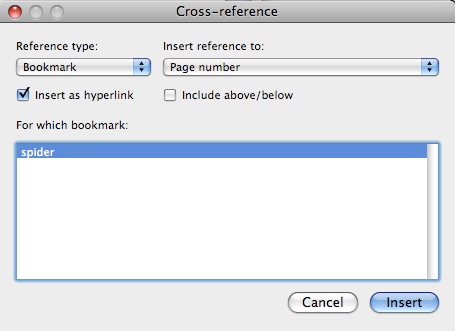
- Now we will make a cross-reference to our bookmark. Go to the end of the “Hey Diddle” rhyme, and type “No spiders were present as they are on Page”. Now from the Insert menu, choose Cross-reference.
- In the Reference type: drop down list, choose Bookmark.
- From the list of bookmarks presented, select spider (in this case this is the only item in the list).
- From the Insert reference to: drop down list, choose Page number (as opposed to the actual text that was bookmarked).
- Click Insert. The appropriate page number is inserted into the document.
- Click on the Close button to close the cross-reference window.
Outline view
Outline view is very useful for viewing the structure of your document, or for restructuring it. The following exercise takes you through some of the features/uses of Outline View.
Exercise:
- Click on the View menu and choose Outline.
- You will see the complete document, including the text, but we only want to see only Heading 1 through Heading 3. In the Home tab, beside Show: choose "Level 3".
- “Rhymes About Animals” is currently a Heading 2. Promote it to a Heading 1 by clicking in the heading, and then clicking the Promote button
. (Alternatively, click SHIFT TAB). Note that when you promote this heading, you do not promote any headings at a lower level. “Baa Baa…”, “Hey Diddle…” and “Mary Had…” all remain as Heading 3.

- Click “Rhymes About Animals” again and demote it back to a Heading 2 by clicking the Demote button
(or by pressing the TAB key).

- Now we would like to promote “Rhymes About Stars” from a Heading 2 to a Heading 1, and all Heading 3s beneath it to Heading 2 (and if there were any Heading 4s they should become Heading 3, etc. All text, however, will remain as text):
- Click on the Plus (+) sign beside “Rhymes About Stars”. (The mouse printer will become a double headed arrow when you are over that plus sign.) Clicking on this plus sign selects the current line AND the entire structure under that line as well.
- Now click the Promote button. Note that all heading levels are promoted, but the text remains as text.
- To verify that the text remained as text, click on All Levels (beside Show:) in the toolbar to view all levels including text.
- Select this structure again (click on the Plus sign beside “Rhymes About Stars”), and demote it to its original level by clicking on the Demote button.
- Perhaps the heading “Twinkle Twinkle …” should have been body text, and not a heading. Click on the heading "Twinkle Twinkle ..." and demote it to body text by clicking the Demote to Body Text button
. Now promote it back to a heading by clicking the Promote button. (It may become a Heading 2 so you may need to click on the demote button to make it a Heading 3 again.)

- View different levels of headings:
- Try clicking on All Levels (beside Show:) from the tool bar to display the entire document.
- Check the checkbox beside Show first line only, to see that it displays only the first line of each paragraph but all heading levels.
- Click on Level 1 (beside Show:) to view only level 1 headings.
- Click somewhere in the first level one heading, and then click the Expand button
to expand that heading to show all Heading 2s under it.

- Click in one of the Heading 2s and expand it by clicking the Expand button .
- Now reverse the process by clicking in the appropriate heading level and clicking the Collapse button
. Return your outline to showing only level 1 headings.

- Now click on the big plus sign beside the “Nursery Rhymes” heading, and click the Expand button. Note that you see all Heading 2s under that heading. Click again on the Expand button, and all Heading 3s appear. Reverse the process by repeatedly clicking the Collapse button twice.
- In Outline view you can move whole sections of text to another part of your document, quite easily. Perhaps you have decided that the “Rhymes About Stars” section should appear before the “Rhymes About Animals” section.
- Click on Level 2 (beside Show:)to view Heading 1s and Heading 2s.
- Click on the Plus (+) sign beside the heading “Rhymes About Stars” to select the entire structure.
- Move it up in the document by clicking the Move Up
button until you have the heading appearing above the “Rhymes About Animals” heading.

- View the entire document by clicking on All Levels (beside Show:)to convince yourself that not only the heading but everything that appears under that heading was moved.
- Now put the entire structure back into its original location by clicking on Level 2 (beside Show:) and then the Plus (+) sign beside the heading “Rhymes About Stars”and clicking the Move Down
button.

- Let's go back to Print Layout view. From the View menu, choose Print Layout.
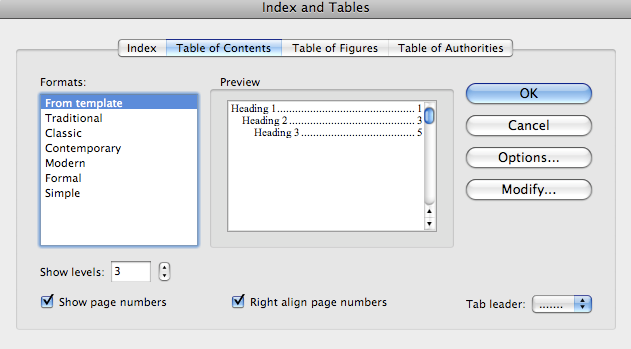
Creating a table of contents
Word can automatically generate a Table of Contents (TOC) from your styles, primarily the Heading styles you have used. Although it is easiest to create the TOC from built in Heading styles, you can also ask Word to include other styles as well by clicking on the Options button in the Table of Contents window while generating the Table of Contents. To create the Table of Contents, you
- Set the insertion point at the beginning of the document, where the TOC should appear
- From the Insert menu, choose Index and Tables; click on the Table of Contents 'tab'
- Select the format you like under Formats:, and the number of heading levels you wish to have appear in the TOC beside Show levels, and optionally click on the Options button if you want to add or remove styles to include in the Table of Contents, and click OK.
- Word will insert the Table of Contents.
Generating a list of tables and list of figures
A list of tables and a list of figures can be automatically generated as well.
You would, from the Insert menu, choose Index and Tables,then click on the Table of Figures 'tab'. From the Caption label: list, you would choose either Table or Figure, whichever is appropriate. If you wish to generate a list for both, do one first and then the other.
Exercise: Adding a title page and creating a table of contents
- Change your view to Draft View: View menu, then choose Draft
- Go to and click your mouse at the top of your document or press Command-Home (together)on your keyboard to go to the top of your document (or Command + Fn + Left Arrow if you don't have a Home key on your keyboard).
- At the top of your document, press Enter> to open up a blank line. Make sure that the blank line is in the normal style by clicking on the Normal style in the Styles section of the Home tab.
- Type some information that will constitute the Title Page of your thesis.
- Click at the end of the text on the title page, press enter, and insert a Section break: Insert menu/Break/Section Break (Next Page)
- Click within the text of your title page and click on the Format menu and choose Document. Click on the Layout 'tab'. Beside Vertical alignment: choose Center; beside Apply to: choose This section; click OK. The text on your title page will now be centred vertically. You will still need to centre it horizontally and format it as necessary.
- Now, on the page after the title page, press the Enter key to open a new line (if necessary). In that line, type Table of Contents.
- Let's create a new style for the titles on the preliminary pages, called "Prelim Headings". This new style should be based on the Normal style, Centered, Arial font, 14 point, and bold.
- Select "Table of Contents" and assign the new style, Prelim Headings to it.
- Click after the title, Table of Contents and press Enter to go to a new line. Make sure that the blank line is in the normal style byclicking on the Normal style in the Styles section of the Home tab.
- Insert the Table of Contents:
- From the Insert menu, choose Index and Tables; click on the Table of Contents 'tab'
- Select the format you like under Formats:, beside Show levels, choose '3'(since the we will use the Heading 1 through 3 styles to build the Table of Contents).
***If you want the titles from your preliminary pages to appear in the Table of Contents:- Click on the Options button.
- Scroll down until you see the Prelim Headings style in the list.
- Put at "1" beside the Prelim Headings style and click on the OK button.
- Click OK to complete the insertion of the Table of Contents.
- The Table of Contents is inserted into your document. When you click on it, it may appear greyed, but the grey shading will not print.
- After making changes in your document, to update the Table of Contents, hold down the control key on your keyboard while you click your mouse and choose Update Field; you will then be prompted to Update page numbers only or to Update entire table; choose one and then click OK.
Exercise: Creating a list of figures and a list of tables
- Now we will create a List of Figures.
- Put a page break after the Table of Contents by choosing Insert/Break/Page Break from the menu.
- At the top of the new page, type List of Figures.
- Assign the new style, Prelim Headings to the title List of Figures.
- Press Enter to go to a new line. Make sure that the blank line is in the normal style by clicking on the Normal style in the Styles section of the Home tab.
- From the Insert menu, choose Index and Tables,then click on the Table of Figures 'tab'. From the Caption label: list, choose Figure.
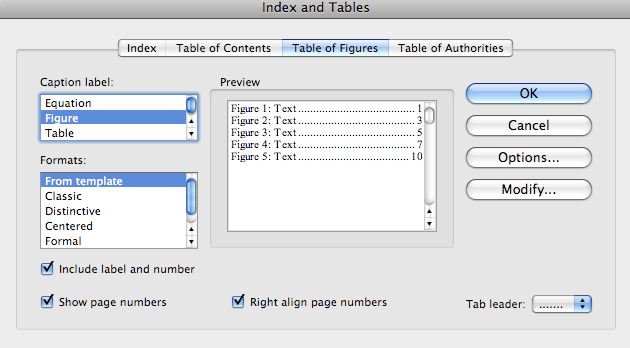
- Everything else is fine, so click OK. A List of Figures is inserted.
- Repeat the above procedure to create a List of Tables. The title of the page should be List of Tables. Assign the new style, Prelim Headings to the title List of Tables. In the settings window, choose Table from the list under Caption label:.
- To update a List of Figures or a List of Tables, hold down the control key on your keyboard while you click your mouse and choose Update Field; you will then be prompted to Update page numbers only or to Update entire table; choose one and then click OK.
Page numbering/Headers and footers
The pages of the front material of the thesis (all components up to and including the Table of Contents) should be numbered in lower case Roman numerals, but no page number should appear on the first page. The body pages of the thesis must be numbered in Arabic numerals, starting at 1. In order for parts of the document to have different formatting, it must be divided into sections. Earlier, when we were inserting the Table of Contents and Title Page, we inserted a section break. We will need to insert another section break between the preliminary pages and the body pages. We will then have the front material in one section, and the body in another section and be ready to number our pages. We will place our page numbers in the bottom centre.
Assigning page numbers
Exercise:
- Click on the View menu and choose Draft to change to Draft view.
- Insert a section break between the preliminary pages and the body of your thesis:
- Click at the top of the first page of the body of your thesis (before any text, and after your preliminary pages)
- Insert a 'Next Page' Section break which will also do a page break between the preliminary pages and the body of the thesis:
- Choose from the menu, Insert/Break/Section Break (Next Page)
- You will see (if you are in Draft view) the following code between the last page of your preliminary pages and the body of your thesis:
- Scroll to the beginning of the document, and place the cursor at the top of the second (2nd) page after the section break.
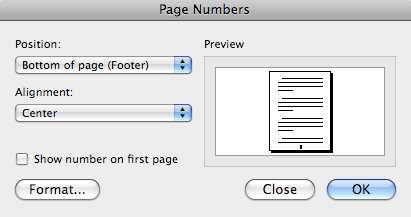
- To set up the page number style, click on the Insert menu, and choose Page Numbers, then click on the Format button. Choose the lower case roman numerals from the Number format: drop down list, and set the Start at: to be ii by clicking on the up arrow beside this setting so the window looks like this (see image below) and click OK.
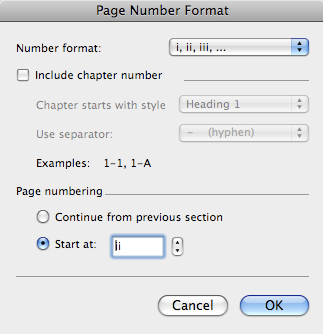
- On the window that is left open, choose Bottom of page (Footer) under Position, choose Center under Alignment, and check Show number on first page as shown below and click OK.
- You should now have lower case roman numeral numbering starting from ii on the second page of your preliminary pages.
- You also may have a number on the title page. To remove it:
- Double click in the footer area of the title page.
- Click on the Header and Footer tab at the top
- Check Different First Page in the Header and Footer ribbon.
- Your pages will now have numbers on the bottom centre, but in the main body, the numbering didn't restart at '1'. We need to reset the page numbering beginning on the first page of the body of your thesis.
- Click on the first page of the main body of your thesis.
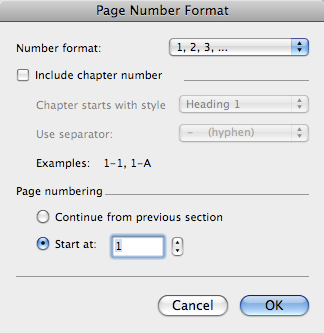
- Click on the Insert menu, and choose Page Numbers, then click on the Format button.
- Choose the arabic numerals from the Number format: drop down list, and set the Start at: to be 1 by typing the number 1 in the space provided beside Start at:. Click OK and then click OK again:
- Your thesis is now numbered correctly.
Inserting landscape pages
Sometimes you may have a table or figure that is too wide to fit on a normal portrait page (8.5 by 11) so you want to place it rotated on the page. That is, you want to create a landscape page, (11 by 8.5). That is fairly simple to do if you understand the concept of Word sections.
In order to change any formatting in Word, such as the page orientation, you need to insert a new section.
Exercise: Adding a landscape page in the middle of a document
- To begin, we will create an empty page, in its own section:
- Click on the View menu and choose Draft to change to Draft view.
- Go to the spot in your document where you want to insert the landscape page.
- Choose from the menu Insert/Break/Section Break (Next Page). You will see (if you are in Draft view) the following code:
- Press Enter after the section break to open up a blank line.
- Then, choose from the menu Insert/Break/Section Break (Next Page) to end the previous section.
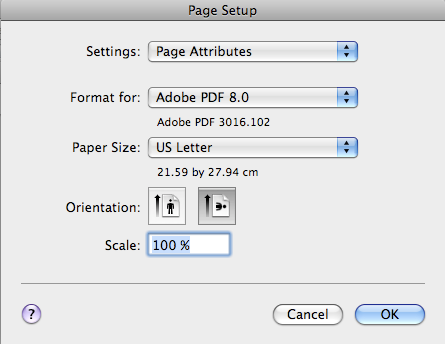
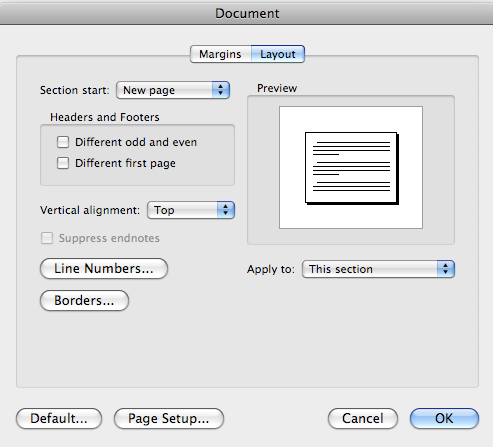
- Click in the empty line between the two section breaks. Click on the Format menu, and choose Document; then click on the Page Setup... button. Click on the landscape button (the right one) beside Orientation (see image below), click OK.
- Then make sure This section is chosen beside Apply to: (as shown below) and click OK. This will cause the new empty page to be landscape but all other pages will remain portrait.
Perhaps you have already created the table, and now wish to modify it so that it appears in landscape mode.
Exercise: Modifying a table so that it appears in landscape mode
- Select the table:
- If you have a table caption, you will want to drag through the text of the caption and the table to select all the information you will want on the landscape page.
- Or, to just select the table you can click in the table and then from the menu choose Table/Select/Table.
- With the table selected, click on the Format menu, and choose Document; then click on the Page Setup... button. Click on the landscape button (the right one) beside Orientation (see image below), click OK.
- Then make sure Selected text is chosen beside Apply to: (as shown below) and click OK.
- This will cause Word to add the section breaks before and after the table and to put the table on a landscape page.
- Note that if you already had page numbering set up, you would have to re-do the page numbering, as the section breaks will reset the page numbering you had. For each page that has had it's numbering reset to 1, you will need to:
- Click at the top of the page in question and repeat for the next page as well)
- From the menu choose Insert/Page Numbers; click on the Format button; select Continue from previous section and click OK.
- Note that when you add page numbers or headers/footers to this document, they will appear in a landscape not portrait orientation. This is acceptable in an electronic thesis. If you had a requirement for a printed copy to have a portrait page number on a landscape page, Microsoft has instructions on the Microsoft Support website for other versions of Word. Word 2011 mac instructions:
- Make sure page numbers have already been inserted, as described in its section above.
- Double click in the footer of the landscape page; click on the Toolbox in the standard toolbar. Under Header and Footer, uncheck Link to Previous. Repeat this step for the page following the landscape page.
- There will be a text box around the page number in the footer (on the landscape page); click it when you see the double (cross hair) arrow when hovering over it.
- Choose from the menu, Format/Text Direction. Choose the text orientation you want (likely the right option with the 'Text' sideways) and click OK.
- Then manually drag the page number to its new location at the bottom of the page (as if it was a portrait page).
- Save your file by clicking on the File menu and choosing Save.
In-line references and bibliography
Creating in line references and generating a bibliography is possibly the most complex task involved in preparing a thesis. This isn't because this is hard to do, but because there are probably as many different formats required for references as there are people preparing a thesis at any given point in time.
One solution to this problem is to purchase a Personal Bibliographic Management program. Packages such as these, all perform essentially the same functions, interface with Word, and let you manage a bibliography, etc.; however, these packages can be costly to purchase.
The recommended solution is to use RefWorks, a web based bibliographic management package licensed by the UWaterloo Library, that is available to all UWaterloo faculty, staff and students at no charge.
It is linked from the UWaterloo Library website in the right panel. The UWaterloo Library offers courses on how to use RefWorks (see upcoming course information) and they also maintain course notes for RefWorks.
PDF for electronic submission
Theses are now submitted electronically in PDF format to the Graduate Office.
To save your file in PDF format:
- Click on the File menu and choose Save As
- Beside Format: choose PDF
- Beside Save As: enter the file name in the form of 'Yourlastname_Yourfirstname'
- Click Save.
Electronic thesis submission procedures
Procedures for submitting your thesis electronically.