Introduction
LEDs are small, powerful lights that are used in many different applications. To start off, we will work on blinking an LED, the Hello World of microcontrollers. That’s right - it’s as simple as turning a light on and off. It might not seem like much, but establishing this important baseline will give you a solid foundation as we work toward more complex experiments.
Parts Needed
You will need the following parts:
- 1x Breadboard
- 1x Arduino Uno R3
- 1x LED
- 1x 330Ω Resistor
- 2x Jumper Wires
Suggested Reading
Before continuing on with this experiment, we recommend you be familiar with the concepts in the following tutorial: Light Emitting Diodes
Hardware Hook-up
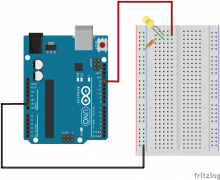
Ready to start hooking everything up?
Check out the following diagram to see how everything is connected. Open up 123D circuits on your computer or laptop and make sure all the connections are completed.
Open Your First Sketch
Open up the online Arduino IDE on 123D circuits on your computer and laptop. Coding in the Arduino language will control your circuit. Copy and paste the following code into the 123D circuits code editor and follow along. Hit upload, and see what happens!