Introduction
In this circuit you’ll work with a potentiometer. A potentiometer is also known as a variable resistor. When powered with 5V, the middle pin outputs a voltage between 0V and 5V, depending on the position of the knob on the potentiometer. A potentiometer is a perfect demonstration of a variable voltage divider circuit. The voltage is divided proportionate to the resistance between the middle pin and the ground pin. In this circuit, you’ll learn how to use a potentiometer to control the brightness of an LED.
Parts Needed
You will need the following parts:
- 1x Breadboard
- 1x Arduino Uno
- 1x LED
- 1x 330Ω
- 6x Jumper Wires
- 1x Potentiometer
Suggested Reading
Before continuing on with this experiment, we recommend you be familiar with the concepts in the following tutorials:
Hardware Hook-up
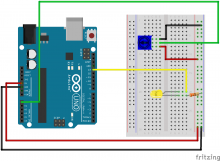
Ready to start hooking everything up? Check out the diagram to see how everything is connected.
Open the Sketch
Open up the Arduino simulator IDE software (123D circuits) on your computer. Coding in the Arduino language will control your circuit. Copy and paste the following code into the 123D circuits code editor or the Arduino IDE and follow along. Hit upload, and see what happens!