Introduction
Back in Driving a Servo, you got to work with a servo motor. Now, we are going to tackle spinning a motor. This requires the use of a transistor, which can switch a larger amount of current than the Arduino Uno can.
When using a transistor, you just need to make sure its maximum specs are high enough for your use case. The transistor we are using for this circuit is rated at 40V max and 200 milliamps max – perfect for our toy motor! When the motor is spinning and suddenly turned off, the magnetic field inside it collapses, generating a voltage spike. This can damage the transistor. To prevent this, we use a “flyback diode”, which diverts the voltage spike around the transistor.
Parts Needed
You will need the following parts:
- 1x Breadboard
- 1x Arduino Uno
- 1x Motor
- 1x 330Ω Resistor
- 1x NPN transistor
- 1x Diode 1N4148
- 6x Jumper Wires
Suggested Reading
Before continuing on with this experiment, we recommend you be familiar with these concepts: Motors
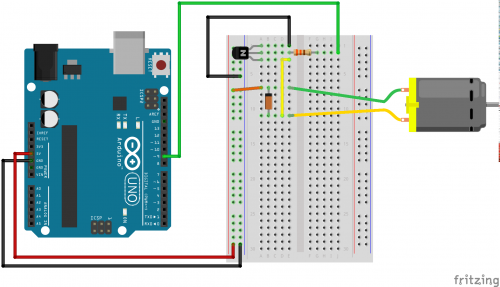
Hardware Hook-up
Ready to start hooking everything up? Check out the diagram below, to see how everything is connected.
Open the Sketch
Open up the online Arduino IDE on 123D circuits on your computer and laptop. Coding in the Arduino language will control your circuit. Copy and paste the following code into the 123D circuits code editor and follow along. Hit upload, and see what happens! Make sure to spend time adjusting the code here.