WE Go.DEsign Inventor's Corner

Hello wondering designer!

Welcome to the WE Go.DEsign Inventor’s Corner at the University of Waterloo. Congratulations on being selected for the opportunity to learn how to and develop your own code. This is the space where you will develop your understanding of embedded systems as well as software applications in order to compete at the WE Go.DEsign competition during the first weekend in February.

WE Go.DEsign participants working in the Sedra Student Design Centre

This WE Go.DEsign Inventor’s Corner is a space developed by the Engineering Outreach Department at the University of Waterloo that will provide your map for navigating the waters of beginning embedded electronics. This space will provide you with the WE Go.DEsign Inventor’s Guide, which contains all the information you will need to explore the eight circuit experiments required to develop your understanding of both the Arduino hardware and software required for our competition! When you’re done with this guide, you’ll have the know-how to start creating your own projects and experiments.

At the centre of this guide is one core philosophy; anyone can - and should - play around with electronics. Now enough talking - let’s get inventing!

Inventor’s Kit for Arduino

  • 1x Arduino Uno
  • 1x connector cable
  • 1x Bread Board 
  • 1x Jumper Wire Kit 
  • 10x 330Ω Resistors 
  • 5x 10k Resistors 
  • 1x Diode 
  • 1x Transistor
  • 12x LEDs
  • 1x Potentiometer 
  • 1x Photoresistor 
  • 1x Push Buttons 
  • 1x Servo Motor 
  • 1x DC Motor

Why Arduino? 

We live in a unique time where we have access to resources that allow us to create our own solutions and inventions. The DIY revolution is composed of hobbyists, tinkerers and inventors who would rather craft their own projects than let someone do it for them.

A Computer for the Physical World

The Arduino in your hand (or on your desk) is your development platform. At its roots, the Arduino is essentially a small portable computer. It is capable of taking inputs (such as the push of a button or a reading from a light sensor) and interpreting that information to control various outputs (like a blinking LED light or an electric motor).

That’s where the term “physical computing” is born - this board is capable of taking the world of electronics and relating it to the physical world in a real and tangible way. Trust us - this will all make more sense soon.

Download the Arduino IDE

In order to get your Arduino up and running, you’ll need to download the newest version of the Arduino software. This software, known as the Arduino IDE, will allow you to program the board to do exactly what you want. It’s like a word processor for writing programs. With an internet-capable computer, open up your favourite browser and go to Arduino download page

If you are ever away from your kit and still wish to do the experiments, please check out 123D Circuits. They provide an excellent online Arduino IDE and simulator!

Connect your Arduino to your Computer

Use the USB cable provided in the WE Go.DEsign Inventor’s kit to connect the Arduino to one of your computer’s USB inputs.

Getting Started in the Arduino IDE

Now, it’s finally time to open up the Arduino software. You’ll be presented with a window that looks a little something like this:

1. Verify: Compiles and approves your code. It will catch errors in syntax (like missing semi-colons or parenthesis).

2. Upload: Sends your code to the Arduino. When you click it, you should see the lights on your board blink rapidly.

3. New: This buttons opens up a new code window tab.

Arduino IDE Window Layout

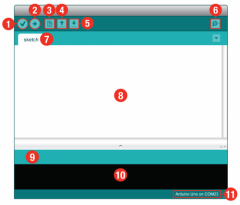
4. Open: This button will let you open up an existing sketch.

5. Save: This saves the currently active sketch.

6. Serial Monitor: This will open a window that displays any serial information your Arduino is transmitting. It is very useful for debugging.

7. Sketch Name: This shows the name of the sketch you are currently working on.

8. Code Area: This is the area where you compose the code for your sketch.

9. Message Area: This is where the IDE tells you if there were any errors in your code.

10. Text Console: The text console shows complete error messages. When debugging, the text console is very useful.

11. Board and Serial Port: Shows you what board and the serial port selections.

Select Your Board: Arduino UNO

Before we can start jumping into the experiments, there are a couple adjustments we need to make. This step is required to tell the Arduino IDE which of the many Arduino boards we have. Go up to the Tools menu. Then hover over Board and make sure Arduino Uno is selected.

Select a Serial Port

Next up we need to tell the Arduino IDE which of our computer’s serial ports the Arduino is connected to. For this, again go up to Tools, then hover over Port (Serial Port in older Arduino versions) and select your Arduino’s serial port. 

Window Users: This is likely to be COM3 or higher (COM1 and COM2 are usually reserved for hardware serial ports). To find out, you can disconnect your Arduino and re-open the menu; the entry that disappears should be the Arduino. Reconnect the board and select that serial port.

Mac Users: Select the serial device of the Arduino from the Tools, then hover over Port. On the Mac, this should be something with /dev/tty.usbmodem or /dev/tty.usbserial in it.

Suggested Reading

Before continuing on with this tutorial, we recommend you be somewhat familiar with the concepts in the following tutorial provided by SparkFun Electronics: 

How to Use a Breadboard - First time working with a breadboard? Please check out this tutorial! It will help you understand why the breadboard is a great for prototyping and how to use one.