Instructions on how to:
Print using Windows operating system
Video tutorial:
Step by step walk through:
- Go to Start
- Search and click on Run
- Type in \\civnexus.uwaterloo.ca
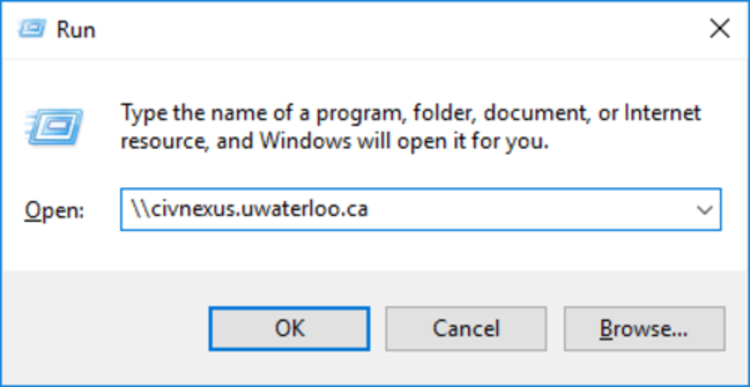
- Click OK
- Make sure the Domain name states 'NEXUS'. If it does, enter your WatIAM user ID into the user name field (e.g. mmwoldea). If the domain is not 'NEXUS', enter nexus\your_userID in the user name field (e.g. nexus\mmwoldea). Do not include the @uwaterloo.ca.
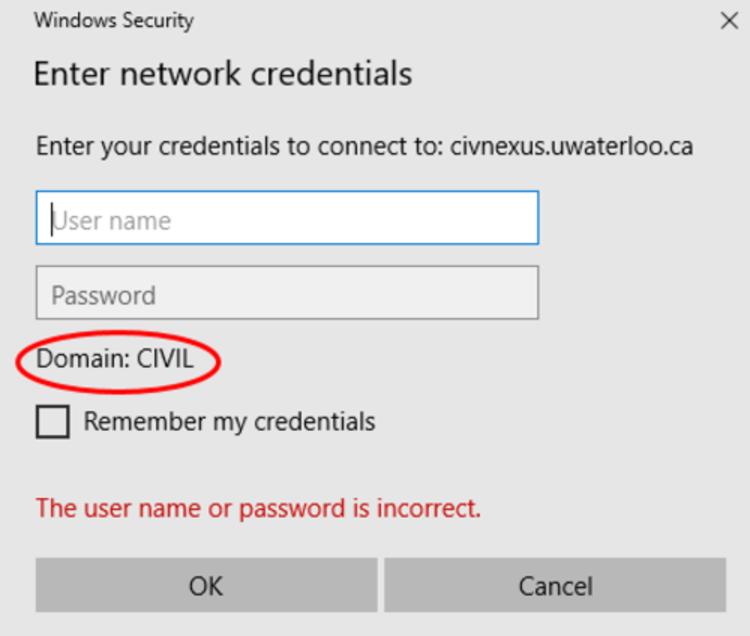
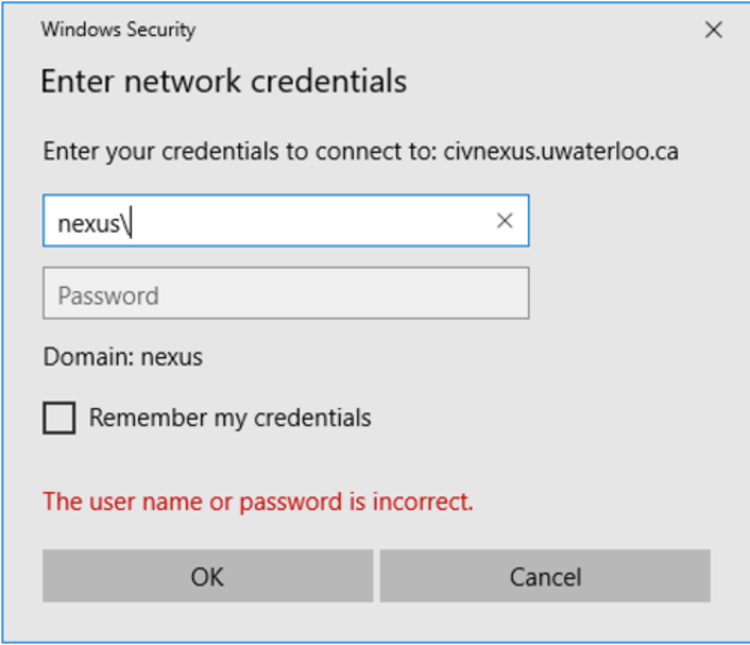
- Enter your password
- Check the 'Remember my credentials' checkbox
- Click OK
- A list of printers should appear. Right-click on a printer to connect.
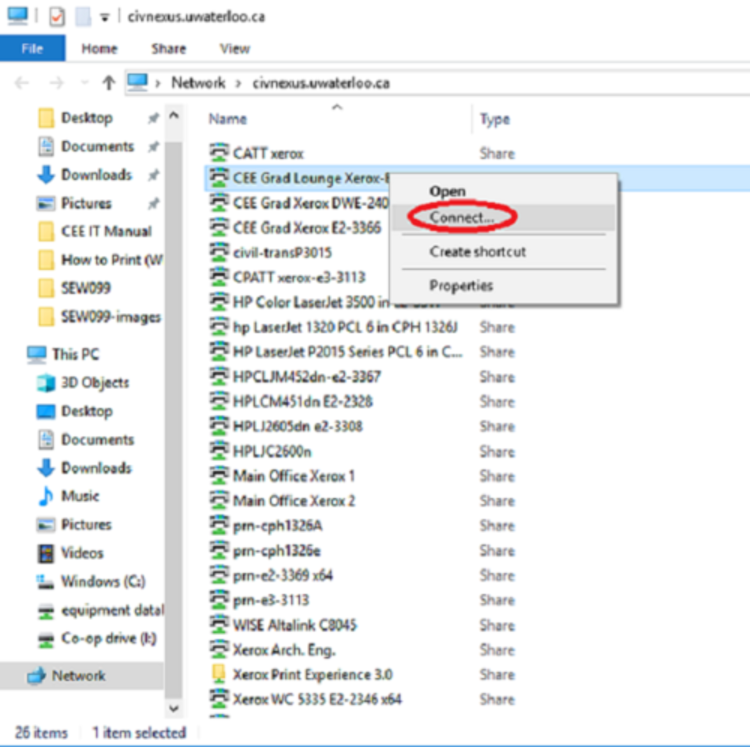
- Click Connect...
Note: If you are experiencing errors while trying to connect to a printer, return to step 3 and instead enter \\129.97.63.204.
Print using Mac operating system
CEE-IT does not provide support for the Mac Operating System (OS). However, we have provided as-is instructions to print from Mac OS.
Step by step walk through:
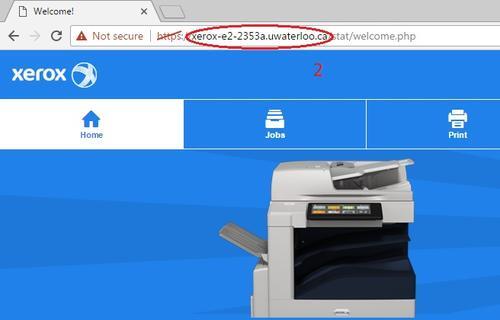
1. Find the name of the Xerox you would like to use.
| Printer name | Room # |
|---|---|
| xerox-e2-2353a.uwaterloo.ca | Engineering 2 Room 2353A (E2 -2353A) |
| xerox-dwe-1401.uwaterloo.ca | Douglas Wright Engineering Room 1401 (DWE-1401) |
If graduate students want to access other printers that are not listed above, please contact us.
2. Click the link on the printer's name above. The result should look as below:
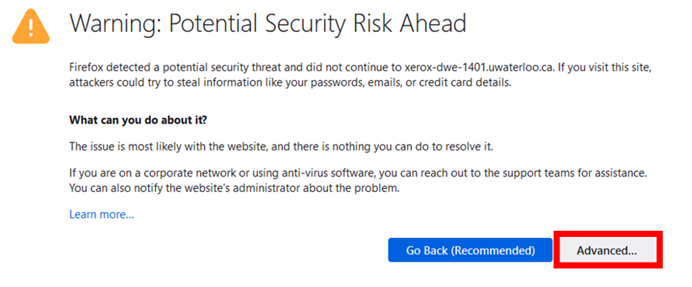
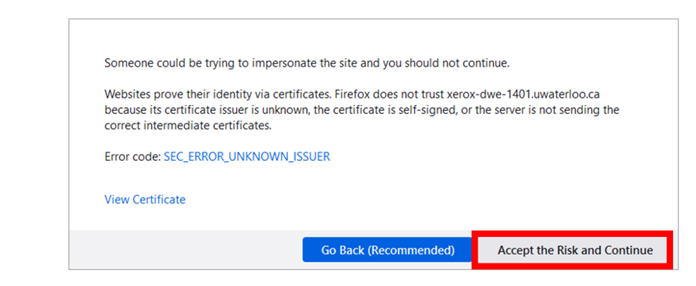
3. If an error shows up relating to the website's security certificate, click the "Continue to this website" option. For Chrome and Firefox users: click on the "advanced" button first to find the "Continue" option.
4. Select the Print tab.
5. Click Browse... and choose the file you want to print. (The file type is limited. If the document print out is not as expected, convert the file to a PDF or print from a Windows system.)
6. Configure the settings to specify how you want the item to be printed.
7. Enter your five-digit code into User ID (if you do not have your User ID, please contact CEE Department Assistant, located in E2-2336).
8. Click Submit Job.

9. Your document(s) should now be printed and available for pickup.
How to install Windows using Parallels
Parallels is a virtualization software that allows Windows to run alongside the Mac OS without rebooting. Once Parallels is installed, switch to Windows in order to print.
How to install Windows using Boot Camp
Boot Camp can install Microsoft Windows onto an Apple device. After installing, restart the Mac to switch between OS X and Windows. Once Boot Camp is installed, boot into Windows in order to print.
Submit a secure print job
Video Tutorial:
Secure print jobs are withheld in the printer queue and can only be released at the printer console with the set PIN (Personal Identification Number).
To submit a secure print job:
- When printing, select the Xerox copier and then click on Printer Properties, or other similar options that will open the Xerox Printing Preferences window.
- Under Job Type, select Secure Print.
- In the Secure Print window, enter a PIN twice.
- Click OK twice.
- Choose any other settings as needed, then select Print.
- Follow the instructions below for releasing the secure print job.
To release a secure print job:
- On the printer console, go to Job Status.
- Enter your print user id.
- Click the print job, and then select Release.
- Type in the PIN, and then press Enter.
How to send a fax:
Faxes must be sent via your email account. The Xerox printers managed by Civil and Environmental Engineering (CEE) are not configured for sending faxes via landline.
Note: the document you wish to fax must be in the .pdf format. If you already have the document in that format, skip to step four.
- Place your paper document on the copier as if you were making a photocopy.
- On the printer, select All Services and then select Email.
- Select New Recipient. Enter your email address and send. You will receive a .pdf copy of your document.
- In the To: field, enter the fax number as an email address according to the following format: 6[fax-number]@fax.uwaterloo.ca.
Replace [fax-number] with the fax number to which you are sending the document with no separators. For example, to send a fax to 123-456-7890, the email address would be 61234567890@fax.uwaterloo.ca.
- Attach the document to your email.
- Press the Send button to send the fax.
For more information check out the IST website on fax services.