Looking for a creative outlet to work through the last of that end of term stress? Need a project to keep your hands busy during the holiday season? Special Collections & Archives can help!
The department maintains a wealth of handicraft patterns as part of its rare book holdings and there’s something for everyone:
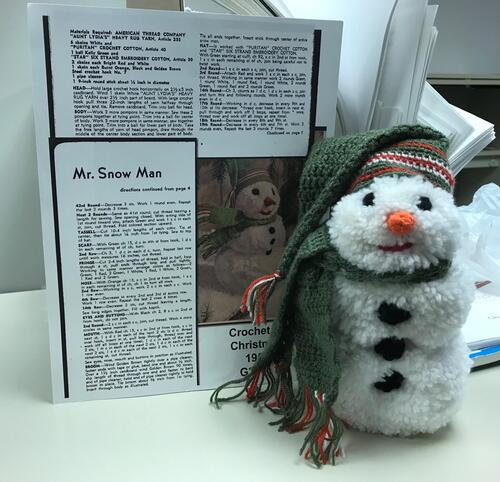
Here’s an example of pattern in action made by SCA's very own – and very talented - Nicole Marcogliese. It’s a charmingly executed version of the Mr. Snow Man pattern from Crochet for Christmas (G24031), a booklet published by the American Thread Company in 1952.
You can make one for yourself using the pattern included below!
Mr. Snow Man Pattern
Materials Required: AMERICAN THREAD COMPANY "AUNT LYDIA'S" HEAVY RUG YARN, Article 235 6 skeins White and
"PURITAN" CROCHET COTTON, Article 40
1 ball Kelly Green and
"STAR" SIX STRAND EMBROIDERY COTTON, Article 50
2 skeins each Bright Red and White
1 skein each Burnt Orange, Black and Golden Brown
Steel crochet hook No. 7
1 pipe cleaner
1 9-inch round stick about ¼ inch in diameter
HEAD-Hold large crochet hook horizontally on 2½ x 5 inch
cardboard. Wind 1 skein White "AUNT LYDIA'S" HEAVY
RUG YARN over 2 ½ inch part of board. With large crochet
hook pull three 22-inch lengths of yarn halfway through
opening and tie. Remove cardboard. Trim into ball for head.
BODY-Work 2 more pompons in same manner. Sew these 2
pompons together at tying point. Trim into a ball for center
of body. Work 3 more pompons in same manner, sew together
at tying point. Trim into a ball for lower part of body. Take
the free lengths of yarn of head pompon, draw through the
middle of the center body section and lower part of body.
Tie all ends together. Insert stick through center of entire
snow man.
HAT- ls worked with "PURITAN" CROCHET COTTON
and "STAR" SIX STRAND EMBROIDERY COTTON.
With Green starting at cuff, ch 92, s c in 2nd st from hook,
1 s c in each remaining st of ch, join be ing careful not to
twist work.
2nd Round- 1 s c in each s c, join, cut thread.
3rd Round-Attach Red and work 1 s c in each s c, join,
cut thread. Working in same manner work 2 rounds Green,
1 round White, 1 round Red, l round White, 2 rounds
Green, 1 round Red and 2 rounds Green.
14th Round-Ch 3, counts as 1 d c, 1 d c in each s c, join
and turn this and following rounds. Work 2 more rounds
even in d c.
17 th Round-Working in d c, decrease in every 9th and
10th st (to decrease: *thread over hook, insert in next st,
pull through and work off 2 loops, repeat from * once,
thread over and work off all loops at one time).
18th Round- Decrease in every 8th and 9th st.
19th Round-Decrease in every 6th and 7th st. Work 2
rounds even. Repeat the last 3 rounds 7 times.
43rd Round-Decrease 3 sts. Work l round even. Repeat
the last 2 rounds 3 times.
Next 2 Rounds-Same as 41st round, cut thread leaving a
length for sewing. Sew opening closed. With wrong side of
1st round toward you, attach Green and work 1 s c in each
st, join, cut thread. Fold colored section upward.
TASSELL-Cut 10-4 inch lengths of each color. Tie at
center, then tie about ¼ inch from 1st tying. Sew to top
of hat.
SCARF-With Green ch 15, d c in 4th st from hook, 1 d c
in each remaining st of ch, turn.
2nd Row-Ch 3, 1 d c in each d c, turn. Repeat last row
until work measures 16 inches, cut thread.
FRINGE-Cut 2-4 inch lengths of thread, fold in half, loop
through a st, pull ends through loop and pull tightly.
Working in same manner arrange colors as follows-2
Green, 1 Red, 2 Green, 1 White, 1 Red, 1 White, 2 Green,
1 Red and 2 Green.
NOSE-With Orange ch 13, s c in 2nd st from hook, 1 s c
in each remaining st of ch, ch 1 to turn all rows.
2nd Row-Working in s c, work 2 s c in each s c. Work
1 row even.
4th Row- Decrease in every 2nd and 3rd st across row.
Work 1 row even. Repeat the last 2 rows 4 times.
14th Row-Decrease 2 sts, cut thread leaving a length.
Sew long edges together. Fill with kapok.
EYES AND BUTTONS-With Black ch 2, 8 s c in 2nd st
from hook, do not join.
2nd Round-2 s c in each s c, join, cut thread . Work 4 more
circles in same manner.
MOUTH-With Red ch 15, s c in 2nd st from hook, s c in
next st, 1 s d c in each of the next 2 sts (s d c: thread
over hook, insert in st, pull loop through, thread over and
work off all loops at one time), 1 d c in each of the next
2 sts 1 tr c in each of the next 2 sts, 1 d c in each of the
next 2 sts, 1 s d c in each of the next 2 sts, 1 s c in each
remaining st, cut th read.
Sew eyes, nose, mouth and buttons in position as illustrated.
BROOM-Wind Golden Brown tightly over a pipe cleaner,
fasten ends with tape or glue, bend one end about ½ inch.
Over a l ½ inch cardboard wind Golden Brown 90 times,
slip length of thread through one end and fasten to bent
end of pipe cleaner, twist end of pipe cleaner tightly to hold
broom in place. Tie broom about 3/8 inch from 1st tying.
Insert through body as illustrated.


