
- Sign in to Quest.
- Select the Personal Information tile.

- Select the applicable tab. Types of personal information that can be viewed or updated in Quest:
Addresses
Your student record can include two types of addresses: a HOME and a MAIL address.
- If you only see a HOME address, you should add a MAIL address.
- It is important to keep your address information up to date at all times.
- If you know you will be moving in the future and know the address, use the future-date feature (see step 3 of Change my address).
- If you are temporarily living somewhere other than the address recorded as your HOME (perhaps a local Waterloo address), it is to your advantage to ensure this local address is recorded as your MAIL address. Otherwise, you may experience unwanted delays in getting important mail.
Tips for writing your address
- Ensure that the address is valid. How to achieve this:
- The province/country should match the city's location (e.g., Waterloo, Ontario, Canada and not Vancouver, Ontario, China).
- Key fields are not left blank (e.g., street, city, province, postal code).
- The postal code is valid and appears in the following format: A#A #A#.
- Use proper capitalization: capitalize street names and cities (e.g., University Avenue and not UNIVERSITY AVENUE nor university avenue).
- If you are adding a Mail address for the University to ship your diploma, the courier service requires you to provide a functional phone number on file. See how to add a phone number.
See how to Change or Add an address.
Change my address information
- Your current address(es) is displayed. Select the edit (pencil) icon next to the address you wish to update (Note: This will override the previous address for the chosen address type - MAIL or HOME).

- Enter the new address information and select OK.
- If applicable, change your country first. Select Change Country and select the appropriate country from the Look Up Country box. Enter up to the first three characters of the country name in begins with and then select the Look Up button. Select the appropriate country from the produced results.
- Additional information for international addresses (as applicable):
- Address 1 line: Apartment or unit number, street number and street name
- Address 2 line: Use for "care of" (c/o) information, PO box
- Address 3 line: Only use if additional information is required
- Address 4 line: Only use if additional information is required
- Mandatory fields: City, Province/District, Country, and Postal/Zip Code (unless not used by country)
- Watch for character count limits - if information is longer, it will not save properly (best to double check after saving):
- Address 1 line: Maximum character count is 35
- Address 2 line: Maximum character count is 25

- Review the updated address information.
- Check the appropriate address type: Home or Mail.
- Note: You can future-date an address change by editing the Date changes will take effect.
- Save or use the Edit Address link if additional changes are required. The system will confirm that the save was successful. Select OK.

- The screen will display your updated address(es).
Add an address
- Select Add a new address.

- Follow the steps above for Change an address.
Names
Phone numbers
See how to Change, Add, or Delete a phone number.
Change your phone number
- Update applicable box(es), e.g., Phone Type, Telephone number, etc. Select Save. A Saved confirmation will be displayed.

Add a new phone number
- Select Add a Phone Number.

- Choose your Phone Type from the drop-down options, enter your telephone number, and update your preferred contact phone number by selecting the Preferred phone checkbox. Select the Save button. A Saved confirmation will be displayed.

Delete a phone number
- Select the delete (garbage can) icon for the phone number that is to be removed. Note: You'll not be able to delete a home telephone number. Select Save.

- Select Yes - Delete to confirm deletion or No - Do Not Delete to exit without saving. A new screen showing the successful deletion will appear.

Email addresses
Your campus email is the official means of communication used by the University. It is important for you to keep your email address up to date while you are a student. See the statement on official student email address for information and guidelines. Note: Alumni should use the Alumni address update form.
- Use the WATIAM button to go to the WatIAM system site to maintain your campus email address. To delete your alternate email address(es), select the Delete button next to the applicable email address(es).

- Follow the instructions on the WatIAM system site. Note: Changes in WatIAM will be reflected in Quest the next business day.
Emergency contacts
See how to Add, Change, or Delete an emergency contact.
Add emergency contact
- Select the Add an Emergency Contact button.

- On the Emergency Contacts page:
- Emergency Contact Detail section: enter the Contact Name and select the Relationship from the drop-down list.
- Contact's Address section: either check Same Address as Individual or select Edit Address.
- Edit Address box: enter the address. Select Change Country if applicable. Select OK. The screen will refresh with the entered information.
- Contact's Phone section: either check Same Phone as Individual or select the Add a Phone Number button.
- Select Save. The system will confirm that the save was successful. Select OK.

- A new screen will appear with the emergency contact name and phone.
Change emergency contact
- Select the edit (pencil) icon of the applicable emergency contact.

- Change emergency contact information as appropriate, following steps in Add an Emergency Contact above.
Delete emergency contact
- Select the delete (garbage can) icon.

- Select Yes - Delete to proceed or No - Do Not Delete to exit without saving.

- The system will refresh the screen with the updated information.
Demographic information
Socio-Demographic
In Quest, you can now view and change your socio-demographic information. By sharing your information, you’ll help the University better understand the diverse needs of its community and improve services for all students. Note: This feature is only available to students, not applicants.
See how to add, change, or delete socio-demographic information.
Add
- The Socio-Demographic page will display. Read the information and review the Notice of Collection/Disclosure to learn more about how this data is used and protected.
- Select the socio-demographic data you would like to submit:
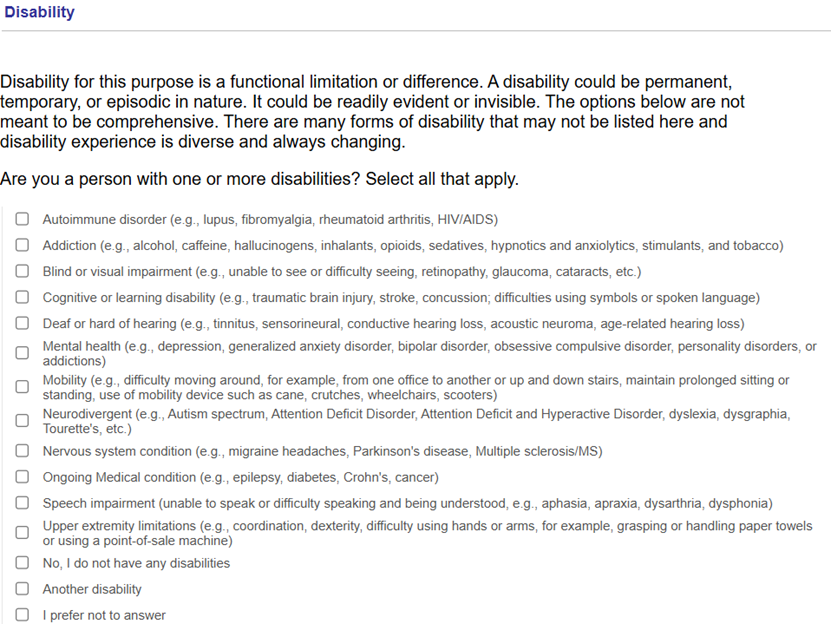
- Disability (Note: This is a self-declaration . If you require academic accommodations, contact AccessAbility Services.)
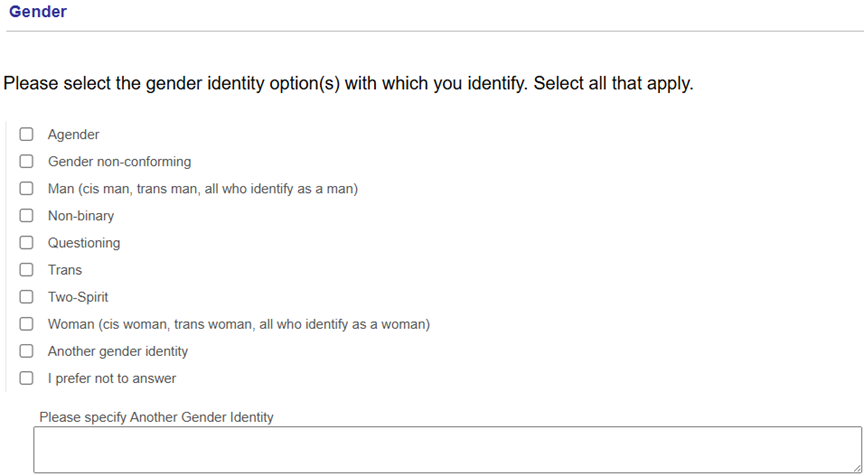
- Gender
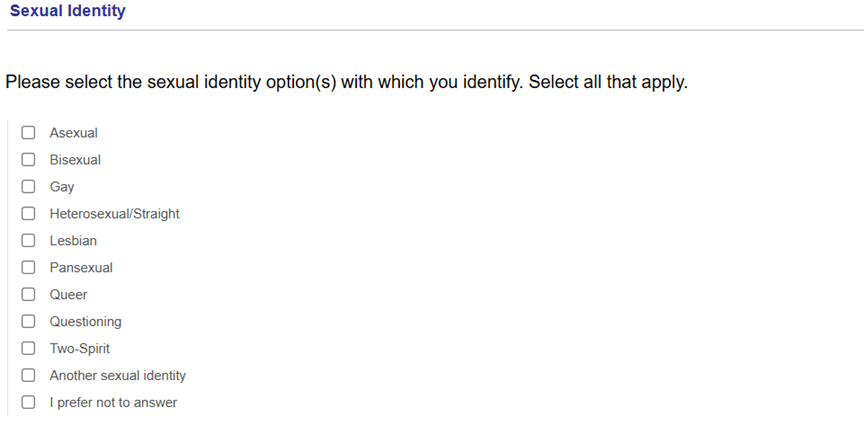
- Sexual Identity
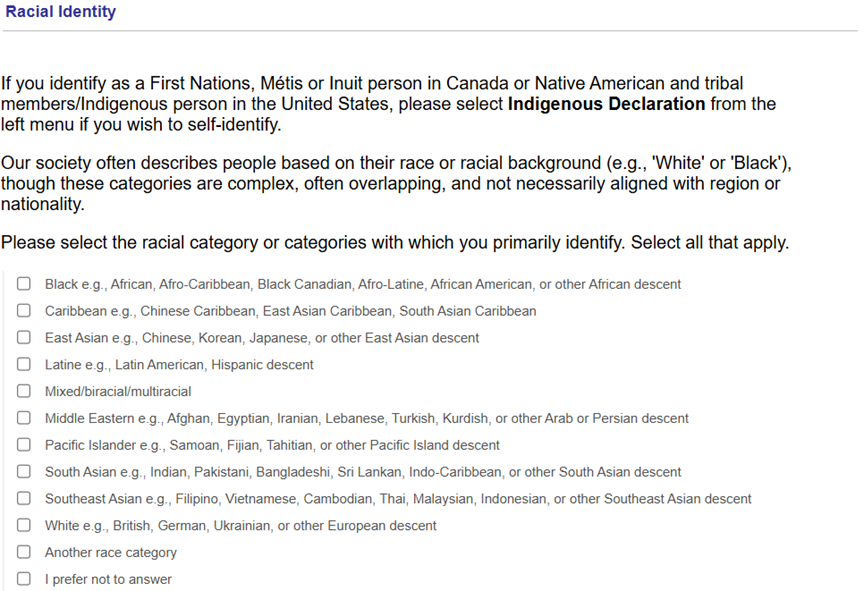
- Racial Identity
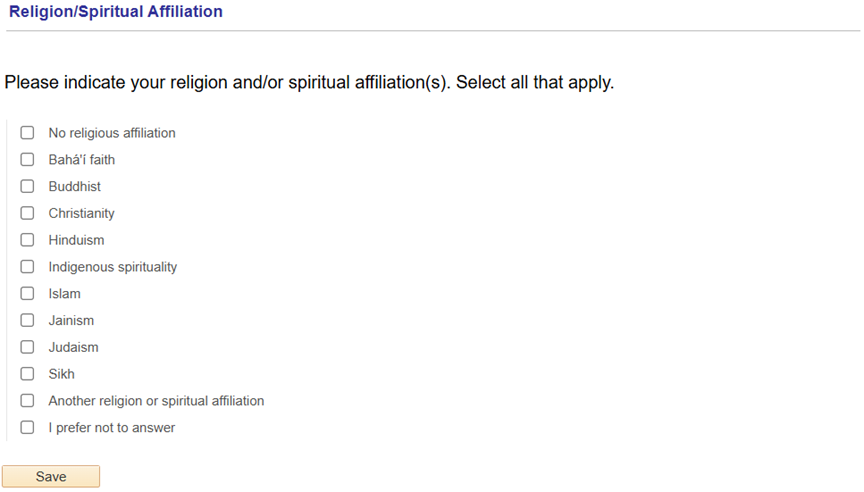
- Religion/Spiritual Affiliation
- Disability (Note: This is a self-declaration . If you require academic accommodations, contact AccessAbility Services.)
- Select Save at the bottom of the page.
Change
- Select or unselect the option(s) you would like to change.
- Select Save at the bottom of the page.
Delete
- Locate the socio-demographic information you would like to delete.
- If you have made a selection, unselect the option(s) under the socio-demographic data you would like to delete. Then, select I prefer not to answer.
- Select Save at the bottom of the page.
Pronouns
In Quest, you can view and change your pronoun(s). Note: This feature is only available to students, not applicants.
- To add or change your pronoun(s), select the arrow.

- Open the drop-down menu and choose your pronoun(s). Note: For students who find the provided list insufficient, you may choose "Other" and a text box will appear where you can add your pronoun(s).

- Select the Save button. Your updated pronoun(s) will display along with a confirmation message.
Indigenous declaration
In Quest, you can declare your Indigenous identity as a First Nation (Status or Non-Status), Inuit, or Métis Person.
- Select your Indigenous identity from the provided list.

- In the Province field, enter the two-character code for your province. If you do not reside in Canada, this field may be left blank.
- Begin to type your Citizen/Membership information and dynamic results, based on the two previous fields, will display options for you to select from. You may also search using the magnifying glass icon. Select the appropriate Citizen/Membership. Note: If your Citizen/Membership is not listed, enter the name in the Citizen/Membership Not in List field.

- If applicable, share the name of your nation(s).
- If applicable, upload your official Indigenous documentation for verification. Ensure that your name in Quest matches the name on the submitted image and that your documentation is not expired. Using the applicable upload buttons, choose to upload images of the front and/or the back of your documentation.

- Notes for uploading images:
- Accepted file types are: GIF, JPEG, JPG, PDF, PNG, TIF.
- Image file size can not exceed 5 MB.
- You can view the image file that has been uploaded by selecting the appropriate View Attachment (Front/Back) buttons.
- If an incorrect upload was made, you can upload again; only the most recent version will be maintained in Quest and used for verification.
- Notes for uploading images:
- Select the Submit button.
- Your submission will be sent to employees in the Office of Indigenous Relations for verification. Once your submission has been reviewed, you will receive an automated email regarding your Status Verified:
- Indigeneity Verified: Email will indicate the review has been completed and this will be noted in Quest for you to see.
- Indigeneity not Verified: Email will ask for additional information or a resubmission of documentation files.
