Creating a Test | Question Tags & Feedback (optional) | Create New Markbook | Printing the Test | Scanning Test Results | Marking the Test
Markbox is a powerful system used across the University of Waterloo to create and mark tests and evaluations for various courses.
Before getting started, you must use Google Chrome as your browser which allows cookies.
Login to MarkBox: https://markbox.uwaterloo.ca
For Technical Support:
Kate Wood: kate.wood@uwaterloo.ca
Step 1 Creating a test in TestCreator
- Click on “New Test Template” near the bottom under "Recent Test Templates."
- To create the cover page, click the default name "Test Title" (or "Imported Test") and type in the desired test title at the top of the page. This will appear on the cover sheet and cannot be changed after the test is created. If there is an error, send the file to Mirko Vucicevich to manually remove it.
- At any point in the test creation process, you can go “Home” and the test will be saved under “Recent Test Templates.”
- Fill in the coversheet chart by changing the information in the right column of the table.
- You can further modify this cover sheet any way you like for midterms. The default version provided is approved by the registry for final exams, but you can customize instructions.
- Choose the correct paper size. The paper size is letter size by default. For legal-size paper, click "Letter Paper" under your test title and it will change to "Legal Size." All bubble answers must fit on a single page (because the scanner picks up the dots from the other page when double-sided). For more than ~75 questions, 8.5”x14” legal size is needed.
- Scrambling Options; ignore this option if you want to control shuffle within specific groups of questions. Also, there is no way to tell what you have selected in the master Scrambling Options, so don’t touch this. In the next few steps, you will have the option to control exactly how you want to randomize individual questions and/or answers.
- Click on “+ Add Question Group”. You can organize your questions in groups (for example, by topic) if you want to control the randomization of the questions. If you want to randomize questions within groups, then you have to set up the groups during the question entry process. You can’t easily do this after the fact. If you don’t want to do this, then you will have only a single question group.
- Give your group a number or title. This is so you can provide automatic feedback statements (later in the creation process). The group name will be linked to the feedback. In a later step, you will be able to select whether or not you want the group name to appear on the test paper itself. Any text you add below this (see arrow) will show up on the test!
Ignore "Add Group Text." It is a built-in feature for future use in creating test banks. If you add something here, students won't see it. It is only for the creator's use.

- Click on “+Add Question” box to add a question. Ignore “Question name.” It is a built-in feature for future use in creating test banks. If you add something here, students won’t see it. It is only for the creator's use.
- Click on “Enter your question body here”. Type in or copy and paste your question from a Word doc or .pdf. Do not use tabs or returns. Make sure there are no empty lines after the text as this will affect spacing. When done, click outside the entry box to save. The box will flash, indicating it is saved. Greek letters and other special characters do not get interpreted correctly when pasted from Word (leads to an error when verifying the test). Instead, use the equation editor tool
in MarkBox for this.

- Adding tables, columns, or images: when entering aligned columns of data, use the Tables option
to keep the formatting. Images and figures can be added in .png format using the insert/edit image icon
 .
.
- Click on the “+Add Answer” box. The answer body will appear here. Click on this and add your first answer.Type or paste each separately from a Word doc or PDFinto the body. The questions, A, B, C, etc will be added by MarkBox automatically.
- Click on the circle next to the correct answer. A green tick will appear to the left of “Question Name” indicating the question is valid. If you make an error, click off the incorrect circle to erase it. Clicking the "X" erases the entire answer choice. If a correct answer is not selected for a question, Markbox will show an error when saving the test. To fix this you can go back to the home and reopen the test.
- Setting the question value: You can do this at any time after making a question. Within the question, click the tools icon
to the right of "Question Name." Questions can be assigned a value of X≥0.

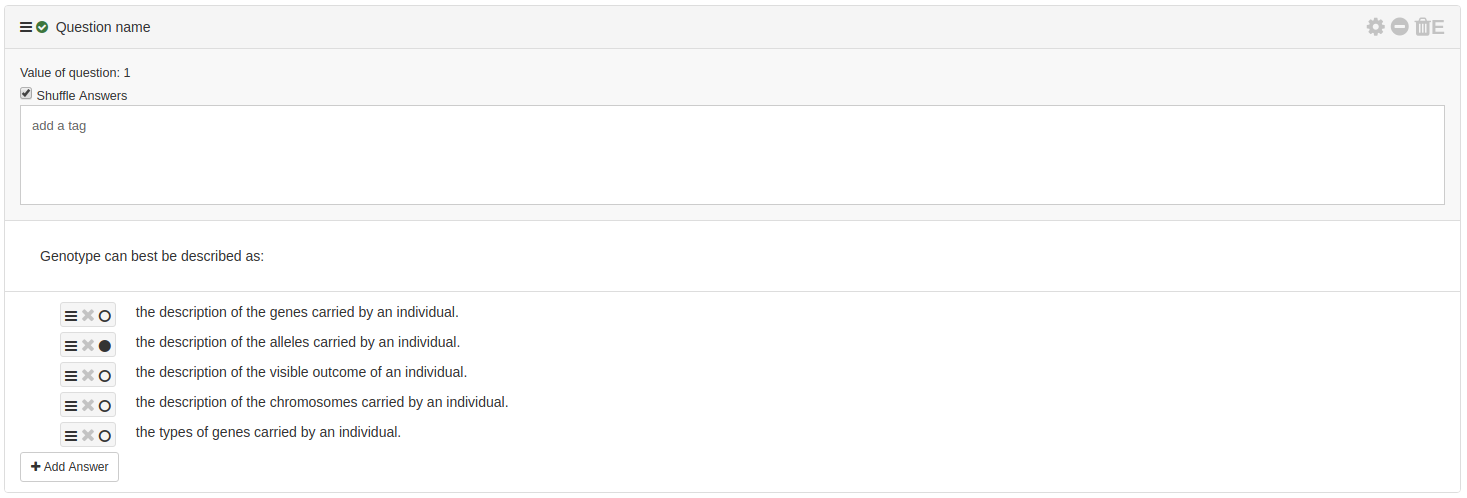
- Randomizing the questions/answers: To shuffle the questions within a group, click the tool icon. Check the “Shuffle Questions” box (this can be done later too). If you want the group name to show up on the test, click the "Show Group Title on Test."
- WARNING: if you select the master Scrambling Options (from the cover sheet set-up), after selecting the group shuffle options, it will override everything.
- To shuffle answers:
- Within a group: choose “shuffle answers for all questions.” It will take approximately 30 seconds to complete this.

- Within an individual question: click on the tools icon
in the individual question and select "Shuffle Answers.”

- Within a group: choose “shuffle answers for all questions.” It will take approximately 30 seconds to complete this.
- Adding Tags for feedback: “Tags” may be added to questions so that you can set up automatic feedback for students when certain conditions are met, such as a threshold number of incorrect answers for tagged questions. This will be released along with the marked-up bubble sheet. (See below: Optional Step – Question Tags and Custom Feedback.)
- After the test is created select “Save test to file” on the left home margin. It will take a few minutes to produce the download. Do not close the browser while downloading the test! MarkBox will check for errors before downloading the test. It will save "YourTestName.test". This is the file to upload in the next stage of creating the Markbook.
- Return to Home and proceed to Step 2: Create new Markbook.
- To delete an old Test Template, go the Homepage and click on the "X" next to the test template you wish to delete. You must "Download Test" to create a backup of the template before being able to "Delete Test."
Optional Step – Question Tags and Custom Feedback
Questions may be tagged to be considered as part of a content group. Automatic feedback can be generated that is sent to students if they perform above or below a custom threshold on these tagged questions. Questions may any number of tags or no tags at all. This allows students to receive customized automatic feedback depending if they do very well, or poorly in specified content areas.
Questions must be tagged individually, and can be placed throughout the test – there is no need to organize all questions of one tag type sequentially.
- Tag questions throughout the test.
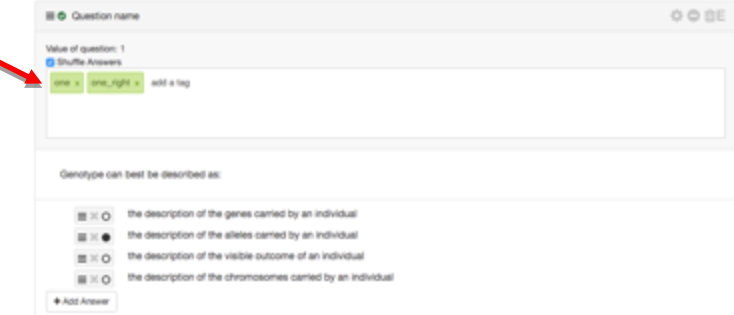
- Click on the tool icon next to an individual question name box. In the area that appears, the large text box will be the location for tags and you may add as many or as few as you like. Pressing “Enter/Return” will complete the tag and it will appear highlighted
- it is best practice to make the tag a single word or use a hyphen/underscore to make multi-word tags.
- In the example below, there are multiple tags. Be sure to hit "Enter" and click outside the question to save the tag. MarkBox may be slow doing this. You’ll need to refresh often and be patient.
- Click on the tool icon next to an individual question name box. In the area that appears, the large text box will be the location for tags and you may add as many or as few as you like. Pressing “Enter/Return” will complete the tag and it will appear highlighted
- Define feedback.
- With tagged questions, feedback can be customized using the “FEEDBACK” button on the right side of the window. Clicking it will bring up the following window:

- MarkBox creates a “Logic Syntax” or block for each type of feedback you create – additional blocks may be created using the “+Add Logic Block” at the bottom of the "FEEDBACK" window.
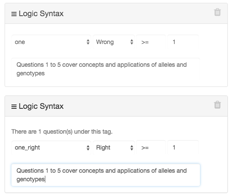
- For each block, there are two drop-down menus and two fillable boxes. The first drop-down box will be a list of tags you have assigned to questions. The second drop-down box sets the condition that Markbox will consider for each tag (i.e. “Right” or “Wrong”). The example above will give the feedback “Questions 1-5 cover concepts and applications of alleles and genotypes” to any student who got a wrong answer for any question with this tag.
- Click just outside the logic box to save. You’ll see the screen flash indicating the save was complete.
- The two fillable boxes allow you to set a value the student must attain, either right or wrong, within these tagged questions before feedback is sent.
- The first fillable box allows you to designate greater than (>), less than (), equal to (=), greater or equal to (>=), and lesser or equal to () the subsequent value.
- The second fillable box is the number of tagged questions that will be the threshold before feedback is sent.
- The empty text box below the above four boxes will be fillable with text that will be sent to students via email, once the specified condition you have designed is met. To set feedback for all correct in a group, set the tag as “one_right”. Any student who gets all the questions containing this tag correct will now receive feedback regarding what group questions 1-5 were about.
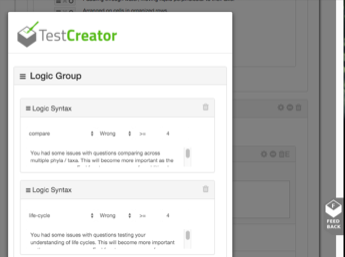
- In the example below multiple feedback is assessed. Questions focusing on comparisons (tag = “compare”) or life cycles (tag = “life-cycles”) have been defined. Students receive appropriate feedback for either group of questions if 4 or more questions are answered incorrectly over the entire test.
- With tagged questions, feedback can be customized using the “FEEDBACK” button on the right side of the window. Clicking it will bring up the following window:
- Troubleshooting.
- When a student does not separate their scan sheet from the test, you’ll have to manually find it. (I suggest making the student do this as it can take a huge amount of time in a big class.) Once you know their test number you can go to Markbook, choose “Manually Grade Failed Exams” and enter the exam number. This will show you the correct answers for that test.
Step 2 Create new Markbook
- Select “New Markbook”, or import a previous Markbook to reformat for a new test.
- Fill in the course name (e.g. Biol 239), title (e.g. W18 midterm), etc.
- Choose your MarkSet type:
- LaTeX markup - enables the creation of a test with LaTeX.
- Hand-marked - enables the creation of a test with no bubble answers. If your test has a hand-marked portion and a multiple-choice portion, they will have to be created as separate tests.
- Pre-printed - allows the creation of a scantron-only sheet. The number of questions is configurable.
- .test files from TestCreator - allows the creation of multiple choice or T/F questions (bubble style)
- Select Submit.
- Under “Things to do” follow the series of steps:
- “Upload your Class List”. From Quest, choose the “I want a *.csv copy of this Class Roster” version for download (needs all student emails). Merge any multiple sections into one file. Remove all WD students. Save as comma-separated.
- You can bypass "Upload class list" and go directly to “Set up Test” to preview it before loading the class list by clicking“View PDF”. You can download the PDF at this point for easier viewing.
- WARNING: Quest is not always updated so before you grade your exams be sure to check that no changes have been made to the class list. There seems to be an issue with students who do not pay fees on time. They appear when they were not there before. If the class list is incorrect, you can upload a new class list from the tab on the left.
- Set up Test: Upload your XXX.test file from Step 1. It will take a few minutes.
- “View PDF.” You can download the PDF at this point for easier viewing. If it looks good, click "Verify" under "Verify Test Source." Otherwise, go back to the actual test template and make changes. Then download a new .test file for upload and preview again. This will overwrite the old test.
- Verify your Options is the next step which then leads to printing your test.
- “Upload your Class List”. From Quest, choose the “I want a *.csv copy of this Class Roster” version for download (needs all student emails). Merge any multiple sections into one file. Remove all WD students. Save as comma-separated.
- To delete an old Markbook, go to the Homepage and click on the "X" next to Markbook you wish to delete.
Step 3 Printing the tests from Markbook
Before setting up your printing settings, take a moment to ensure that your Test Template is set to the correct paper size setting. All bubble answers must fit on a single page (because the scanner picks up the dots from the other page when double-sided.) For more than 75 questions, 8.5”x14” legal size is required. If you go back and change the paper size of the Test Template, you will need to save the test again and re-upload it in Markbook.
- Verify your Options. Enter the number of prints (number of exam copies needed). If you wish to print exactly enough copies to match your class list size, leave the number of prints as "default."
- Print set up: Use the default Separate PDFs if you have used shuffle/randomization. Click "Submit" once you are satisfied.
- If you make an error, click "Markbook Options" in the left menu to make changes to your Options.
- View PDF to check that the number of prints is equal to your entry by scrolling through the pages. You will see the test numbers on the top right. The example below is test number 2.

- Choose Render Test. The time it takes to render your test depends on how large the test is. For example, a Genetics final exam with 106 questions and 850 copies with group randomized questions and answers, took all day, so it ran all night. Don’t log out after initiating render. Once it is done, a zip file will be produced.
- Download Test. When you open up the file, double-check that the last PDF file name corresponds to the number of tests you've entered.
- Printing options:
- Bring digital copies on a USB key to Karen Ertel, New Media Services.
- There is no need to fill out a requisition for a final exam as long as it is registry administered. If the final exam is to be administered by the registry, then make sure your department exam admin officer lets the registry know it's going through New Media Services and there is no cost or form to complete. Deliver the USB to Karen Ertel by the registrar’s deadline, she will courier back the USB.
- For midterms, fill out the online requisition print job, online requisition https://info.uwaterloo.ca/newmediaservices/newreq/index.php with the account number (for Biol 239 60360 10010-10014 801). Contact is kaertel@uwaterloo.ca x 36575 with instructions on where to deliver these for printing. She requires about one week's notice for midterms and the registrar’s deadline for final exam printing.
- Bring digital copies on a USB key to Karen Ertel, New Media Services.
Step 4 Scanning the test results
- The test results can be scanned using any scanner.
- You can also use the Fujitsu fi-7180 scanner in B1 283. Simply log in to the connected PC with your Nexus/WatIAM credentials. Instructions for scanning to Markbox are posted next to the PC and can also be viewed here: Scanning instructions for Fujitsu fi-7180 for MarkBox.
Step 5 Marking the test
- To mark, open MarkBox, open the Markbook (under Recent Markbooks), click “Continue to Marking” and then “Upload Scans.” It will ask which files to upload. Uploading the file may take some time as it is typically large. It is OK to close the browser while the file is uploading.
- Follow the boxes in order – correct scans, associate names, etc.
- A red circle will appear around the bubbles MarkBox picks up. If multiple choices have been made because they did not erase properly, you’ll need to click off the wrong red-circled choice to deselect. Then save.
- If all errors are not to be corrected (eg., they did not make a choice), then choose “Ignore All Errors” and save. If you make an error, you can reload the scan files and the process will start over.
- Associate the tests. This will involve a list of students who did not fill in their IDs correctly. Drag and drop. Verify and proceed to the next step – test stats.
- View test stats. Download the test master “Download Question catalogue” in the tab on the left. Once you are done looking at the stats and are happy with the questions, go back to Markbook Home.
- Modify Marking Strategy. If you want to change your question marking/weighting. For example, if there is a bad question that you want to remove from the marking scheme, choose “Modify Marking Strategy.” Set the question value to 0. Choose “Submit Changes” at the very bottom of the test. MarkBox will regrade the tests and the final score will be out of 1 less.
- There is no way to choose 2 correct answers, but you can manually do this in Excel (Ask Stefan). Elimination of a question will not be reflected in the marked bubble sheet that gets sent out to students. You should communicate this change to students via Learn or a separate email.
- Finalize the test once you are satisfied with your reweights. You can look at the stats anytime after this. Finalizing the test will assign marks to each student.
- To download this data into Excel for Learn, choose "Download Marks CSV."
- You can also "Download Markbook" for future Markbooks as a template and import it when making new Markbooks.
- To send scan results via email to students: select “Release Marks to Students.” The emails will take some time to send for a large class, they are sent in bundles to avoid being mistaken as spam. You may wish to warn students not to contact you if they have not received one immediately.
- You can provide generic feedback in Learn (Announcements) or by email to the students if you choose not to use automatic feedback. See Optional Step – Question Tags and Custom Feedback
- Transfer/Copy tests. Go to “Recent Test Templates” on the Homepage. Choose the test you wish to copy and open it. At the left, click on “Save Test to File” (a box will open up that says Checking for errors then it will download). This is the file (YourTestName.test) that you will need to load when you log in to MarkBox. Under “Recent Test Templates”, click on “Import Test Template” and follow the instructions. This will bring the test into MarkBox.
- The name of the test will show up as “Imported Test” – this cannot be manually changed and will show up on the printed tests. Let Mirko Vucicevich know and he can delete this.
- If your previous test used tags, only the first tag in each group is kept. The rest will get wiped.